Monday, January 4, 2016

Swedish Meatballs with Lingonberries


"You are never too old to set another goal or dream a new dream." C. S. Lewis The arrival of a new year brings yet another opportunity to set new goals, dream new dreams. Although we don't really need to wait until January first for this to happen. In looking back at last year, I wasn't anywhere near committing to returning to running. Thinking about it yes. But thinking about something and doing something about it are two completely things. Truth be told, my list of things I think about doing but don't do anything about, is longer than it really should it be (you know that list, the one containing those things we aren't ready for or we have a plan for mind games we can be guilty of playing). Little did I know walking into my local running store last February would cause all of that thinking to shift into doing. The return to running brought more to my life in the last year than I had ever imagined. Even the unplanned stress fracture turned out to have at least one positive outcome (although at the time I saw the glass as half-empty). And more important than aiding Fleet Feet, Lululemon, and Athleta in meeting their fiscal goals for the year, has been being positively impacted by some new friends who have come into my life. It is often only in looking back that you realize how much more is gained when you start making your dreams your reality. Because if I had waited until I thought I was ready to run again, I would still be thinking about it instead of experiencing all of the (anticipated and unanticipated) benefits that come from running.

When I saw the recipe for Swedish Meatballs in the recent December/January issue of Food and Wine Magazine, I knew they would go on the 'make' rather go into that 'will think about, save for someday' list. For someone who loves Swedish Meatballs, it is hard even for me me to believe I have only made them a few times in my (long) life. Which translates into, I guess the recipe I was using wasn't one I was particularly enamored with.


Swedish meatballs (Köttbullar) have been considered both traditional old-world smorgasbord fare and a food served on festive occasions. Considered to be Sweden's national dish, they may have suffered an unfair identify crisis, due in large part to their 1960s cocktail party finger food reputation (but I am guessing those weren't being served with lingonberry jam). If you didn't grow up in a family celebrating all things Swedish, were too young to have experienced the 60s, don't buy frozen Kottbullars from IKEA, or had never driven hundreds of miles to eat at Al Johnson's Swedish Restaurant in Door Country, Wisconsin, you may not know what a deep love and strong craving for really good Swedish Meatballs feels like. But not to worry, all of that is about to change.

Early in Scandinavian history, beef was considered a luxury item, thus causing meatballs to be put into the category of a highly prized dish. Since its' first written cookbook appearance, numerous regional variations of Swedish meatball recipes are now reflective of ingredient availability. Although most are made with various ratios of meats (beef and pork), seasoned with spices (almost always allspice and sometimes nutmeg), and covered in a broth based cream gravy. When not served as an appetizer, Swedish meatballs are often served with buttered potatoes or egg noodles. And whether lingonberry jam is a required, obligatory accompaniment to them or not, it should be. 


So let's talk about the beef and pork ratio in these Swedish Meatballs. There seems to two common options. Either 1:1 or 2:1. Those that advocate for the 2:1 option assert the meatballs are springier and more flavorful if the amount of beef is double that of the pork. However, going with a 1:1 ground chuck to ground pork option resulted in incredibly flavorful and tender meatballs. So without doing side by side ratio taste test comparisons, I am in no position to advocate for one over the other. Although it's hard to believe these meatballs could have been better.

Some Swedish meatballs call for sautéing the onions before adding them to the meatball mixture. If you mince them finely, they will soften to the point where you notice their flavor but will not experience their crunch.


Early recipes for making Swedish Meatballs call for mixing them by hand (but then again they didn't have the options we have today). Using a standing mixer with a paddle attachment helped to create a cohesive meatball mixture and one not causing the meatballs to toughen when cooked. These savory meatballs were seasoned with allspice and freshly grated nutmeg, in addition to kosher salt and black pepper. The combination and amounts of spices were perfect and I wouldn't dare alter them.

As you know, I am a big fan of using an ice cream scoop every time I make cookies and/or meatballs. More than being slightly less messy, it helps to create perfect same size, same weight balls of delishness. The F&W recipe called for creating 1 1/2 ounce portions but 1 1/4 ounce size meatballs worked perfectly. In the future I might make 1 ounce meatballs if I was serving them as an appetizer at a larger gathering (making certain to adjustment cooking time).

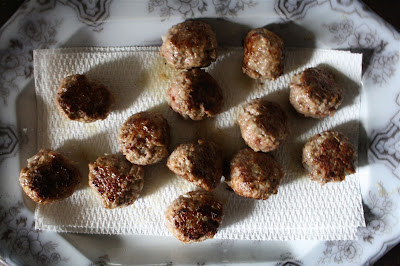
All of the ice cream scooped meatballs were eventually rolled by hand (because meatballs are supposed to be round, right?), they were sautéed in a combination of unsalted butter and extra virgin olive oil for a total of approximately four minutes. 


The meatballs were cooked in two batches and drained on paper towels while the sauce was prepared. After draining the 'fat' from the meatballs, a roux was created with unsalted butter, extra virgin olive oil, and flour until it became lightly browned. When whisking in the low sodium chicken broth and heavy cream, I would suggest you begin by adding the chicken broth first as the roux will seize slightly as soon as the liquid is added. Once the sauce begins to boil you return all of the partially cooked meatballs to the pan.


My cooking time for the meatballs after they were simmering in the sauce was closer to 15 instead of the 8-10 minutes suggested. A meat thermometer came in handy to test for their doneness (160 degrees F).


After removing only the cooked meatballs from the sauce, freshly chopped parsley and dill were added to the sauce before it was poured over the platter of Swedish Meatballs. This sauce was heavenly and from my palate's perspective didn't need to be seasoned with any additional kosher salt and black pepper.


The combination of flavors from the slightly tart, sweet jam with the warm savory meatballs was practically dizzying. When you now think of Swedish Meatballs, you also need to think of Lingonberries. They should be considered one of those inseparable food combinations. Because Swedish meatballs without lingonberries would be like having a vanilla ice cream sundae without the hot fudge, eating buttermilk pancakes without a large dollop of softened butter, or enjoying buffalo chicken wings without the blue cheese dip. And the good news? Nowadays lingonberry jam (the Felix brand) can easily be found at some grocery stores, at IKEA, at World Market, and of course, on Amazon. Of course, feel free to take a trip to Sweden to pick some lingonberries up.

It is quite possible some of you started the new year without any immediate plans to make Swedish Meatballs (with Lingonberry Jam) or getting your Swedish Meatball fix from either your favorite restaurant or at the dinner table of one of your Swedish friends. Heck, they may have not even been on your list of things you have been thinking of making. However, I hope this first blog posting of 2016 is the Swedish Meatball divine intervention you weren't expecting. Who knows what unintended benefits await you when you make them for family and/or friends!

Recipe
Swedish Meatballs with Lingonberries (ever so slight changes to Food and Wine's Swedish Meatballs with Cranberry Relish recipe, December 2015/January 2016 issue)

Ingredients
4 1/2 ounces whole wheat bread, coarsely torn (about 3 or 4 slices of a good quality whole wheat bread)
1/2 cup whole milk
12 ounces ground beef, preferably 85% lean (recommend using ground chuck)
12 ounces ground pork, preferably the shoulder if you can get it
1/2 cup minced yellow onion
1 large egg, lightly beaten
1/4 teaspoon ground allspice
1/4 teaspoon freshly grated nutmeg
1 1/2 teaspoons kosher salt, plus more for finishing
1/2 teaspoon black pepper, plus more for finishing
2 Tablespoons unsalted butter, divided
2 Tablespoons extra-virgin olive oil, divided
1 Tablespoon all-purpose flour
1 cup low-sodium chicken broth
1/4 cup heavy cream (at least a 17% fat content)
2 Tablespoons chopped fresh flat-leaf parsley
2 Tablespoons chopped fresh dill
Lingonberries (recommend Felix brand)

Directions
1. In a stand mixer fitted with a paddle attachment, soak the bread and milk until softened (approximately 5 minutes). Mix on low speed until blended and uniform, about 30 seconds.
2. Add ground beef, pork, minced onion and egg. Mix on low speed until incorporated into the bread mixture.
3. Sprinkle in salt, pepper, allspice, and nutmeg. Increase speed to medium and mix until incorporated, approximately 30 seconds.
4. Using an ice cream scoop, for 1 1/4 to 1 1/2 ounce portions of the meatball mixture. Set meatballs on a parchment paper lined baking sheet. When finished scooping all of the meatballs, roll into balls.
5. Line a platter with paper towels and set aside.
6. Heat a 12 inch skillet over medium-high heat. Add 1 Tablespoon of the unsalted butter and 1 Tablespoon of the extra-virgin olive oil. When butter has melted, add half of the meatballs and turn down heat to medium. Cook meatballs until browned on the bottom, approximately 2 minutes. Flip meatballs over and cook for an additional 2 minutes. Transfer meatballs to platter. Repeat with remaining meatballs.
7. Pour off the fat and return the skillet to medium heat. Add the 1 Tablespoon of the unsalted butter and 1 Tablespoon of the extra-virgin olive oil. When butter has melted, add flour, and cook stirring with a wood spoon until the mixture has turned a light brown (approximately 60-90 seconds). 
8. Slowly whisk in chicken stock and heavy cream. Stir until smooth. Bring to a boil.
9. Immediately add meatballs, reduce heat to medium and simmer shaking the pan occasionally until the meatballs cook through (160 degrees F) and the sauce thickens further, approximately 10-15 minutes. Note: To insure doneness, recommend using a meat thermometer.
10. Transfer meatballs to serving platter. Season with salt and pepper if necessary. Stir in chopped herbs (parsley and dill) into the sauce. Pour sauce over the meatballs and serve immediately with a side of lingonberries.
Notes: (1) Can be served as an appetizer or main course. If serving a main course, serve over buttered potatoes or egg noodles. (2) If serving as an appetizer, reduce size of meatballs to 1 ounce and make adjustments in cooking time as necessary.

Wednesday, December 30, 2015

Cheesy Hasselback Potato Gratin


While having a much too long overdue catching up lunch with friends this past weekend, the question 'what are your goals for the blog in the year ahead? came up. It was a timely question. Not only because the new year brings opportunities for reflection and goal setting, but the blog officially celebrates its' third birthday this week. Where I want the blog to go, what I want its' look and feel to be, and how I want it to evolve are some of the questions I have been mulling over recently. And sooner rather than later I need to come up with some answers!

There have been a variety of changes to the blog over the past three years, some subtle, others markedly discernible. From my perspective, one of the most significant transformations has been the evolution of the photography. Looking back at some of 'first' and 'second' year photos, I realize the bar for what I think is a 'good' photo has changed considerably. And a year from now, when taking another retrospective look back at the photos, I hope the vision I have in my head for the 'look and feel' of the blog is realized. Or is at least getting close. However, I have a feeling that as I change, my vision will change as well.

As you read this blog post your jaw might be dropping and you might be thinking 'well she certainly has her work cut out for her!' And I might reluctantly agree with you considering how I am feeling about these Christmas Day photos of the Cheesy Hasselback Potato Gratin. Which by the way was nothing short of a Herculean feat and a far greater challenge not fully anticipated until I was well into it. (oh well, live and learn). Being one to multi-task with the best of them, getting the holiday meal ready and trying to take photos along the way felt more like I was participating in some sort of holiday Olympics (consider this my sincere attempt at giving an explanation rather than trying to make any excuses). So while these may not be the shiny, perfect photos I envision will someday appear on the blog, I can honestly say this recipe for the Cheesy Hasselback Potato Gratin is pure potato gratin perfection.


Little did I know when I received the newly released The Food Lab: Better Home Cooking Through Science for my birthday earlier this year, that it would be one making multiple best, must-own cookbooks of the year lists. Written by J. Kenji Lopez-Alt, the Serious Eats guru (aka the brilliant nerd king of Internet cooking), the 958 page book will give both your mind and arms a serious workout. Literally and figuratively this book is a weapon. Dominated by more savory than sweet dishes, Lopez-Alt gives us the science underpinning the art of creating both classic and comfort foods. Work your way through this cookbook and your culinary prowess is destined to ascend to level so high your family and friends will brazenly ask, rather than wait or hope, for a meal invitation.

My starting point in what I am now calling an indispensable cookbook was the Cheesy Hasselback Potato Gratin. Paired with a beef tenderloin served with a port wine mushroom sauce, Roasted Balsamic Glazed Onions, and Roasted Brussels Sprouts Gratin, this potato gratin could not have been a more perfect side to help create a memorable Christmas dinner. If by chance you haven't yet fully committed to your New Year's Day menu, let me boldly suggest you make this Cheesy Hasselback Potato Gratin to go along with the ham, lamb, beef, or roasted chicken dish you traditionally make. In case you need to be swayed, I should probably tell you now this creamy layered potato casserole with it's crispy, cheesy browned top has officially achieved the distinction of being placed on my 'last meal' short list.


Potatoes, cheese, cream, garlic, and thyme. Five ingredients are all you need to create what J. Kenji Lopez-Alt calls the ultimate potato casserole. And he delivered on his claim. Russet potatoes peeled and cut into 1/8" slices, finely grated Gruyere (or Comte) and Parmigiano-Reggiano cheese, heavy whipping cream, minced garlic, and coarsely grated thyme come together in a such a way, you cannot help but have an even deeper, greater appreciation for the potato. The vegetable that 'permitted a handful of European nations to assert dominion over most of the world between 1750 and 1950' has a new kind of power in the 21st century.

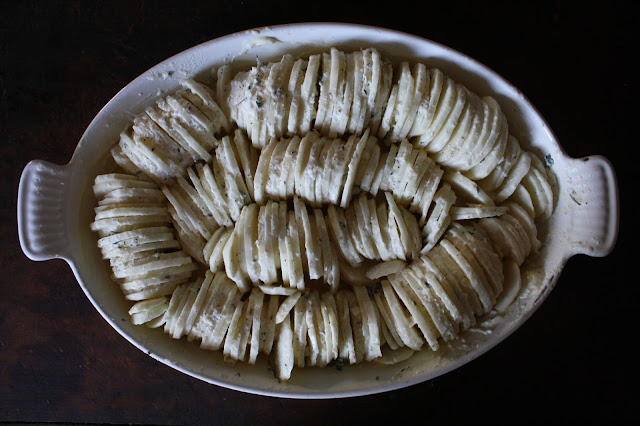
This Cheesy Hasselback Potato Gratin has the creaminess of a gratin and crunchiness of roasted potatoes. In my world, this means you don't have to make a choice, you can have it all! Having the potatoes go into the pan vertically versus layered horizontally combined with submerging the sliced potatoes in the cream-cheese-herb mixture (ensuring each slice gets coated with the mixture) is why this gratin is able to achieve the two textures. (Notes: (1) If you have a mandoline slicer, the cutting of the potatoes goes quickly and helps to keep the slices uniform. But if you have a sharp knife and good eye, you can achieve the same results. (2) When making the cream-cheese-herb mixture, use only 2/3 of the grated cheeses, saving the remaining 1/3 for sprinkling over the gratin in the final stages of baking).

After coating all of the potato slices, the remaining cream-cheese-herb mixture is poured evenly over the potatoes. I used an aged Gruyere cheese instead of the Comte for no other reason than one of my grocery stores was selling some great aged Gruyere cheese for the holidays at a great price.


The total baking time for the Cheesy Hasselback Potato Gratin is 90 minutes, broken up into three 30 minute segments. In a 400 degree preheated oven, the buttered casserole dish tightly filled with the potatoes are covered with foil and baked for 30 minutes. The foil is then removed and the potatoes return to the oven to bake for another 30 minutes. The reserved grated cheese is then sprinkled over the casserole and it bakes for the final 30 minutes. The finished gratin will have a deep golden brown, crispy top and the potatoes will be knife tender. Visually impressive and insanely delicious, this gratin is fancy dinner party or casual dinner worthy.

Had I assembled the gratin (but adding the remaining cream-cheese-herb mixture right before baking) the night before, I would have been less crazed Christmas morning. If there is one contribution I can make to this recipe, it is you can partially assemble the gratin early in the day (covering and refrigerating). I might go so far as to say you might be able to do this night before as well. However, since the overnight assembly theory hasn't been tested (the several hours in the refrigerator idea was), don't try to prove it right or wrong the first time you make the Cheesy Hasselback Potato Gratin.

Sometimes you don't fully appreciate a gift until you put it to use (or until you make it yourself) as the sentiment expressed in any form of thank you changes considerably (and I suppose it could go in either direction). Having now started working my way through some of the recipes in The Food Lab, I am even more grateful for having received it as a gift. This blog posting is more than just sharing a genius recipe with you. It's also a new kind of thank you note.
Recipe
Cheesy Hasselback Potato Gratin (recipe source: The Food Lab: Better Home Cooking Through Science cookbook written by J. Kenji Lopez-Alt)

Ingredients
4 - 4 1/2 pounds Yukon Gold or russet potatoes, peeled and sliced to 1/8 inch thick (Note: Highly recommend the use of Yukon Gold potatoes, unpeeled, and sliced on a mandoline)
3 ounces finely grated Gruyere or Comte cheese
2 ounces finely ground Parmigiano-Reggiano cheese
2 cups heavy cream (if mixture is too thick add up to additional 1/3 cup of heavy whipping cream or half and half)
2 - 3 medium cloves of garlic, minced
1 Tablespoon fresh thyme leaves, roughly chopped
2 Tablespoons unsalted butter
Kosher salt and black pepper

Directions
1. Preheat the oven to 400 degrees (F) and have one of the racks centered in the oven.  Spread 2 Tablespoons of unsalted butter evenly in a 2 quart (or 8"x10" or 9"x12") baking dish and set aside.
2. Combine the grated cheeses in a medium sized bowl and mix until blended. Remove 1/3 of the cheese mixture and set aside. 
3. Add heavy cream, minced garlic, thyme leaves to the bowl containing 2/3 of the cheese mixture. Blend together and season generously with kosher salt and pepper.
4. One at a time, add the sliced potatoes, opening slices to allow each one to be fully coated with the cream-cheese-herb mixture. Transfer fully coated potato to prepared pan, setting potato on its' side (aligned vertically).
5. Continue placing potatoes in the baking dish until the entire dish is tightly packed. 
6. Pour the remaining cream-cheese-herb mixture over the potatoes. Note: If assembling the gratin early in the day, wait to pour remaining mixture until ready to bake in the oven.
7. Cover tightly with aluminum foil, place on center rack in the oven and bake for 30 minutes.
8. Remove foil from baking dish and continue baking for another 30 minutes (uncovered).
9. Briefly remove gratin from oven, sprinkle remaining 1/3 cheese mixture over the gratin and return to oven for another 30 minutes of baking.
10. Finished gratin will be golden brown on top and potatoes will be knife tender. Remove gratin from oven. Allow to rest several minutes before serving. Note: If not serving immediately, cover loosely with foil topped with dry dish towel to keep warm.

Important Note: Having baked these potatoes at both the recommended 400 degrees (F) and due to extenuating circumstances 350 degrees (F), much prefer the creaminess and texture of the potatoes when backed at 350 degrees (F). 

Monday, December 28, 2015

Pink Peppercorn Gravlax


The holiday meal here included several new incredibly, definitely on the making future appearances list, delicious recipes. Yes, I decided to take some (calculated) risks for the meal I wanted to ascend to the 'best ever' category (pretty sure this goal was accomplished). Considering how wordy I can be in some of my blog posts, I have no other option but to share them one at a time. Besides, there is much to be said for pacing oneself (or so some say). There were two new appetizers served for Christmas dinner this year. A Pink Peppercorn Gravlax and the Chipotle and Rosemary Roasted Nuts. The decision regarding which one to share with you first wasn't one that had me tossing and turning in my sleep. It was one of those no-brainer decisions. While the roasted nuts recipe was also well received (coming soon aka no later than next week), the Pink Peppercorn Gravlax was so incredibly over-the-top, amazing. I would be a wicked tease if I made you wait for it or promised to share it with you in the vague future called sometime. Over the course of the almost three years of this blog's life, I have tried hard to earn your 'culinary' trust. So it would be more than a bit foolish and reckless of me to do anything to cause it to shatter, even just a little, as building and keeping trust, including yours, are one of those things that matters to me.


In the spirit of full disclosure I was a little nervous making this Pink Peppercorn Gravlax. Mostly because it was my first time making it. But I took a deep breath and thought 'you can do this' (now if only that message was received on days I want to run continuously and at a fast for me, steady pace when going out for a long run!). For those of you who may have a little trepidation at the thought of making gravlax for the first time or using this recipe instead of the one you have been relying on, let it go! This sinfully delicious dish may be one of easiest recipes posted to the blog in recent weeks.

Lox, smoked salmon, and gravlax have sometimes been used interchangeably to describe raw, cured fish. However, there is actually difference between them. HuffPost Taste wrote a great little article to help us become more salmon savvy. Very simply, gravlax is salmon that has been cured with salt and sugar and infused with the flavor of fresh dill, spices, and sometimes other aromatics (like aquavit, gin, or vodka). The origin of the word gravlax comes from the combination of two Scandinavian words. Gravad ('to bury, to dig) and lax ('salmon'). The earliest version of gravlax was made by Scandinavian fisherman in the 8th century who used a fermentation method (wrapped in birch bark or pine needles, the salmon was buried in the sand above the tide line) to preserve it. While the process of making gravlax has changed considerably over time, the name remained.


Today we often consider the buttery, silky texture of cured salmon one of the more life's more luxurious foods. And it may be somewhat surprising that this delicacy could have such a relatively straight-forward, ridiculously easy preparation process. Instead of burying the salmon in the sand, it is buried in dry brine and a generous amount of fresh dill.


If there was one must serve appetizer for New Year's Eve, it should be silky textured gravlax. And as an added bonus you can serve any leftovers on bagels slathered in cream cheese on New Year's Day. This Pink Peppercorn Gravlax may be the perfect way for your palate to end and/or begin the new year.


Choose a store or vendor who sells high quality fresh salmon. Avoid using frozen fish as freezing adversely affects the texture of cured fish. The fresher and fattier the salmon, the better your gravlax will taste. In other words, choose the highest quality salmon possible. For this Pink Peppercorn Gravlax I used a two pound piece of fresh Icelandic salmon. For best results, buy the salmon the same day you begin the curing process.


Spices add a dimension of flavor to the cured salmon. Coriander and caraway pair well with the fresh dill. Pink peppercorns and fennel seeds add another layer of flavor to the dry brine mixture. Matt Jennings recipe called for the use of fennel pollen (completely new to me, but then sometimes I can be a little behind the food trends). For those of you more foodie savvy than me, use two tablespoons of the fennel pollen instead of the one tablespoon of fennel seeds used in my slightly adapted version of his recipe.


To bring out their maximum flavor, the pink peppercorns, coriander seeds, caraway seeds, and fennel seeds are toasted on the stove. The aroma of the spices will be released in approximately two minutes when cooked in a small pan over medium heat. Once allowed to cool, they are coarsely ground in a spice grinder, mortar, or small food processor (I used the later one with great success).

Salt and sugar are critical to the curing process as they draw the moisture out of the fish through osmosis. While scanning gravlax recipes, I discovered the recommended ratio of salt to sugar used in the dry brine ranged from 1:1 to 2:1 with the higher salt to sugar recipe being the more preferred.

As a side note, some recipes for gravlax call for the use either citrus or alcohol. Several chefs strongly advised against the use of the juice from citrus as the acid would not only cook the fish like a ceviche but would toughen the fish's exterior in a less than pleasant way. There was less consensus on the use of alcohol, however, most suggested using spices to give flavor to the salmon.


In retrospect I should have weighed my large bunch of dill in order to give a bit more specificity to the recipe ingredients considering the dill is an essential flavor ingredient for the gravlax. I am keeping my fingers crossed the visual here will give you some idea of what a 'large bunch' means. Because with so many 'plates in the air' getting ready for Christmas, I failed to attend to that little, but important detail. So please forgive me. Even in the winter, I can still find large bunches of fresh herbs at a couple of the food stores I frequent. Hopefully you can find them too as buying those prepackaged containers of fresh herbs will not only set you back quite a bit, but they are slightly more fragile.


The curing process for the Pink Peppercorn Gravlax is three days. Yes, three days. It all begins with giving the salmon a 10 minute water bath (in a mixture of cold water and 2 Tablespoons of kosher salt) in order to wash off any juices on the surface of the fish, which might cause it develop unpleasant aromas prematurely.

Both the top and bottom of the salmon are coated in the salt-sugar-spice mixture and surrounded by dill before being tightly wrapped with plastic wrap. After placing the wrapped brine-dill coated salmon on a large baking sheet, it is topped with a second baking pan weighted down with canned goods (or heavy cast irons pans would work as well) before going into the refrigerator. Weighing down the salmon will help to draw out moisture. After 24 hours, the salmon is removed from the refrigerator and drained for all accumulated liquid. Squeezing as much liquid out of the dill as possible without losing most of the spices was a bit of trick, but somehow it all managed to work out. The salmon is then tightly rewrapped in the dill and spices with fresh plastic wrap and returned to the refrigerator (again topped with a weighted down baking sheet) for two days. Why 2 days? At the end of three days of curing, the fish becomes slightly more firm and perfect for slicing into thin slices. You will be richly rewarded with gravlax perfection if you give the salmon three days of curing.

The gravlax needs to be sliced on a flat surface and cut on the bias with a really sharp knife. If you knife is dull your gravlax will tear into small pieces versus delicate strips. 

Serve the gravlax with bite sized strips or squares of pumpernickel or rye bread along with some sour cream or a mustard dill sauce (if serving as an appetizer). For breakfast or brunch, serve with bagels and softened cream cheese.

A better translation for gravlax would be luxurious although more than likely the 8th century Vikings viewed this cured fish as a necessity for surviving those long cold Scandinavian winters. If you have considered gravlax an expensive, occasional luxury, this Pink Peppercorn Gravlax should be enough to cause you to make a paradigm shift. Remember, not everything considered luxurious is a luxury (my new mantra for 2016). Now that I discovered how insanely delicious it is (as well as how relatively easy it is to make), this impressive dill-cured salmon will be making regular appearances at gatherings with family and friends. 
Recipe
Pink Peppercorn Gravlax (slight adaptation to chef Matt Jennings recipe for Pink Peppercorn and Fennel Gravlax as shared in Food and Wine, December 2015)

Ingredients
1/2 cup plus 2 Tablespoons kosher salt
2 pound piece of skin-on center-cut fresh salmon fillet, pinbones removed (recommend either Icelandic or Wild Salmon)
2 Tablespoons pink peppercorns
2 Tablespoons caraway seeds
2 Tablespoons coriander seeds
1 Tablespoon fennel seeds (or 2 Tablespoons fennel pollen)
1 teaspoon white pepper
1/4 cup granulated sugar
1 large bunch of fresh dill
Pumpernickel bread, rye bread, and/or crackers for serving

Directions
1. Fill a large bowl or baking dish with cold water. Add 2 Tablespoons of the kosher salt. Stir until salt is dissolved. Submerge salmon in the water and let stand for 10 minutes. Drain fish and pat dry with paper towels.
2. In a small heavy skillet, toast the pink peppercorns, caraway seeds, coriander seeds, and fennel seeds over medium heat, stirring until very fragrant (approximately 2 minutes). Cool slightly and then coarsely grind in spice grinder, mortar, or small food processor. Transfer spice mixture to small bowl. Stir in white pepper, granulated sugar, and remaining 1/2 cup of kosher salt until well combined. NOTE: If using fennel pollen, add to the toasted spices along with the white pepper, granulated sugar and kosher salt.
3. Line a large rimmed baking sheet with plastic wrap. Arrange half of the dill down the center of the baking sheet. 
4. Sprinkle half of the spice mixture over the dill, then top with salmon (skin side down).
5. Sprinkle remaining spice mixture evenly over salmon and top with remaining half of dill.
6. Wrap salmon tightly in plastic wrap. Place skin side down on the baking sheet. Top with a second baking sheet and heavy canned goods (or cast iron pans) to weigh it down. Refrigerate for 24 hours.
7. Unwrap the fish and drain the liquid. Squeeze moisture out of the dill (being careful not to lose too many of the spices) and place back on lightly patted dry salmon. Rewrap salmon with clean sheets of plastic wrap. Place freshly wrapped salmon, skin side up on baking sheet. 
8. Top with second baking sheet and and heavy canned goods (or cast iron pans) to weigh it down. Refrigerate for 2 days or until flesh feels firm in the center.
9. Rinse off salmon, pat it dry and thinly slice.
10. Serve with rye crackers, sour cream, capers, sliced red onions, and/or a mustard sauce. If serving for breakfast, serve with bagels and softened cream cheese.
Note: Keep gravlax well wrapped and chilled in the refrigerator. Will last up to 5 but not more than 7 days.

Monday, December 21, 2015

Peppermint Bark - Version 2


Tomorrow marks the official first day of winter. With the Winter Solstice marking the day with the fewest hours of sunlight, it feels more like the Winter Solstice has instead decided to infringe on the days leading up to it (at least around here anyway). The gray cloudy skies, the rare sightings of the sun, and the absence of snow is making it seem more like spring rather than winter will be arriving here in the midwest. The balmy weather forecast for the days leading up to Christmas are one of those unexpected, welcomed gifts from Mother Nature. Or maybe this is a sign I should be paying much closer attention to the climate change and global warming issues that seem to be dominating all political conversations except those in the presidential debates. However, at the moment my energies and attention are focused elsewhere, so I guess I will have to get up to speed in 2016.


When I went to make Peppermint Bark this past weekend I decided to make a slightly different version than the one I shared with you last year at this time. Taking a bite of the Peppermint Bark samples being handed out at Williams-Sonoma inspired me to make a few tweaks.


There are very subtle differences between last year's recipe and this one. Although if I was forced to choose between the two, I am might choose this one.


Dark or semi-sweet chocolate, white chocolate, peppermint extract (not oil), and crushed candy canes create one of the holidays most refreshing confections. With simple recipes, the quality of ingredients matters. In other words, do not use the bags of chocolate chips you put into your cookies as they are contain stabilizers that don't allow them to achieve the silky, shiny melted chocolate taste and look this bark needs.


You can crush your own candy canes (a good way to take out some of the holiday stress), use prepackaged peppermint crunch chips, or use a combination of both.

For this version of the Peppermint Bark, I reduced the amount of peppermint extract from 1/2 teaspoon to 1/4 teaspoon and mixed in four (4) ounces of crushed candy canes into the white chocolate. The remaining two (2) ounces of crushed candy canes were sprinkled on top of the melted white chocolate. Incorporating some of the crushed candy canes into the white chocolate gave this bark a great texture.


Some recipes call for chilling the bottom layer of dark or semi-sweet chocolate in the refrigerator before pouring on the melted white chocolate, however, if too chilled the two layers may not adhere to one another. So my advice is to not chill the bottom layer, but rather let it partially set up sitting out on a counter as the room temperature bottom layer of chocolate will bond better with the 'warmer' melted white chocolate.


After the white chocolate layer was sprinkled with candy cane/peppermint chips, you have two options. Allow the Peppermint Bark to set up in the refrigerator (for approximately 10 minutes) or allow it to set up on its' own. To create less random sized pieces of Peppermint Bark, cut into desired shapes and sizes  before the bark has fully set up using a thin, sharp knife. After cutting the bark into pieces, either return the tray to the refrigerator to allow each piece to fully firm up or allow it to set up on its' own by putting the tray in a cool place before plating or packaging. In some families, Peppermint Bark is an expected holiday tradition, one where it wouldn't be the 'holidays' without it. Sort akin to the 'I am dreaming of a White Christmas' expectation all of us who grew up in the midwest have come to count on and remember. If by any chance there is not any snow (expected or not) for your holiday, at least make sure you have a platter of some of this Peppermint Bark.


I am almost certain this is my only blog post for the week (although stranger things have happened). If all goes well for this year's holiday meal, next week's recipes will shift from candies and confections to 'real food'.

Merriest and happiest of holiday wishes to all of you! "May your walls know joy, may every room hold laughter, and every window be open to great possibility." (Mary Anne Radmacher) 

Recipe
Peppermint Bark - Version 2
Updated December 2021

Ingredients
16-18 (452g- 508g) ounces dark or semi-sweet chocolate (55-62% cocoa), coarsely chopped
16-18 (452g- 508g) ounces white chocolate, coarsely chopped
6 ounces (173g) crushed candy canes, divided (e.g., 6-12 medium sized candy canes) OR 6 ounces of packaged crushed peppermints (like Andes Peppermint Crunch Baking Chips or Brach's Crushed Candy Canes)
1/4 teaspoon pure peppermint extract (recommend Nielsen-Massey Pure Peppermint Extract)
Optional: Edible white glitter flakes

Directions
1. Line an 15"x 10" baking pan with parchment paper.
2. Over a pot of simmering water, melt the coarsely chopped dark or semi-sweet chocolate. Pour onto prepared baking and spread evenly using an offset spatula. Allow to partially set (but do not refrigerate).
3. Over a pot of simmering water, melt 12-14 ounces of the coarsely chopped white chocolate. Remove from heat and stir in remaining 4 ounces of white chocolate to temper mixture. 
4. Stir in peppermint extract and 4 ounces of crushed candy canes. Stir until combined. Pour evenly over the partially set dark or semi-sweet chocolate. Carefully and evenly spread using an offset spatula.
5. Immediately sprinkle remaining two ounces and glitter flakes (if using) evenly over the white chocolate. 
6. Place pan of peppermint bark in the refrigerator for 10 minutes. Remove from refrigerator and cut into desired shapes using a sharp knife. Or place the pan of peppermint bark in a cool place to partially set up. Note: Peppermint Bark is easier to cut into shapes before it has completely hardened.
7. Allow the Peppermint Bark to fully set before plating or packaging. Store Peppermint Bark in a tightly sealed container.

Friday, December 18, 2015

Chocolate Crinkle Cookies


This week, time has gotten completely away from me. As the holidays get closer, I am absolutely convinced time is more of an illusionary concept than the absolute one described in Isaac Newton's first law of space and time. Somewhere in the recesses of my high school physics memory lie the concepts associated with Einstein's theory of relativity. But rather than getting myself tripped up explaining the technical aspects of this theory (high school was a lifetime ago) just know it asserts time happens differently depending on who we are and what we are experiencing at any given moment (e.g., time moves more quickly as we age). In years past, all of the shopping got done, presents got wrapped, packages were sent, baking kind of-sort of was finished, and the holiday meal was made and served. However, at the moment I am seriously beginning to wonder if everything on my long list will get checked off in the whirlwind week ahead. I just need time to slow down. If only that was possible.


It wasn't in my plan this week to make a 'new' cookie, let alone try to attempt to as artfully as possible capture the beginning to end baking process (just in case a rich brownie like cookie made with three kinds of chocolate, rolled in two different sugars, and finished with a sprinkling of sea salt isn't enticing enough for you). This may partially explain why I can't seem to get anything done around here. Some distractions are harder to resist than others. And these Chocolate Crinkle Cookies are the kind of distractions we should all recklessly abandon our will power and control over our time for.


Of course, the making of any new cookie means comparing multiple, similar recipes all claiming to be the BEST ever, the prettiest, the most chocolatey, and the most scrumptious. After investing even more time into the making of a new cookie (there is no such thing as doing things simply), I narrowed my options down to two. One shared by "Baked' fame cookbook authors and pastry chefs Matt Lewis and Renato Poliafito and one by Cook's Illustrated. As luck would have it, there would be some fundamental differences in the ingredients and the baking process between two recipes for a Chocolate Crinkle-like Cookie. There seemed to be some room to merge various aspects of the two of them and possibly make a nuanced contribution of my own.


The idea of using only dark brown sugar to give the cookie a 'more complex, tempered sweetness with a bitter molasses edge' to compliment the chocolate appealed to me. So instead of going with a granulated sugar/brown sugar combination in the cookie dough, I decided to go with Cook's Illustrated dark brown sugar only recommendation. The amount of espresso powder used ranged significantly between the two recipes (1 teaspoon to 4 teaspoons). I could have split the difference between the two amounts, but 1 1/2 teaspoons just made the most sense and would be enough to deepen the chocolate flavor. Both recipes used unsweetened cocoa, but one used a dark semi-sweet (60-72% cocoa) and the other used unsweetened chocolate. With several bars of Scharffen Berger 62% semi-sweet chocolate siting in the cupboard, the decision seemed to be predetermined. There were a few more ingredient differences I needed to reconcile before deciding on the assembling and baking process. Once the number of eggs to be used, how much baking powder and kosher salt to use, and whether or not to use baking soda decisions were made I was (almost) ready to start baking.


After first melting the coarsely chopped semi-sweet chocolate and butter and before combining with the espresso powder, the mixture is removed from its' heat source, mixed until the chocolate is smooth, and allowed to cool. Measuring out the remaining ingredients and getting your standing mixer ready is more than enough chocolate cooling time. Once the eggs and dark brown sugar are thoroughly mixed and the vanilla is blended in, the slightly cooled chocolate mixture is added. The sifted dry ingredients are added all at once. Adding a half cup of miniature chocolate chips to the batter was a last minute decision. While these are a somewhat optional ingredient, I will add them with rather than after the sifted flour ingredients are added to the batter as this is a very thick dough (one you don't want to dry out with over mixing). Cook's Illustrated recommended the batter simply rest for 10 minutes, whereas the Lewis/Poliafito recipe called for chilling the dough for at least 2 but up to 24 hours. The density of dough didn't seemed to call for a 2 hour chill time. Thirty (30) minutes seemed long enough as the dough had completely set up and was still able to scooped without difficulty.


Not only did I want a cookie that tasted insanely delicious, I wanted one that if put in a Miss Cookie Universe pageant it would have the best chance of being crowned the winner. Rolling the cookies first granulated sugar and then in confectionary sugar gave these Chocolate Crinkle Cookies an almost perfect crackly finish (thank you Cook's Illustrated for this recommendation).


If there is one thing you should hope to find under the tree this year, consider asking for a set of some really good ice cream scoops (if you don't have them) as they are almost one of those must-have kitchen tools. Especially if you want your cookies uniform and don't want a pan of cookies in various stages of baked doneness.

Dough balls that are 1 to 1 1/4 inch in diameter will yield anywhere between 22 and 24 cookies. Because the cookies spread, no more than 11 or 12 cookies (spaced apart by at least 1 inch) should be put on the baking pan before going into a preheated 325 degree (F) oven.


Baking time for cookies ranges from to 12 minutes (my baking time was 12 minutes). The baking pan is rotated midway through the baking process. Testing 'dark' cookies for doneness is always a bit of a challenge. To test for this cookie's doneness, you are looking for their edges to start firming up but will still have a slightly soft center.  Because the cookies remain on the baking pan for 5 minutes after being removed from the oven, the cookie will continue to 'bake', so it is important to not over bake them.


After the Chocolate Crinkle Cookies rest on the baking sheet for 5 minutes, they are transferred to a cooling rack. Allow them to cool to room temperature before plating or putting into a container. If not eaten shortly after they are cooled, store the cookies in a tightly sealed container (they will be at their best for up to 2 days after baking). Adding a light sprinkling of sea salt is another optional recommendation. Although once you taste them with and without salt, I am pretty certain you won't see the sea salt as optional. Just be sure to sprinkle on the sea salt when you remove the baked cookies from the oven.


If you have room in your holiday baking schedule to add another cookie, add this one. If you don't have time, figure out a way to make some (sleep is over-rated). These Chocolate Crinkle Cookies are decadent, addictive, and immensely satisfying. They are also Miss Cookie Universe winning worthy as they are beautiful both the inside and out. They have also just become my new favorite cookie.


'The glory of friendship is not the outstretched hand, not the kindly smile, nor the joy of companionship; it is the spiritual inspiration that comes to one when you discover that someone else believes in you and is willing to trust you with a friendship." Ralph Waldo Emerson Of the thousands of quotes on friendship, there are some that truly speak to the significance of those relationships grounded in the enduring mutual love and respect shared between two people. This quote by Emerson is one of them. These are the words you want to share with someone you value and hope will always remain as a close friend. They are not meant to put distance or limits on a friendship, but rather serve to validate how deeply a friendship has touched not only one's heart, but one's soul. Whether you are the giver or receiver of words having such a profoundly beautiful sentiment to them, they are neither time nor situation bound. So as you think about what gifts to give to your most treasured friends this year, think about gifting them with Emerson's words as the holidays seem to lend themselves to bringing the purest of joys to those whose unselfish gift of friendship has shaped you in innumerable ways. These seemingly simple words could make this the most glorious Christmas for both of you.

Recipe
Chocolate Crinkle Cookies (inspired by the recipe for Exceedingly Chocolaty Cookies shared by Matt Lewis and Renato Poliafito)
Makes 22-24 cookies

Ingredients
1 1/4 cups (163g) all-purpose flour
2 Tablespoons (18g) unsweetened cocoa powder
7/8 teaspoon baking powder
1/4 teaspoon baking soda
1/2 teaspoon kosher salt
6 ounces (170g) dark chocolate (60-72% cacao), coarsely chopped (recommend Scharffen Berger Semi-Sweet 62% Chocolate, however use any semi-sweet or dark chocolate containing 60-72% cocao)
4 Tablespoons (57g) unsalted butter, slightly softened, cut into chunks
2 large eggs, room temperature
1 1/2 teaspoons instant espresso powder (recommend King Arthur's Espresso Powder, but most instant expresso powders should work)
3/4 cup (150g) dark brown sugar, firmly packed
2 teaspoons vanilla
1/2 cup miniature chocolate chips (optional but good)

1/2 cup confectionary sugar
1/2 cup granulated sugar
Optional: Sea salt for finishing

Directions
1. Preheat oven to 325 degrees (F). Line two baking sheets with parchment paper and set aside.
2. In a medium sized bowl, sift together flour, cocoa powder, baking powder, baking soda, and salt. Set aside. 
3. Melt butter and coarsely chopped chocolate in a heatproof bowl set over a pan of simmering water. Stir occasionally until almost completely melted and combined. Stir in espresso powder. Remove from heat and continue stirring until chocolate has completely melted. Allow to cool.
4. In the bowl of a standing mixer fitted with a paddle attachment, beat eggs and dark brown sugar together on medium speed until smooth (approximately 3-4 minutes).
5. Add vanilla and beat again until incorporated.
6. Scrape chocolate mixture into the bowl and beat until combined. Scrape down sides and bottom of the bowl.
7. Add flour mixture. Beat on low speed until flour is just incorporated but some streaks remain. Add miniature chocolate chips and finish mixing until flour is incorporated (do not overmix). Note: The miniature chocolate chips are optional, however, because this is a very thick batter, add them in with the sifted flour mixture if using.
8. Cover bowl and place in the refrigerator for 30 minutes.
9. Put granulated sugar and confectionary sugar into two separate bowl.
10. Using an ice cream scoop, form the dough into balls approximately 1 - 1 1/4 inch in diameter. 
11. Roll dough balls first in granulated sugar, then in confectionary sugar. Place on prepared baking sheet (11-12 cookies per sheet).
12. Bake, rotating baking sheets halfway through the baking time, until cookies begin to firm up along the edges (approximately 9-12 minutes). Note: Cookies will still be slightly soft in the center, giving them a moist brownie-like texture).
13. After removing cookies from the oven, lightly sprinkle with sea salt.
14. Allow cookies to rest on baking sheet for 5 minutes before transferring to a cooling rack. Allow to cool to room temperature.
15. Store cookies in a tightly sealed container. Note: Cookies are at the best if eaten within 2 days of baking.


Some of the ornaments hung on one of the Christmas trees this year.