Wednesday, June 13, 2018

Herb Roasted Pork Tenderloin, Fingerling Potatoes and Red Grapes


On the last day of the recent trip back east, we tried to pack in as much as possible yet not feel hurried or rushed. A leisurely early morning walk in the lush woods helped to set the pace for the hours we had left. With the sounds of birds and rushing water providing a kind of background music, it was impossible not to take in the unspoiled landscapes lying beneath the canopies of the trees. For a brief moment, with the light casting shadows on the trail and on the abundant greenery, it felt magical. Almost as if we had traveled back to another time in history. One much simpler and with limited distractions. Working up a bit of an appetite, we headed out to breakfast before driving to the beach for a last walk along the ocean. After having the woods all to ourselves, we were thrilled to discover, with the exception of a few seagulls, there wasn't anyone else there. For more than an hour we foraged for shells and lucky rocks as we walked along the shoreline. The public beach was our very own private beach. It could not have been a more perfect morning, more perfect end to the trip. Even getting temporarily locked out of house couldn't spoil the day. And yes, that would have been the fault of the most key obsessed person in the group. Me.

Sometimes when I return back from an ocean or mountain view trip, I wonder why I still live in the midwest. A place where neither of these zen-inducing landscapes exist. Unless you squint your eyes and pretend the clouds in the horizon look like a mountain range or drive to a lake having a sandy beach. Although there is a world of difference between a lake and an ocean. Maybe someday I can bring myself to get over the complacency hurdle I have my found myself in. Until then, I will have to figure out how to increase the number of days per year I spend in 'the happy places'.


A few weeks back, a good friend shared and gave rave reviews to the Food and Wine Roast Pork with Fingerling Potatoes and Red Grapes recipe. She made us all laugh when she said only she would consider turning on her oven to a temperature of more than 400 degrees (F) on a sweltering day. Little did she know, several of us would have done the same thing. Having made Lemon Thyme Roasted Grapes as an appetizer before, the combination of roasted pork, fingerling potatoes, and red grapes served in a single dish sounded like the perfect combination of sweet and savory. 


Using the Food and Wine recipe for inspiration, I decided to change it up a bit. Because why not turn a simple sheet pan dinner into a slightly less simple one?

To add even more flavor to the pork tenderloin, I made a marinade using dijon mustard, olive olive oil, chopped rosemary and chopped thyme. From my experience making pork, marinades infuse great flavor into the meat. And this one lived up to all of my marinade flavoring expectations.


After spreading the marinade evenly over the pork tenderloin, it's wrapped and refrigerated for at least 4 hours or up to overnight. If you are making the Herb Roasted Pork Tenderloin, Fingerling Potatoes and Red Grapes for dinner, you can prepare the pork early in the morning or the night before and let the flavor magic happen in the refrigerator.


The overall baking time for this dish ranges from 30-35 minutes, with the most baking time given to the fingerling potatoes and garlic.


Before you begin mixing the potatoes, garlic, freshly chopped herbs, and olive oil together, place the large baking sheet in the preheating 425 degree (F) oven. A hot baking sheet will help to sear the (cut lengthwise) fingerling potatoes. With the potatoes roasting in the oven for 10 minutes, you have more than enough time to sear the pork tenderloin.

Using a cast iron pan, heat 2 tablespoons of olive oil. Scrape the marinade off the pork tenderloin before placing the pork in the heated pan. Sear the tenderloin on all sides until just lightly browned. The entire browning process takes about 6-8 minutes. Not only does searing add color to the pork tenderloin, it seals in flavor and adds texture.


After giving a quick toss to the roasting potatoes, the seared, salt/pepper seasoned pork tenderloin and thyme/olive oil/red grape mixture are added to the sheet pan. Everything roasts for 20-25 minutes or until the internal temperature of the pork reaches 135-140 degrees (F) when a thermometer is inserted in the thickest part of the pork. 


For the juiciest pork tenderloin, allow it rest 8-10 minutes before slicing into thick 1/2 inch slices. While the pork is resting, keep the potatoes and grapes warm in the oven (immediately reduce the oven temperature to 200 degrees after removing the pork from the tray) as they cool rather quickly.


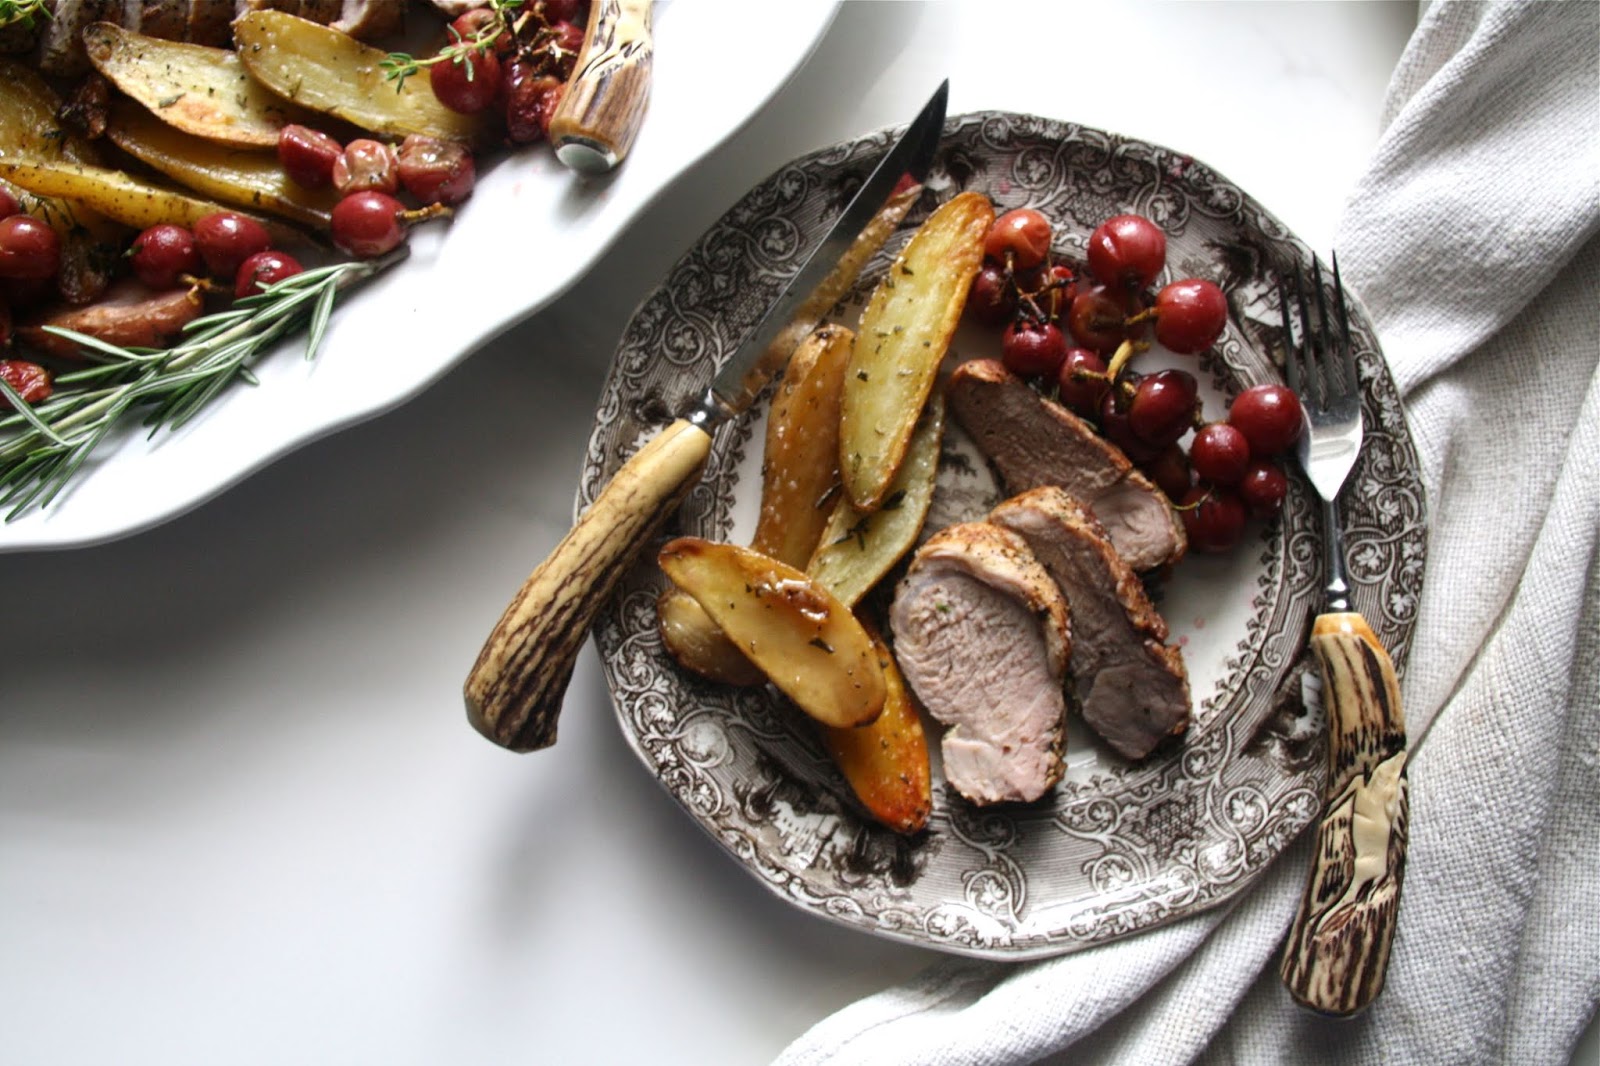
For a casual presentation of the Herb Roasted Pork Tenderloin, Fingerling Potatoes and Red Grapes, return the sliced pork to the sheet pan and serve. For a slightly more dressed up version of this sheet pan dinner, arrange the pork slices, potatoes and red grapes on a large platter.  Note: If you go the sheet pan presentation route, have a basket of some great, hearty fresh bread available as some might want to sop of some of the highly flavorful pan juices or to schmear on the roasted garlic. 


If you ever needed a reason to turn the oven on to 425 degrees (F) on a hot, humid day, this Herb Roasted Pork Tenderloin, Fingerling Potatoes and Red Grapes would be one of them.  In addition, to having great flavors, this simple, yet elegant dinner can be either a weekday and celebratory meal. 

If you have never had roasted grapes before, you are in for a treat as roasting intensifies their flavor to an incredible level of deliciousness. When picking out red seedless grapes at the farmer's market or grocery store, choose medium to large sized ones as you want the grape clusters to remain slightly intact during the roasting process.

Sheet pan dinners have been trending for awhile now and roasted grapes should never go out of style. The added tweaks of marinating and searing the pork tenderloin are ones you shouldn't skip. And consider the freshly chopped herbs non-negotiable ingredients. Fingerling potatoes roast up beautifully. Their crispy edges and creamy centers will cause everyone to fight over any remaining few. The pork tenderloin is tender, juicy, and rich in flavor. In other words, every element in this savory, sweet Herb Roasted Pork Tenderloin, Fingerling Potatoes and Red Grapes works beautifully. Don't let a hot, humid day deter you from turning on the oven to 425 degrees (F) in order to make it. Because this dish is as blissfully perfect as being able to have the woods and beach all to yourself or shared with a few of your friends.

Recipe
Herb Roasted Pork Tenderloin, Fingerling Potatoes and Red Grapes
Serves 4 to 6

Ingredients
Marinade
2 Tablespoons dijon mustard 
1 Tablespoon finely chopped fresh rosemary
1 Tablespoon finely chopped fresh thyme
2 Tablespoons olive oil

Roasted Pork Tenderloin, Fingerling Potatoes and Red Grapes
1 1/4- 1 1/2 pounds fingerling potatoes, cut lengthwise
1 1/4 - 1 1/2 pounds pork tenderloin
1 to 1 1/4 pounds red seedless grapes, medium to large sized, cut into clusters of 4-5 grapes
8 cloves of garlic, peeled
5 Tablespoons olive oil, divided
1 Tablespoon finely chopped fresh rosemary
1 Tablespoon  finely chopped fresh thyme
5-6 fresh sprigs of thyme
Rosemary sprigs and thyme sprigs for garnish
Kosher salt and black pepper

Directions
Marinade
'1. Combine marinade ingredients in small bowl. Stir to combine. 
2. Brush marinade evenly over the pork tenderloin. Place tenderloin on dish. Cover and refrigerate for 4 hours or as long as overnight.

Roasted Pork Tenderloin, Fingerling Potatoes and Red Grapes
1. Preheat the oven to 425 degrees (F). Place baking sheet in the oven (at least 10 minutes).
2. Toss the grapes with 1 Tablespoon of olive oil and 1 Tablespoon of finely chopped fresh thyme. Set aside.
3. Toss the fingerling potatoes and garlic cloves with 2 Tablespoons olive oil and 1 Tablespoon finely chopped fresh rosemary. Transfer potatoes (cut side down) to heated baking sheet. Roast for 10 minutes.
4. While potatoes are beginning to roast, scrape the marinade off the pork tenderloin. Using a cast iron pan sear the pork tenderloin in 2 Tablespoons of olive oil until lightly browned on all sides. Remove pork from pan, season with salt and pepper, and place on the baking sheet with potatoes. Add grape mixture along with several sprigs of thyme to the pan. Return sheet pan to oven and bake for 20-25 minutes or until an instant read thermometer inserted in the thickest part of the pork reads 135-140 degrees (F). Note: Turn potatoes over before returning the baking sheet back in the oven.
5. Reduce oven temperature to 200 degrees (F).
6. Transfer the roasted pork to a cutting board. Allow to rest for 8-10 minutes. Keep the potatoes and grapes in the reduced temperature oven while the pork is resting.
7. Slice pork into thick (half-inch slices). Arrange pork slices on large platter.
8. Remove potatoes and grapes from the oven. Arrange on platter with the pork. Season potatoes with salt and pepper. Garnish with thyme and rosemary sprigs. 
9. Serve immediately.

Wilbur Woods, Little Compton, Rhode Island (June 2018)


Friday, June 8, 2018

Cranberry White Chocolate Chip Cookies


For the weeks and days leading up to an east coast destination running trip with friends, I became obsessed with checking the weather. And once we arrived, there probably wasn't an hour that went by that at least one of us was checking it. We weren't just consumed with race day weather conditions, but with the weather for each of the five days we planned to be there. Considering the fluidity of weather reports, why would we spend any time worrying about something completely out of our control? Mostly because we looked forward to doing everything on our itinerary. But partly because running has made weather watching part of our daily (and in some instances hourly) routines. Race day conditions were as close to perfect as possible. So not even two days of rain and one day of high humidity spoiled or deterred us from having fun. I would, however, have loved for my friends first trip to Martha's Vineyard to be one having a calm sea and slightly breezy, sunny day rather than one dominated by continued waves of rain and a roller coaster fast ferry ride. Up until the ferry ride to the Vineyard, I had always said to anyone who asked or was anxious about being on a ferry that you could barely feel the ocean waves during the hour long trip. Going forward I may have to reframe how I describe what that fast ferry ride could feel like.


Being the only one in the group having first hand familiarity with the part of Rhode Island we would be spending most of our time in (as well as the Vineyard), creating the trip itinerary fell to me. As much as I love being in control (what Type A personality doesn't?), I felt some self-imposed pressure to create a plan which would allow my friends to not only understand why this part of the world was one of my happy places, but also have them leave feeling touched by its' beauty and enchantment. For me, sharing a place in the world where I feel such a deep emotional connection is akin to giving the most unselfish, priceless gift imaginable. Yet just as important, sharing such a meaningful place can further strengthens the bonds of a friendship. And as close as I felt to my friends before the trip, I felt even closer to them after it ended.


Weighing more heavily on me than whether or not my friends would really, really like the sites and food venues I had chosen for us (including the local coffee shop), was the 10 mile race. The real reason for the trip. The combination of an injury plagued winter/spring, a long run of only 6 miles, and a work emergency preventing my running partner from joining us had me more than a little anxious on the couple of days prior to as well as the morning of the race. I had mentally linked my race endurance and finish to being able to run it with a friend. Running the 10 miles on my own seemed like an insurmountable distance. As someone who doesn't have the best running 'head' game, I needed to figure out how to not only get through it but finish it before the course closed. I decided early on I would not judge my performance by my time, but rather by my effort. Additionally, I was committed to not being the one doing the 'coming home without race medal bling' walk of shame. With the time pressure off my shoulders, I surprised myself by being able to finish the race fifteen minutes earlier than I anticipated. It might have been eighteen minutes if I hadn't stopped several times to take some photos of the spectacular scenic course. Better than having the finishers race medal placed around my neck as I crossed the finish line was realizing I didn't need anyone to push me, to keep me focused. I only needed me. Reconnecting with my inner strength may have been the best race reward to come in my second running life. Proof that anything is possible if you want it bad enough.


On the fast ferry ride to the Vineyard, I had bought some Cranberry White Chocolate Chip Cookies for us to nibble on during the ride over. As soon as I tasted the cookie, I knew I would be making some when I returned home. After learning the cookie maker used cake and bread flours in his cookies, I knew which cookie recipe I would adapt. the Jacques Torres chocolate chip cookie recipe. One I shared on the blog more than five years ago.


With the exception of increasing the amount of vanilla, using white chocolate chips instead of (dark) chocolate chips, adding dried cranberries, and eliminating the sea salt finish, almost everything about the recipe remained the same. Some might put these Cranberry White Chocolate Chip Cookies in the fussyterian category as it uses both cake and bread flours versus the more common all-purpose flour. Two flours one might not normally buy or keep unless cake baking and/or bread making is your passion. But whatever you do, don't let this little bit of fussiness stop you from making these cookies.


Using a standing mixer fitted with a paddle attachment, the butter, granulated sugar, and brown sugar are beat until light and fluffy. This will take approximately 5 minutes. The eggs are beaten in one at a time, followed by the vanilla. After reducing the mixer speed to low, the dry ingredients are added and beaten just until incorporated. Lastly the white chocolate chips and dried cranberries and mixed in. Instead of white chocolate chips, you could also use coarsely chopped white chocolate.

Now comes the second somewhat fussy part. The dough has to be chilled for 24 to 36 hours before baking. When making the chocolate chip and sea salt version of the Jacques Torres cookies, I simply covered the bowl of dough with plastic wrap and refrigerated it. What I have learned from making hundreds of dough chilling cookies is shaping the dough into balls before refrigerating makes the baking process so much easier. Just remember to tightly cover the trays of dough balls.

In a preheated 350 degree (F) oven, the cookies bake for 15-17 minutes. Turn the tray midway and tap it gently on the counter before returning to the oven. Upon removing the baked cookies from the oven, I gave the tray another light tap. After 10 minutes of cooling on the cookie sheet, transfer the cookies to a wire rack to allow them to cool completely.


Honestly, these Cranberry White Chocolate Chip Cookies were better than the ones we had on the ferry.


From this point forward, this will be my Cranberry White Chocolate Chip Cookie recipe. Why mess with perfection when you find it? These cookies are crunchy, chewy, and oh so satisfying. The taste of the dried cranberries balances nicely with the cookie itself as well as the flavor and texture of the white chocolate. It's a complete package of deliciousness!


Store the baked cookies in a tightly sealed container. If you place the cookies in a ziplock bag, you can freeze them and thaw just before serving. It's always good idea to have some home baked cookies on hand without having to go through all the work of making them. You never know when you are going to get a craving for them or have unexpected guests.

Seriously, these Cranberry White Chocolate Chip Cookies are swoonworthy delicious. They are also slightly addicting.

Recipe
Cranberry White Chocolate Chip Cookies, an adaptation of the Jacques Torres chocolate chip cookie recipe
Makes 46-48 (3") cookies 

Ingredients
2 cups cake flour with 2 Tablespoons removed (8 1/2 ounces)
1 2/3 cups bread flour (8 1/2 ounces)
1 1/4 teaspoons baking soda
1 1/2 teaspoons baking powder
1 1/2 teaspoons Kosher salt
1 1/4 cups (or 2 1/2 sticks) unsalted butter, room temperature
1 1/4 cups (10 ounces) light brown sugar, firmly packed 
1 cup plus 2 Tablespoons granulated sugar (8 ounces)
2 large eggs, room temperature
1 Tablespoon high quality vanilla extract
1 pound white chocolate chips or chopped white chocolate
9 ounces dried cranberries

Directions
1. Take butter and eggs out of the refrigerator the night before so they can come to room temperature.
2. Sift together the flours, baking soda, baking powder, and salt. Set aside.
3. Using a mixer fitted with a paddle attachment, cream butter and both sugars until very light and fluffy (approximately 5 minutes)
4. Add eggs in one at a time, beating well after each addition.
5. Mix in vanilla.
6. Reduce speed to low and add dry ingredients. Mix until just combined 15-30 seconds.  Do careful to not over mix.
7. Drop in white chocolate chips and dried cranberries. Mix until incorporated in the dough.
8. Using a large (1 3/4") ice cream scooper, make and place dough balls on a parchment paper lined baking sheet. Cover tightly plastic wrap and refrigerate for 24-36 hours. Alternately place plastic wrap directly against the dough in the bowl. Chill dough in the refrigerator for 24-36 hours.
9. Preheat oven to 350 degrees (F).
10. Line cookie sheets with parchment paper.
11. Place 9-10 balls on a cookie sheet. Press dough down oh so lightly, just to flatten the top. Note: If you had chilled the entire bowl of dough, use a large (1 3/4") ice cream scooper, make and place dough balls on a parchment paper lined baking sheet.
12. Bake in upper top third of oven for 16-18 minutes (turning tray around midway through the baking process) or until they are lightly golden but still soft.
13. Transfer cookie sheet to wire rack and let cookies rest for 10 minutes. Remove slightly cooled cookies to another wire rack to cool further.
14. Serve and enjoy!
15. Store cookies in a sealed container and/or store baked cookies in the freezer. If frozen, allow to come to room temperature before serving.

Notes: (1) If you don't want to bake all the cookies at once, freeze the dough balls in a ziplock bag after they have chilled in the refrigerator for at least 24 hours. Baking time may need to increase by 1 or 2 minutes. (2) In addition to white chocolate chips and coarsely chopped white chocolate, could also use white chocolate discs. If discs are used, recommend coarsely chopping them. (3) I use Ghiradelli white chocolate chips in these cookies.


South Shore Beach, Little Compton, Rhode Island (June 2018) 


Thursday, May 24, 2018

Paloma


Several weeks ago one of my friends got our attention when she said tequila could be the key to our ongoing weight loss quest. Hearing the words 'alcohol' and 'weight loss' in the same sentence sounded almost too good to be true. Would our summer evening post run rituals have us abandoning wine and/or prosecco as the preferred form of (re)hydration? Or would tequila become our new post run 'drink' of choice? Even one of the non-tequila lovers in the group said she would be happy to put on 'her big girl pants' and give tequila another try. With so much fake news out there, we all hoped this story didn't fall into that category. Learning there was an actual study done a couple of years ago linking tequila with weight loss started to give this story some credibility. Proof of an actual study was one thing, the results were another. It turned out scientists actually did discover the naturally occurring sugars in the agave plant (called agavins), a key ingredient in tequila, were found to lower blood sugar and cause weight loss. But here's the catch. The fermentation process in the making of tequila actually removes all of those good agavins as the sugars are converted into alcohol ethenol. In other words, tequila is one of those great low-carb and least caloric alcohol options out there (as compared to let's say vodka), it's just not the magic weight loss bullet we all hoped it would be. However, we are all looking at tequila a little differently now.


When most of us think of a tequila based cocktail, we immediately think of a Margarita. Not as many of us think of the Paloma. Generally speaking, the Paloma has lived in the shadows of the Margarita here in the states as it hasn't yet ascended to the same level of popularity it enjoys in Mexico. And honestly, up until recently I didn't even know what a Paloma was. Whether I have lived a tequila cocktail sheltered life or suffer from a form of margarita blindness, I am thankful my eyes and tastebuds have now been opened! Going forward, if I had to choose between a freshly made margarita and a paloma, I would have a difficult decision to make. If the choice was between a frozen margarita and a paloma, it would be one of those no-brainer, don't even have to think about it decisions. I would absolutely order a Paloma. It only took one sip of this cocktail for it to become one of my new favorites.


Traditionally, the Paloma, served in a tall cocktail glass, is made with only three ingredients: tequila, lime juice, and grapefruit flavored soda. In Mexico, the grapefruit soda used most frequently in this drink is Jarritos. Here in the states, where Jarritos isn't easily accessible, Fresca, Squirt, and/or the new sparkling Grapefruit Juice made by Izze are ones used most frequently. Not surprisingly, this Paloma doesn't follow the traditional Paloma rule. This version uses grapefruit juice and club soda to bring flavor and a bit of fizz to this cocktail.


If you can find or want to make freshly squeezed grapefruit juice, go for it. I used a commercially made 100% grapefruit juice in this Paloma. The one usually found in one of the refrigerated sections at the grocery store. And I would definitely use it again. Some recipes call for the addition of a teaspoon of sugar (granulated or superfine) to temper the slight bitterness of the grapefruit juice. Instead of sugar I used a simple syrup (equal parts water and sugar boiled until the sugar dissolves). The first time I made this Paloma I used only one teaspoon of the simple syrup. The second time I used two teaspoons. For me, two was definitely better than one. But before topping the Paloma with the club soda, take a tiny taste of the grapefruit juice, lime juice, tequila, and a teaspoon simple syrup mixture. If you like it made with just one teaspoon, great. If you want a tad more sweetness (trust me it's not going to be super sweet), add another teaspoon.

Note: If you want a less diluted Paloma top with only 1/8 cup (1 ounce) of club soda. If you like a cocktail on the slightly more bubbly side, use 1/4 cup (2 ounces) of the club soda.

In spite of suggesting a commercially made versus a freshly squeezed grapefruit juice would work, I will tell go out on a short limb and tell you there is no substitute for freshly squeezed lime juice. So if you plan on making Palomas for a gathering, make certain you have bought more than enough limes. 

Your choice of tequila will affect the taste of the Paloma. Personally, I like the smooth taste of Patron Silver. If you like a hint of oakiness and a little more complexity in your tequila, use a Reposado. 


To rim or not to rim, that is the question. Personally, I like my tequila drinks served in a salt rimmed glass as it enhances the drinking experience for me. But whether your serve the Paloma in a salt rimmed or non-salted rimmed glass, it's what in the glass where all the magic is.

If you are looking for a refreshing, semi-lethal, and yes, less caloric summer sipping season option make this Paloma. Better yet, make the Paloma your new 'house' cocktail. Live dangerously! And, if by chance you believe everything you read about the grapefruit diet, well consider this cocktail a win-win! 

Recipe
Paloma (slight adaptation to Bon Appetit's Paloma recipe, January 2013)
Makes 1 serving

Ingredients
1/4 cup (2 ounces) grapefruit juice
1 Tablespoon (slightly less than a half ounce) freshly squeezed lime juice
1 - 2 teaspoons simple syrup (recommend using 2 teaspoons)
1/4 cup (2 ounces) good quality agave tequila (I like Patron Silver, but Patron Reposada would work well too)
1/8 to 1/4 cup (1-2 ounces) club soda
Kosher salt for the rim
Fresh grapefruit slices and wedges
Ice Cubes

Directions
1. Pour some kosher salt on small plate. Rub the rim of a glass with a grapefruit wedge. Dip the rim of the glass in the salt.
2. Combine the grapefruit juice, lime juice, simple syrup, and tequila in the glass. Stir to combine.
3. Add ice and top off with club soda. 
4. Garnish with a grapefruit slice. 
5. Serve and savor.

Notes: (1) Serve the Paloma in either the traditional tall glass cocktail glass or in rocks/tumbler glass. (2) You could make a pitcher of Palomas (without the club soda or ice cubes added) and store in a covered pitcher or jar in the refrigerator. When ready to serve, pour 4 1/2 ounces of the mixture into a salt rimmed glass, add ice cubes, and top with up to 1/4 cup (2 ounces) of club soda. (3) Simple syrup will last several weeks in a covered container in the refrigerator. I use one cup of water and one cup of granulated sugar when making a batch. To make, combine water and sugar in a small saucepan. Over medium heat, cook until sugar dissolves, stirring often. When the mixture is clear, remove from heat. Let cool slightly before pouring into a jar.


Tucson, Arizona (2016)


Sunday, May 20, 2018

Peach Cobbler, Version 2


"We are not so much what we eat, but we remember what we have eaten." ("A Short History of Truth", Julian Baggini)  Over a post run breakfast the other day, there was a rather funny, interesting conversation about how foods from our childhood turned into ones banned in our adulthood. The reasons for this varied from eating certain foods served way 'too many' times to being unable to get past remembering the not so tasty versions gracing the dinner table to having the meal bait and switch (breakfast for dinner) done to us with regularity. While redundancy can sometimes be endearing, it seemed it was having the completely opposite effect. Apparently when food is involved redundancy is a bad thing. As I listened to everyone describe the limited or expansive repertoire of meals made by parents and/or grandparents, I couldn't help but giggle at the uncanniness of how so many of us, no matter our ages, could remember exactly what meals we each had for dinner growing up. Good and/or bad food left a really powerful, potent imprint on all of our memories. Those early taste and smell experiences not only served to shape everyone's hilariously told childhood narratives, they significantly and permanently influenced our unique present day food preferences.

Although my father was the one who loved to bake and did almost all of the baking, I don't ever remember having dessert after dinner. There were no 'eat your potatoes or finish your plate if you want dessert' threats spoken at our dinner table. At least there weren't any in my 'food' memories. So I wonder when it was we were eating all those cookies, cakes, and ice cream! This absence of a dessert course memory may be responsible for the way I think about them today. In my world any dinner gathering of family and friends absolutely must have a dessert course, preferably a homemade one. Because a dinner without a dessert seems unfinished, incomplete. Dessert here is never an after thought. It's usually one of the first thoughts when I am planning a menu. 


This isn't the first time I shared a Peach Cobbler recipe with you. But unlike my two guacamole recipes, the one really good one and the really great one, I love both this original Peach Cobbler recipe and what I am now calling the Peach Cobbler, Version 2 one. If you asked me which cobbler was better, I couldn't tell you. I love them both for different reasons. At some point in the months ahead when peaches are in abundance, you should make both versions. Maybe you, like me, will be unable to choose between them or choose a definite favorite.


However, I will tell you that you might not consider either of these recipes to be cobblers in the traditional "biscuit topped" sense. In the untraditional, but still cobbler eligible sense, one has a quasi-cookie dough top and the other has an unusual quasi-cake batter top. There are several other differences between these two cobblers. One is made with peeled peaches, the other with unpeeled ones; one uses a variety of spices, the other only cinnamon; and one is sweetened with honey, brown sugar, and granulated sugar, the other only with granulated sugar. 


When I saw a table at the grocery store piled high with the most gorgeous peaches I couldn't resist buying them. For a brief moment I thought the month of May was shortened, the months June and July completely skipped over, and August had arrived as these were the kind of peaches we usually have to wait a year to find. These were definitely peach cobbler worthy peaches.


The idea of having to peel four to four and half pound of peaches could be considered a peach cobbler making deal breaker. But this recipe doesn't require you to peel them. In other words, it takes the 'it's too much messy work' excuse off the table. Since I like my cobblers made with peach slices versus chunks, I generally cut each peach half into four or five (half-inch) slices. 


The recipe for this Peach Cobbler didn't call for the use of any sweeteners, spices, or thickeners mixed in with the sliced peaches. Just the zest and juice from a large lemon. But I decided to add them in anyway. At first I thought about mixing in cinnamon, ginger, and allspice with the sliced peaches, but then decided I would only use cinnamon as well as a teaspoon of vanilla. I prefer the juices in peach layer of cobblers to have a thicker consistency than one normally achieved by letting a fruit only cobbler rest for 30 minutes before serving, I added in cornstarch and a small amount (one-quarter cup) of sugar. 


The topping for this Peach Cobbler is one simply made with flour, butter, sugar, baking powder, kosher salt, and milk. Beaten longer than most cake batter recipes, this thick, fluffy batter spreads beautifully over the layer of lightly sweetened, spiced, and thickener added peaches.


Before going into a preheated 350 degree (F) oven, the batter layer is sprinkled with some granulated sugar (I used 1/3 versus the recommended 1/2 cup) and then drizzled with a half-cup of hot water. Yes, hot water! The technique of topping the cobbler with sugar and hot water causes the batter to develop a shiny, crisp, cracked lid. The result is a cobbler having another textural component. Note: Using a 9"x13" pan or baking dish gives this Peach Cobbler the perfect luscious lightly spiced, slightly lemony peach filling to crunchy, just the right amount of sweetness cake like top ratio.


If you baking pan isn't deep, place it on a baking sheet to catch any of the juices bubbling up and spilling over. The cobbler bakes for 70-80 minutes in a preheated 350 degree (F) oven. My baking time was 75 minutes. 


After removing the peach cobbler from the oven, place on a cooling rack and let it rest for 30 minutes before serving. This resting time allows the juices to thicken up a bit. Your patience will be rewarded as this Peach Cobbler has all of the textural elements of one having a swoonworthy status.


Just as I find it hard not to pair peaches and cinnamon together, I find it even more challenging to not serve a warm Peach Cobbler with a couple of scoops of vanilla ice cream. If you don't adhere to the cobbler-ice cream rule, serve it with some heavy cream, some creme fraiche or my version of creme anglaise (otherwise known as melted vanilla ice cream). In full disclosure my version of creme anglaise isn't really mine, it's Ina Garten's version.


What is better than having an incredibly delicious recipe for Peach Cobbler? Having two of them! Although the common ingredient between the two recipes is the peaches, they each offer two completely different kinds of cobbler. The taste, texture, simplicity, unusual baking technique of Peach Cobbler, Version 2 make it irresistible. I would put a cobbler, especially this one, in both the comfort and celebratory food dessert categories. 

As soon as your market has ripe peaches available make a cobbler! For dessert of course! I am hoping ripe peaches arrive earlier than usual this year because I really don't want to wait two months to make another Peach Cobbler.

Recipe
Peach Cobbler, Version 2 (several adaptations to Renee Erickson's Peach Cobbler recipe as shared in her cookbook "A Boat, A Whale, and A Walrus: Menus and Stories"
Serves 8 to 10

Ingredients
10 large ripe peaches, approximately 4 to 4 1/2 pounds, unpeeled, pitted, and cut into 1/2 wedges
Zest and juice of 1 large lemon
1 teaspoon vanilla
1 slightly rounded teaspoon cinnamon
2 Tablespoons cornstarch
1/2 cup (1 stick or 4 ounces) unsalted butter, room temperature
1 1/2 cups plus 1/3 cup granulated sugar, divided
1 1/2 cups (192 g) all-purpose flour
2 teaspoons baking powder
1 teaspoon kosher salt
3/4 cup whole milk
1/2 cup hot water
Ice cream, heavy cream, creme fraiche, or creme anglaise for serving

Directions
1. Preheat oven to 350 degrees (F).
2. Place peaches in 9"x13" or similar sized baking pan or gratin dish. Try arranging peaches into a roughly even layer(s).
3. Using a microplane or zest, zest the lemon and squeeze the lemon juice evenly over the top.
4. Pour the vanilla, sprinkle 1/4 cup of sugar, and evenly sift the cornstarch and cinnamon over the fruit.
5. In a the bowl of a standing mixer fitted with a paddle attachment, cream the butter the 1 1/4 cups of the granulated sugar on medium speed until it reaches a sandy texture (approximately 1 minute).
6. Add the flour, baking powder, and salt. Beat again for another 30 seconds or or until all of the flour has been incorporated and the mixture looks evenly crumbly.
7. With the mixer on low speed, slowly add the milk. Increase the speed to medium and beat until light and fluffy (approximately 2 minutes).
8. Place 6 or 7 large scoops of the batter on top of the peaches. Using an offset spatula, carefully spread the batter evenly over the fruit, making sure it's no more than 1/2" thick in any one place.
9. Sprinkle 1/3 cup of granulated sugar evenly over the top of the batter.
10. Heat 1/2 cup of water in the microwave for approximately 1 minute. Pour hot water evenly over the batter.
11. Bake the cobbler for 70 to 80 minutes, or until the top is browned and cracked. Use a toothpick to check for doneness of the cobbler topping.
12. Let the cobbler rest for 30 minutes to allow the filling juices to slightly firm up. 
13. Serve warm with vanilla ice cream, heavy cream, creme fraiche, or creme anglaise.

Note: This Peach Cobbler is best enjoyed the same day it is baked, however, if leftovers are covered, it can still be enjoyed the second day. Would recommend reheating individual portions in the microwave before serving.