Saturday, July 11, 2020

Levain Style Chocolate Chip Cookies


Apparently I have a thing for chocolate chip cookies. Or maybe I will never be satisfied. Ever since discovering and sharing the recipe for Tara's Chocolate Chip Cookies, I was convinced I never needed another chocolate chip cookie recipe in my life. Actually I never thought I would ever entertain the idea of making another version of a chocolate chip cookie. Evidently I had been holding out believing the sage old advice of 'never say never'. But two completely random events caused me to ultimately cave. The first was when a friend sent me a packet of recipes, including one for a Levain style chocolate chip cookie, she thought I might be interested in making. Considering she lives more than two thousand miles away, this was clearly a thoughtful, selfless gesture. In other words, she wouldn't get to be a taste tester. While scrolling through Instagram posts, I came across a posting from hi.imadehtis featuring a showdown of seven copycat Levain Bakery chocolate chip cookies. Call it serendipitous, but the chocolate chip cookie recipe sent by my friend and the winning showdown recipe were one in the same. I took it as a sign from the universe. One I couldn't ignore. 


This wasn't going to be my first attempt at replicating the Levain style chocolate chip cookies. Last year I shared the recipe for Gigantic Chocolate Chip Cookies, my version of one shared by foodblogger, cookbook author Stella Parks. And just like that recipe, I tinkered with the Copycat Levain Chocolate Chip Cookie recipe from Delish. Three of the changes made were intentional, but one was an unintentional oversight. But that unintentional change turned out to be a fortuitous one. Could I choose a favorite between the Gigantic Chocolate Chip Cookies and these Levain Style Chocolate Chip Cookies? I can't. Because I really, really liked them both. However, if I wanted to satisfy my craving for a ginormous chocolate chip without having to wait more than 3 hours, then I would make these cookies. If I could show some restraint, I would make the Gigantic Chocolate Chip Cookies.


So you might be wondering, if I already had a recipe for a Levain style cookie, why would I make another version? Like I said earlier, maybe I will never be satisfied. But in all seriousness, everything about this Levain Style Chocolate Chip Cookie defies everything I thought I knew about making cookies. Not only does it use cold butter, thus eliminating the need to take butter out to come to room temperature, it mixes in the chocolate chips and toasted walnuts before the flour is mixed in. What??!! And that's not all. The eggs are the last ingredient to be mixed in! The process of making these cookies was such a significant departure from all of the other cookies I have ever made, chocolate chip ones aside, caused me take pause. I almost didn't make them. Thank goodness I over rode my cookie baking instincts this time!


From start to finish you can be eating a incredibly delicious, satisfying, warm Levain Style Chocolate Chip Cookies in slightly more than three hours! For those of you with a limited ability hold off satisfy ing a craving, these are the cookies are for you!


When making these cookies, I strongly recommend you look for larger sized chocolate chips (not the regular, average sized ones) as you really want the chocolate to have a strong presence in each bite of the cookie. Additionally, use toasted versus instead of raw walnuts as toasting them is game changing flavor enhancer in any cookie. 

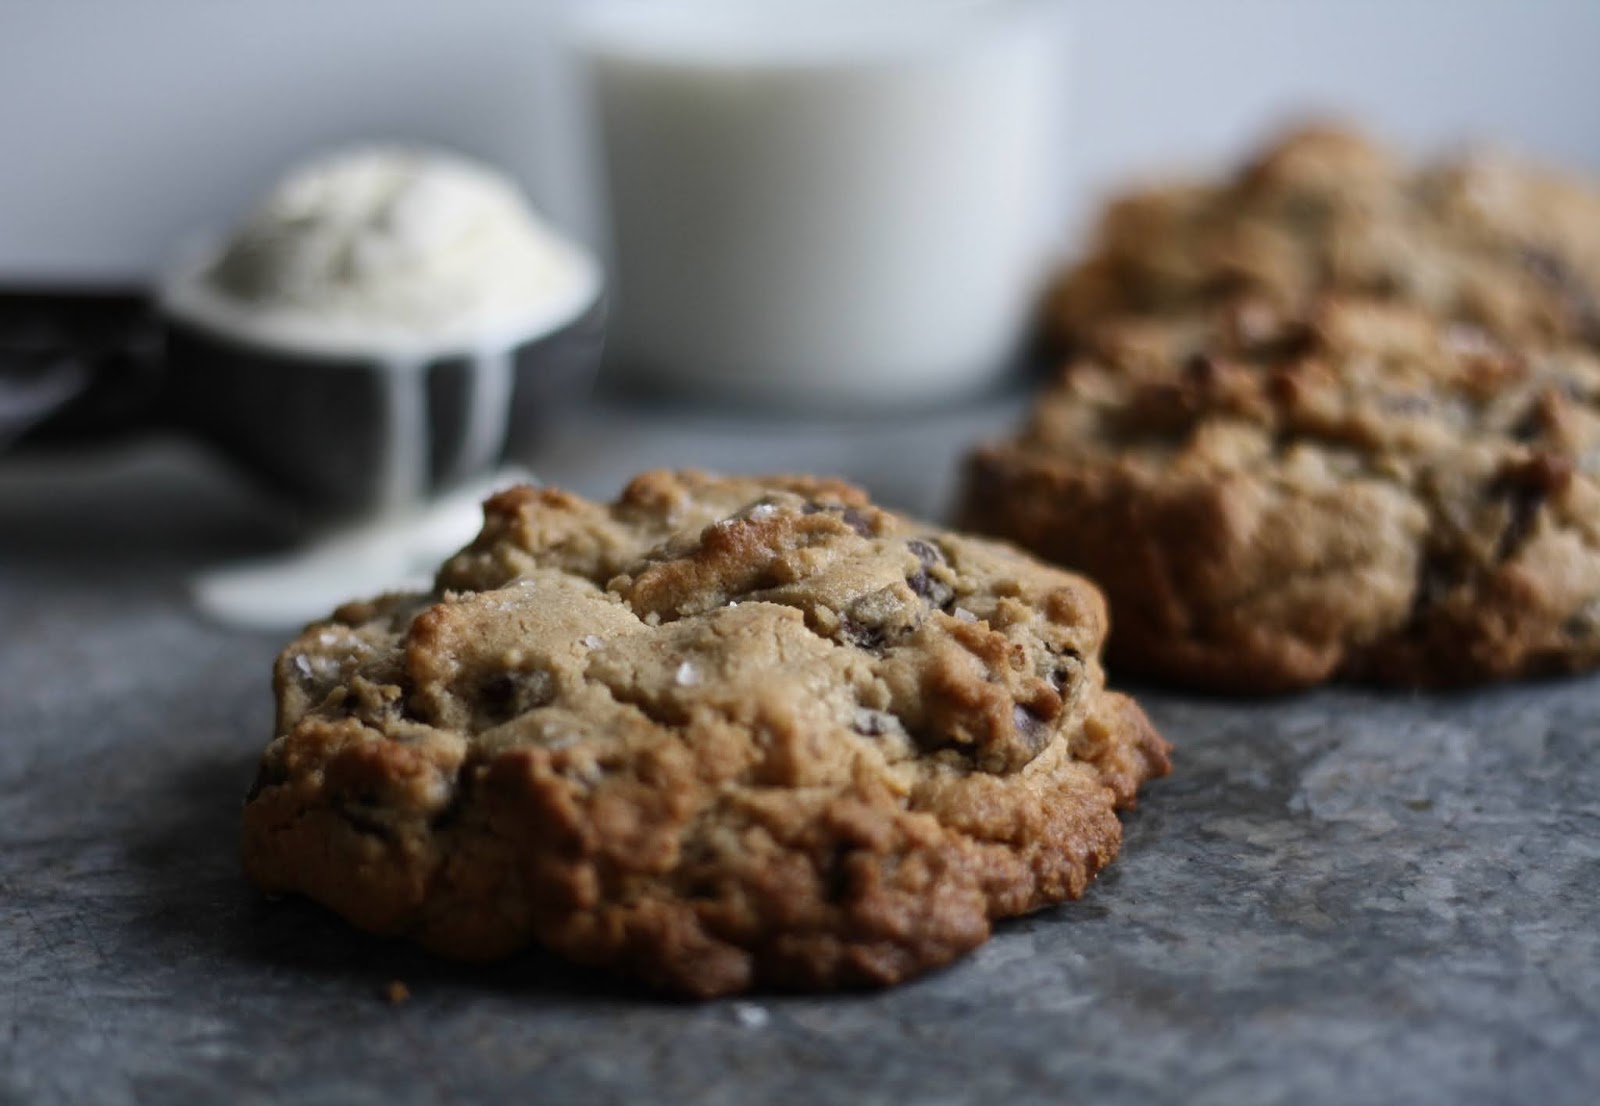
This recipe makes eight GINORMOUS cookies. Each ball of dough weighs a little more than 6 ounces (172-176 grams). If you don't have a scale, evenly divide the dough into eight large balls.

When baking a batch of these cookies, you will need two baking pans. One for the cookies to bake on and one turned upside down underneath the pan holding the cookies you are baking. Turning one of the baking pans upside down helps to prevent the bottom of the cookies from getting too dark as they bake at a relatively high oven temperature (375 degrees F) for a relatively long time (24-26 minutes). And due to the size of these cookies, bake the eight (8) balls of dough in two batches.

Cookies and ice cream or cookies and milk? Which kind of chocolate chip cookie eater are you? And, yes, you can be both. You don't have to choose which one to go with these crispy on the outside, slightly doughy on the inside monstrously scrumptious, oh so satisfying cookies. Just when you think you didn't know or even believed your life needed another chocolate chip cookie recipe, one comes along to tempt you. To prove you should say never say never. If you have gotten this far in the blog post, the universe has now also sent a 'you need these Levain Style Chocolate Chip Cookies in your life" message to you. 

Recipe
Levain Style Chocolate Chip Cookies  (inspired by the Copycat Levain Bakery Cookies from Delish)
Makes 8 ginormous cookies

Ingredients
2 cups (260 g) all-purpose flour
1 cup (113 g) cake flour
2 teaspoons baking powder
1/2 teaspoon baking soda
1/2 teaspoon kosher salt
1 cup (8 oz/226 g) unsalted butter, chilled and cubed (recommend a European-style butter)
2/3 cup (134 g) light brown sugar (or combination of light and brown sugar) - See Notes
2/3 cup (134 g) granulated sugar
2 teaspoons vanilla
2 cups (340 g) dark chocolate, chocolate chips - See Notes
1 cup (4 oz/112g) walnut halves, toasted, very coarsely chopped
2 large eggs, lightly beaten
Flaky sea salt for finishing (optional, but really good)

Directions
1. Combine the all-purpose flour, cake flour, baking powder, baking soda and kosher salt in a medium sized bowl. Whisk to combine. Set aside.
2. Using a standing mixer fitted with a paddle attachment, beat cold butter on low speed until the butter cubes lose their shape (about 30-45 seconds).
3. Beat in the granulated sugar (about 30 seconds)
4. Beat in the brown sugar and vanilla (about 30 seconds). Mixture will be thick and creamy.
5. Mix in the chocolate chips and walnuts to distribute evenly in the batter (about 30 seconds).
6. On low speed mix in the dry ingredients in three additions. Do not over beat, but there should be no streaks of flour showing.
7. Add in the lightly beaten eggs in two additions. Beat until mixture forms a cohesive dough.
8. Divide the dough into 8 balls. Balls of dough will weigh slightly more than 6 ounces each (or 172-176 g).
9. Place the balls of dough on a baking sheet, lightly cover with plastic wrap and chill in the refrigerator for 2-3 hours.
10. Preheat oven to 375 degrees (F). Get out two baking sheet pans Line only one baking pan with parchment paper. 
11. Place 4 balls of the cookie on the parchment paper lined baking sheet. Lightly sprinkle with flaky sea salt. Place this baking sheet on top of an upside down baking sheet so the bottoms of each baking pan are touching. (Yes, you are using two baking sheets.)
12. Bake cookies for 22-24 minutes or until the edges and spots on top are lightly golden. Do not over bake the cookies. Let cookies rest on the cookie sheet for at least 5 minutes. 
13. Remove from baking sheet and place on a cooling rack. Let cool slightly or let come to room temperature before serving. 
14. Store any left over cookies in a tightly sealed container or wrap in a cellophane bag.

Notes: (1) I used a combination of light and dark brown sugars, about a 2/3 to 1/3 ratio. (2) I used Nestle's 53% Cacao chocolate chips because of their larger size. Next time I make them I would increase the amount of chocolate chips to at least 2 1/4 cups (383 g). (3) To toast walnuts, preheat the oven to 350 degrees (F). Place walnut halves on a baking sheet and bake for approximately 10 minutes. (4) There were multiple changes made to the inspiration recipe: cake flour was decreased from 1 1/4 cups to 1 cup, kosher salt was increased from 1/4 teaspoon to 1/2 teaspoon, 2 teaspoons of vanilla were added, and the cookies were topped with flaky sea salt.

Monday, June 29, 2020

Peach Buttermilk Ice Cream w/ Raspberry Swirl


It's almost hard to believe we are within days of the halfway point in the year. At my age I really don't like time to move too quickly. However, there are more than a handful of us secretly wishing 2020 was done and over with already. Whatever the next version of normal is going to look like, I am choosing to believe it will be an even better version of the one we had been living in. Yes, better. With all of the time we have been given to reflect back on what was, surely we have all given thought as to what we would like life to be going forward. Not just with the state of the world (who doesn't wish for social justice, the end of the pandemic, medical breakthroughs), but in our own lives too. In her recent Sunday Paper, Maria Shriver talked about her desire to spend more time developing the humble rather than the strong, arrogant side of herself. Instead of investing time in constantly doing to feel validated or to fill the voids in our lives, she believes time spent learning and awakening (our minds) will create the momentum of humility necessary to lead us all forward individually and collectively. Her words resonated with me. The unexpected pause we have all experienced over the last several months may actually turn out not be a waste. Especially if we each use the time going forward to become the best, most awakened, most humble versions of ourselves. Just imagine the possibilities!

It was a bit tongue and cheek when I said there are some of us (yes, I would be among them) wishing 2020 was over. There are still many things to look forward to. Peach season being just one of them. For those of you who love peaches as much as I do, the long awaited arrival of fresh, ripe peaches at the Farmer's Markets and grocery stores is a most welcome sight. Having discovered the deliciousness of grilled peaches and ice cream, salads made with peaches, tomatoes, and burrata cheese, peach cobblers, peach galettes, and even a no-churn peach ice cream, my excitement for the arrival of peach season is akin to a six year old anticipating the arrival of Christmas. Thankfully peach season lasts longer than a day!


After having recently made the Blueberry Mascarpone Ice Cream, I experienced a slight boost to my ice cream making confidence level. For the record, this confidence level hovers somewhere between a four and a five on a scale of one to ten. Yet, this has not deterred me from trying new ice cream recipes. Because each time I make a new ice cream, I learn something new. While there are still gaps in my ice cream making knowledge base, peach season gives me yet another reason to keep filling them. 


Turns out this creamy, luscious Peach Buttermilk Ice Cream w/ Raspberry Swirl is one peach lovers will not only swoon over, but one all of us self-proclaimed ice cream connoisseurs will fall deeply, madly in love with. As someone who considers themselves a peach ice cream fussytarian, I am always on the lookout for the elusive, perfect peach ice cream. Can you guess what I am about to say next? Yes, this Peach Buttermilk Ice Cream w/ Raspberry Swirl is just about perfect. At least it is for me.

The ingredients used and ratios of milks to sugar in this ice cream recipe is different than the ones used in the Blueberry Mascarpone Ice Cream. I thought about switching out the buttermilk for mascarpone cheese, but wanted to make an ice cream with another flavor base profile. Additionally, this recipe calls for more sugar. At first I thought about scaling it back a bit, but then I wouldn't have discovered how sugar affects the texture and consistency of ice cream. From the article "How Does Sugar Affect the Freezing of Ice Cream" written by the Kitchn, I learned two things: (1) the more sugar used in the custard base, the longer the freezing time and (2) the more sugar the smoother, the creamier the ice cream. While I decided not to alter the amount of sugar in the recipe (1 1/2 cups/300g), I did add an additional egg yolk as well as some Kosher salt to further amplify the flavor. 


For someone is a self-proclaimed peach lover, why would I even consider adding a raspberry sauce to the peach ice cream? The simple answer is I love the combination of peach and raspberry. And I really wanted to see how raspberry sauce swirled in the peach buttermilk ice cream would taste. Would I always make the peach ice cream with the raspberry swirl? Not always. But almost always. If you are a peach ice cream purist, just leave the raspberry swirl out. 


Between chilling the custard base and freezing the ice cream, plan on allowing at least a day and half before being able to scoop and serve it. So let me share my lessons learned along the way here. Here's the first one: Rather than just allowing the custard to chill for at least 6 hours, give it at least 8 hours but preferably overnight. Not only will the flavors meld together better, your custard will be very chilled when it goes into the ice cream machine. And here's the second, maybe most important one: Let your well churned ice cream chill overnight in the freezer. Because of the amount of sugar in this ice cream, your well chilled ice cream will still have a great scooping consistency. This is a rich, creamy ice cream. And depending on the temperature outside, it might best be served in a waffle cone cup or a dish. This is definitely one of those 'two scoops' please ice cream!


Peach season doesn't last very long. In other words, if you love peaches make sure you get your fill of them in the months ahead. And if you love peach ice cream, I would suggest you make this Peach Buttermilk Ice Cream w/ Raspberry Swirl sooner rather than later. Because once you make and taste this 'rivals a high-priced, small-batch' ice cream, you will want to put it on regular repeat. Besides, I just don't want you to look back on the peach season and wish you had made this ice cream more often. A year is a long time to wait.

Recipe
Peach Buttermilk Ice Cream w/ Raspberry Swirl

Ingredients
Raspberry Sauce
2 cups (250 g) fresh raspberries
1/2 cup (100 g) granulated sugar
1 teaspoon freshly squeezed lemon juice
1/8 teaspoon Kosher salt

Peach Buttermilk Ice Cream
3 very ripe yellow peaches (1 1/4 pounds), peeled, pitted and coarsely chopped (See notes)
2 Tablespoons freshly squeezed lemon juice
1/2 cup peach preserves (recommend Bonne Maman Peach Preserves)
2 cups heavy whipping cream (do not use ultra-pasteurized)
1 cup buttermilk
1 1/2 cups (300 g) granulated sugar
3 large egg yolks, lightly beaten
2 teaspoons vanilla
1/4 teaspoon Kosher salt

Directions
Raspberry Sauce
1. In a heavy bottomed saucepan, add in the raspberries, granulated sugar, lemon juice and pinch of Kosher salt.
2. Stirring regularly, cook until the mixture reaches a slightly thicken consistency (about 7-8 minutes).
3. Remove from heat and pour the raspberry sauce into a small bowl. Let cool slightly before putting in the refrigerator to chill. Note: Raspberry Sauce should be completely chilled before layering onto the ice cream. Note: You will only use about 2/3 of the raspberry sauce for this ice cream. Save the remainder for another use.

Peach Buttermilk Ice Cream
1. Puree the peaches and lemon juice in a food processor until smooth but with some small pieces still visible. Remove 1 1/2 cups of the puree and transfer to a bowl. Note: You will more than likely have some leftover puree. Save it for another use.
2. Stir the peach preserves and Kosher salt into the peach puree mixture.
3. Cover and let chill in the refrigerator. 
4. In a heavy bottomed saucepan, heat the cream and buttermilk until simmering.
5. Add the sugar and whisk until the sugar is dissolved.
6. Add about 1/4 cup of the milk/sugar mixture to the beaten egg yolks to temper them. Then stir the egg yolk mixture back into the saucepan.
7. Continue cooking the mixture, stirring regularly, until it has thickened and coats the back of a spoon (approximately 6-8 minutes).
8. Remove from the heat and stir in the vanilla.
9. Let the mixture cool slightly. Stir in the peach puree. Cover and chill in the refrigerator for at least 6-8 hours or preferably overnight.
10. Line an 8" x 4" or 8" x 5" metal baking pan with plastic wrap. Set aside. (Or alternately use an insulated ice cream container.)
11. Pour the chilled mixture into the ice cream maker. Process until the ice cream is thick, has a scoopable consistency, and well chilled (approximately 20-30 minutes or according to most manufacturer directions). Notes: Depending on the size of your ice cream machine, you may need to process in two batches. Think achieving the consistency of a thick, frozen yogurt when you are churning the ice cream.
12. Spread one-third of the ice cream into the prepared pan.
13. Top one-third of the raspberry sauce on top of the ice cream base layer. Use a butter knife to gently swirl the raspberry sauce into the ice cream.
14. Repeat for a total of three layers.
15. Wrap the pan with plastic wrap (wrap well to keep air from getting to the ice cream) and place pan in the freezer overnight. Note: This is a very creamy ice cream. If not serving immediately after churning, give it adequate freezing time.
16. Remove ice cream from the refrigerator and scoop into bowls or onto ice cream waffle bowls/cones. Remember: This is a very creamy ice cream.

Notes: (1) The recipe for the Peach-Buttermilk Ice Cream was inspired from a recipe in "Jubilee: Recipes from Two Centuries of African American Cooking" by Toni Tipton-Martin. (2) The Peach-Buttermilk Ice Cream was sinfully delicious all on its' own. So if you aren't a fan of the flavors of peach and raspberry combined, just make the ice cream. (3) To easily peel the peaches, bring a pot of water to a boil over high heat and simultaneously fill.a large bowl with ice cold water/ice cubes. Blanch the peaches for 20 seconds. Remove and immediately place them in the bowl of ice water. Let sit in ice water for 20 seconds. Use a peeler to help slip off the skin.

Tuesday, June 23, 2020

Banana Nut Streusel Muffins


A long overdue trip to Rhode Island had been scheduled for this past March. But then the world suddenly changed and that much anticipated trip was cancelled. While travel has yet to return to the old normal, I very much need a change in scenery. With a significant birthday coming up in September I had a difficult choice to make. Head to sea on the East Coast or go back to the mountains in Colorado. Risk traveling during both a pandemic and hurricane season. Or take my chances traveling during a pandemic and only have to worry about crossing paths with a wild animal while out hiking in the mountains. After going back and forth between these two options, I decided if my favorite cabin overlooking the Front Range at Chautauqua was available, the mountains would be my birthday trip destination. I have between now and then to get over my fear of larger than life wildlife. Keeping my fingers crossed that nothing will cause this 'happy birthday to me' trip to the mountains be scraped.


Staying in a cabin has many benefits. Maybe none as important as being able to stock it with groceries and wine for the week. Making it possible for me not to have to worry about going out for meals. I am not yet ready to eat out regularly or even irregularly at restaurants. Regardless if that changes over the course of the next several months, I look forward to being able to starting the day making a good breakfast, putting together hiking snacks, and enjoying a leisurely, solo dinner in front of a fireplace. Even though my upcoming trip is three months away, I am already starting to put together some tentative lists of the food I want to bring from home. Definitely near the top of the list will be these incredibly scrumptious, packed with flavor Banana Nut Streusel Muffins. As they would not only be perfect for breakfast but great to take on a hike. Not only will they travel well, they have a freshness life of at least a week (if I keep them refrigerated). 


I have always had a weakness for those bakery style muffins. You know the ones with high, perfectly rounded tops. Yet up until I made these Banana Nut Streusel Muffins I had hit or miss success getting mine to have that irresistible muffin look. In doing some banana muffin research I learned a muffin making life changing lesson. A blast of intense heat from baking muffins at a high temperature (425 degrees F) temperature for only the first five minutes activates the leavening. Thereby causing the muffins to puff up sky high. All my baking life I thought it had more to do with the amounts of leavening ingredients used. Imagine how happy I was to learn all it took was a brief period of high heat to create the muffins of my unfulfilled dreams. Upon discovering this baking technique, it felt like I had either unearthed some well-hidden secret or was allowed in to an exclusive muffin making club. When these Banana Nut Streusel Muffins came out of the oven I was beside myself. Almost to the point of hyperventilating from joy. They were the most beautiful muffins to ever come out of my oven.


There are three components to these Banana Nut Streusel Muffins: the muffin batter, the streusel, and the glaze. Together they create a muffin eating experience on par with the euphoria of a Rocky Mountain high. From the deeply flavorful, perfectly textured muffin, to the brown sugar, spiced, crunchy streusel topping, to the just right amount of sweet glaze, these Banana Nut Streusel Muffins are the be all and end all of high topped muffins. 


The recipe makes a dozen muffins. Fill your cupcake papers almost to the top leaving only a little bit of room for the streusel topping. Note: You may have a couple of tablespoons left of the streusel topping and enough batter for maybe two miniature muffins.


After baking the muffins in a preheated 425 degree (F) oven for five minutes, reduce the oven the temperature down to 350 degrees (F) and continue baking for 16-20 minutes (or until a toothpick inserted into the muffin comes out clean or only with a few moist crumbs). Place the muffin tin on a cooling rack and let rest for at least 5 minutes. Remove the muffins from pan, place on a cooling rack, and let cool for at least additional 10 minutes before drizzling on the glaze. Note: If you add the glaze while the muffins are still hot, it will melt into the muffin.


These Banana Nut Streusel Muffins wouldn't just be a serious contender in a beauty contest, they are what I would call throw down worthy!


If I have one baking regret from the last four months, it's that I wish I had been making these Banana Nut Streusel Muffins instead of using the perfectly ripened bananas for all of those loaves of Banana Bread. So in the next new normal, ripe bananas will now be used for Banana Nut Streusel Muffins.


If you too have longed to make those beautiful, delicious high topped banana muffins, well, now you can. Bake up a batch, eat some, share some. Wait a week or two, then bake up another batch. If anything should go on regular repeat in the months ahead, it's going to be these gorgeous, mouthwatering Banana Nut Streusel Muffins.

Recipe
Banana Nut Streusel Muffins
Makes 12 regular sized muffins

Ingredients
Streusel Topping
1/2 cup (100 g) light brown sugar
1/2 cup (65 g) all-purpose flour
1/2 teaspoon cinnamon
1/8 teaspoon Kosher salt
3 Tablespoons unsalted butter, melted
2 Tablespoons chopped walnuts (from the 1/2 cup of walnut halves used in the muffin batter)

Banana Nut Muffins
1/2 cup (58 g) walnut halves, toasted and divided
2 1/2 cups (325 g) all-purpose flour
1 teaspoon baking soda
1 teaspoon baking powder
1/2 teaspoon Kosher salt
1 cup (200 g) granulated sugar
2 large eggs, room temperature
3 Tablespoons sour cream
1/4 cup whole milk
1/2 cup (113 g) unsalted butter, melted and cooled slightly
1 teaspoon good quality vanilla
3 large, very ripe bananas (12 ounces/338 g) peeled and mashed

Glaze
1/2 cup (60 g) plus 1 Tablespoon confectionary sugar
1/8 teaspoon kosher salt
1/2 teaspoon good quality vanilla
2 Tablespoons whole milk

Directions
Streusel Topping
1. In a small bowl, combine the light brown sugar, flour, cinnamon, Kosher salt, unsalted butter, and walnuts. Mix until well blended. Set aside.

Glaze
1. In a small bowl, whisk the confectionary sugar, Kosher salt, vanilla, and milk until smooth and creamy. Note: If the glaze is too thin add a little more confectionary sugar. If the mixture is too thick, add a little more milk.

Banana Nut Muffins
1. Preheat oven to 425 degrees (F). Line a muffin tin with cupcake papers and set aside.
2. In a large bowl, whisk together the flour, baking soda, baking powder, Kosher salt, and sugar. 
3. In a medium sized bowl, combine the mashed ripe bananas, sour cream, whole milk, vanilla, and melted butter. Whisk until well blended.
4. Add the wet ingredients to the dry ingredients. Using a spatula, fold until well combined.
5. Divide the batter equally between the 12 muffin cups. Generously top with the streusel topping.
6. Bake muffins for 5 minutes at 425 degrees (F). Immediately reduce the temperature to 350 degrees (F) and continue to bake for 16 to 20 minutes or until a toothpick inserted into the muffin comes out clean.
7. Transfer muffin tin to a cooling rack. Let rest for 5 minutes.
8. Remove muffins from the tin and place on a cooling rack. Allow to cool for at least another 10 minutes.
9. Drizzle the muffins with the glaze.
10. Serve and enjoy with a cup of hot coffee or tea. 

Notes: (1) Baked muffins can be frozen. Do not glaze the muffins before placing in the freezer. Can add the glaze when you thaw and serve them. (2) Muffins will be good for several days if left at room temperature, lightly covered.

Sunday, June 21, 2020

Baked Macaroni and Cheese


The first Macaroni and Cheese I ever tasted came from a box. It would be a very long time before I ever tasted my first homemade Macaroni and Cheese. Although I don't remember if it was one made on the stovetop or baked. It would also be quite some time before I came to view Mac and Cheese as both a main dish and a beloved side dish. And only recently did I truly gain a deep appreciation of just how deeply embedded and how culturally important Macaroni and Cheese is in the Black culture. In the words of Brittany Hutson (a freelance writer from Detroit), "it is the center of life's milestones, trials, and tribulations....it's about tradition." Macaroni and Cheese is a dish served at all life's big events, a fixture at all holiday meals and special occasions. Recipes for Macaroni and Cheese are often passed down from generation to generation to further preserve and honor family traditions. While there is a great deal of regional variation in the these recipes, particularly the cheeses used and in it's preparation, a Southern Macaroni and Cheese is almost always baked. However, no matter where you grew up or how your Macaroni and Cheese was made, it is almost always synonymous with comfort food.


There are currently four recipes, three baked and one stovetop, for Macaroni and Cheese on the blog. The Gouda Mac and Cheese with Caramelized Shallots is made primarily with an aged Gouda Cheese but topped with some sharp White Cheddar Cheese. The Mac and Cheese East Coast Style is made with Fontina Cheese and Lobster. Macaroni and Cheese, Version 2, one inspired by a James Beard recipe, is primarily made with sharp white cheddar cheese but topped with gruyere cheese. And then there is the Stovetop Mac and Cheese with Caramelized Onions, the homemade version intended to invoke the memories of the boxed ones some of us grew up with. However, none of them were inspired by or based on Southern Macaroni and Cheese recipes. While it may have taken me awhile to get here, but this Baked Macaroni and Cheese finally pays homage to the cherished, celebratory Southern side dish.

After just one bite I knew this Baked Macaroni and Cheese would be the one I would tell everyone to make. It would be the only one served at gatherings from this point forward. 

A few weeks back one of my running friends asked if I had a simple recipe for Macaroni and Cheese. I wish now I had this one to give her. Because it gives simplicity a really, really good name.

And it's one reminding us that elbow macaroni is the only pasta to use. While you might be tempted to use cavatappi, orrecchietti, or even penne pasta, don't give in to that temptation. Cool the elbow macaroni to somewhere between the al dente and firm stage. Cooking time should be no more than seven minutes. 

Some will say it's not really a Southern Macaroni and Cheese recipe unless it's made with at least four cheeses. If you consider cream cheese a cheese, then technically this Baked Macaroni and Cheese is made with five cheeses. But only if you add the optional, but really worth it, freshly grated Parmigiano-Reggiano cheese to the top. Otherwise it's made with four cheeses. If you don't consider cream cheese a cheese or add the Parmigiano-Reggiano, then this is a three cheese mac and cheese. In addition to using eight ounces of Sharp White Cheddar Cheese, it uses eight ounces of Colby Jack Cheese. A cheese technically qualifying as two cheeses in one. Right?


All of the other Mac and Cheese recipes shared on the blog were made with whole milk, heavy whipping cream or a combination of both. This one uses evaporated milk. In addition to Kosher salt and pepper to ramp up the flavor, onion powder, garlic powder and paprika (regular or smoked) are added in. Making this one of the most flavorful macaroni and cheeses I have ever tasted. 


Definitely worthy of bringing to or serving at a celebratory meal!


Many of us are stay at home, Covid19, maintain social distance, no hugging weary. When you add all of the unrest and injustices occurring on top of this, never have cravings for comfort food been stronger. It explains it part why our consumption of homemade bread, chocolate chip cookies, and banana bread is at an all-time high.

While many of us are still trying to keep our social gatherings small, our desire to remain physically connected to our family and friends is unyielding. So there may be no better way to bring some much needed joy to our lives than by making this Baked Macaroni and Cheese.  I promise, in just one bite, you will feel as if you have temporarily gotten off the corona-coaster. And quite possibly discovered your most favorite version of a Baked Macaroni and Cheese in the process. A simple down-home version of a recipe with roots from the South.

Recipe
Baked Macaroni and Cheese (recipe inspired from multiple sources)
Serves 8-10

Ingredients
1 pound (454 g) elbow macaroni, cooked to somewhere between al dente and firm (about 7 minutes), and drained
8 ounces (226 g) Sharp White Cheddar Cheese, coarsely grated
8 ounces (226 g) Colby Jack Cheese, coarsely grated
8 ounces (226 g) cream cheese, cut into 1/4 inch cubes
2/3 cup sour cream
1/2 cup (1 stick, 4 ounces) unsalted butter, melted and cooled slightly
3 large eggs, lightly blended
12 ounce can of evaporated milk
1/2 teaspoon kosher salt
1/2 teaspoon white pepper
1 teaspoon garlic powder
1 teaspoon onion powder
1/4 teaspoon dry mustard (such as Coleman's)
1/4 teaspoon paprika or smoked paprika plus more for sprinkling over the top before baking
Optional, but a worthy finishing touch: Freshly grated Parmigiano-Reggiano Cheese 

Directions
1. Preheat oven to 350 degrees (F). Generously butter a 9" x 12" baking dish. Set aside.
2. In a large bowl, add in the grated cheddar and grated Colby Jack cheeses. Stir until well blended. Remove one cup of the cheese mixture and set aside.
3. Add in the melted butter, evaporated milk, sour cream, cream cheese and eggs to the remaining cheeses in the large bowl. Stir to combine.
4. Add in the kosher salt, white pepper, garlic powder, onion powder, dry mustard and paprika. Stir to blend.
5. Stir in the drained, cooked macaroni. Stir to combine.
6. Pour the mixture into the prepared baking dish. Top with the reserved one cup of grated cheeses and generously sprinkle with paprika. Now would be the time to sprinkle on freshly grated Parmigiano-Reggiano cheese if you are using.
7. Place the baking dish on a baking tray and place in the oven. Bake for 35 minutes (but no more than 40 minutes) or until the top is browned and cheese is bubbly on the sides of the pan. Do not over bake!
8. Let the Baked Macaroni and Cheese sit for at least 10 minutes before serving. 
9. Store any leftovers covered in the refrigerator for up to four days. They reheat well in the microwave. 

Monday, June 15, 2020

Lemon Thyme Ricotta and Roasted Brussels Sprouts on Grilled Naan


Every so often my friends tell me about a recipe or something they ate and suggest maybe I want to 'make it even better'. For so many reasons I love when this happens. However, the conundrum for me is that I haven't either made their recipe or tasted the dish they want slightly reinvented. Which means unless they taste it, I really don't know if 'my' version is indeed a better one. And while I usually like to work 'solo' in the kitchen, especially when making and photographing a new recipe, I decided to ask one of my friends if she wanted to come over to witness chaos in action. Because it was she who was the one telling me about a flatbread recipe topped with a ricotta flavored lemon and Italian herbs, sautéed Brussels Sprouts, grated Italian cheeses, and a honey infused with chilies (aka Mike's Hot Honey). By asking her to join me in the kitchen, not only could I bounce my recipe revision ideas with her, I could get her very honest opinion on whether or not my version was as good as (or better) than the one she had made. As it turned out, what I initially envisioned as some of the changes to the recipe she gave me ended up changing for the better. Proof that two heads are sometimes better than one.


With some freshly made homemade ricotta in the refrigerator, I made a Whipped Lemon Thyme Ricotta instead of a ricotta mixed with lemon and Italian Herbs. Why did I make that change? Well, I happen to love the flavor combination of lemon and thyme. And in doing some reading about which herbs pair well with Brussels Sprouts, thyme was one of those regularly mentioned. But there was a secondary reason for this change. I wanted to use fresh rather than dried herbs. Not only because I believe fresh herbs are a better flavor enhancer, but I didn't have a jar of anything labeled Italian Herbs in my cabinet. 

While it would have been easier to sauté some finely sliced Brussels Sprouts, I thought Roasted Brussels Sprouts might be more flavorful. There is just something irresistible about the flavor of roasted Brussels Sprouts.

Because I couldn't find a good flatbread at the grocery store, I bought some Naan. Actually I bought a package of both smaller ones and larger ones because I wasn't certain which one to use. I ended up using the larger ones. However, if I were going to make 'individual, non-shareable' servings I would definitely use the smaller ones. And rather than initially roast the Naan in the oven (like the recommendation of roasting the flatbread in the oven), I decided it should be lightly brushed with olive oil and grilled.

And those were all of the preliminary recipe changes I made and kept. However, once my friend arrived, almost all of what I envisioned for assembling the Lemon Thyme Ricotta and Roasted Brussels Sprouts on Grilled Naan shifted. For the better, I might add. Yes, definitely for the better.


I wasn't going to put the assembled Lemon Thyme Ricotta and Roasted Brussels Sprouts on Grilled Naan back in the oven before serving. I knew I wasn't going to use a package of pre-shredded Italian Blend cheeses, but I wasn't going to top it with both freshly shredded Fontina and shaved Parmigiano-Reggiano cheeses (just the Parmigiano-Reggiano). All I can say is thank goodness I had someone around to get me to change my Type A personality mind!


If you haven't yet tasted Mike's Hot Honey, a honey infused with chilies, all I can say is you aren't living your best life. While all of the layers of flavor in this Lemon Ricotta and Roasted Brussels Sprouts on Grilled Naan are seriously beyond amazing, the finishing touch of Mike's Hot Honey sends it over the top. 

Roasting Brussels Sprouts at a high temperature (400 degrees F) amplifies their flavor significantly. From the charred, crispy leaves to the sweet, nutty, slightly caramelized flavor, roasted Brussels Sprouts are simply divine. Tossed in some olive oil, they roast for 30-40 minutes. Because the Brussels Sprouts are briefly reheated in the oven when the Naan is assembled, you can roast them several hours ahead and leave the out at room temperature.


What I learned in the process of making the Lemon Thyme Ricotta and Roasted Brussels Sprouts on Grilled Naan was to let the grilled Naan cool before slathering on a thick layer of the Whipped Lemon Thyme Ricotta. Not only does the Naan crisp up a bit when it's cooled, the ricotta doesn't melt into before it goes into the oven. And you definitely want to taste to the ricotta when you bite into this hearty appetizer.


After the layer of Whipped Lemon Thyme Ricotta on the cooled piece of Naan, goes a layer of the roasted Brussels Sprouts. Followed by a layer of shredded Fontina and shaved Parmigiano-Reggiano  cheeses. Then it all goes back onto a baking sheet in a preheated 425 degree (F) oven for 5-6 minutes or until the cheese has melted. After removing the Naan from the oven, top with a little more shaved Parmigiano-Reggiano, a sprinkle of sea salt, some thyme leaves and julienned basil leaves, and a generous drizzle of Mike's Hot Honey. And then get ready to have one of the best bites of your life!


After just one bite, I knew this recipe was a keeper! From the earthiness of the roasted Brussels Sprouts, to the creaminess of both the whipped lemon thyme ricotta and melted Fontina cheese, to the saltiness of the Parmigiano-Reggiano cheese, to the flavor of fresh herbs, to the spiciness of Mike's Hot Honey, this is one mouthwatering, scrumptious, satisfying appetizer. Destined to be the hit of your next small, safe, socially distanced gathering. Not only is it the perfect summer appetizer, it's one you will be making well into the fall while Brussels Sprouts are still in season.


We should all be so lucky to have friends looking out for our best interests and embracing all of our qwirkiness. Especially now more than ever. Thanks to my friend Sheri, I am able to share with you the recipe for this incredibly delicious Lemon Thyme Ricotta and Roasted Brussels Sprouts on Grilled Naan. One made infinitely better because of her. For so many reasons, thank goodness our paths crossed five years ago.

Recipe
Lemon Ricotta and Roasted Brussels Sprouts on Grilled Naan
Makes 2 large appetizers serving 4-8 or 4 smaller appetizers serving 4

Ingredients
Whipped Lemon Thyme Ricotta
1 cup homemade (or store bought) whole milk ricotta
2 teaspoons olive oil
1 teaspoon of fresh thyme leaves
Zest of one small lemon
1-2 teaspoons of freshly squeezed lemon juice

Roasted Brussels Sprouts
8 ounces (227 g) of small to medium sized Brussels Sprouts, ends trimmed, and halved if small or quartered if medium sized
2-3 tablespoons of olive oil
Kosher salt

Lemon Thyme Ricotta and Roasted Brussels Sprouts on Grilled Naan
2 large (about 10 inch each) or 4 small (about 5 inches each) pieces of Naan, lightly brushed with olive oil and grilled (about 2 minutes per side)
1 cup Whipped Lemon Thyme Ricotta, divided
Roasted Brussels Sprouts, divided
2 to 3 ounces of Fontina cheese, shredded and divided
1-2 ounces Parmigiano-Reggiano cheese, shaved and divided
1-2 ounces of Mike's Hot Honey, divided
Freshly chopped thyme and julienned basil
Flaky Sea Salt

Directions
Whipped Lemon Thyme Ricotta
1. Place all ingredients in the bowl of a small food processor. Process until smooth and creamy (about 2 minutes). Note: Begin with using one teaspoon of the freshly squeezed lemon juice. If you like your ricotta to have even more of a lemony flavor add in the additional teaspoon.

Roasted Brussels Sprouts
1. Preheat oven to 400 degrees (F).
2. Drizzle a generous tablespoon of olive oil on a rimmed baking sheet. Toss the quartered/halved Brussels Sprouts in a medium bowl with two Tablespoons of olive oil. Pour onto the baking sheet, placing cut sides down. Sprinkle with kosher salt.
3. Bake for 30-40 minutes or until the Brussels Sprouts are charred and crispy.
4. Remove from oven and let come to room temperature (or use immediately).

Lemon Thyme Ricotta and Roasted Brussels Sprouts on Grilled Naan
1. Preheat oven to 425 degrees (F).
2. Spread a layer Whipped Lemon Ricotta evenly over the grilled and cooled Naan.
3. Evenly divide the Roasted Brussels Sprouts and place on top of the ricotta layer.
4. Evenly divide the shredded Fontina and Parmigiano-Reggiano cheeses over the Roasted Brussels Sprouts layer.
5. Place in oven and bake for 5-6 minutes or until the cheeses have melted.
6. Remove from the oven and transfer to a serving platter or cutting board.
7. Top with additional shaved Parmigiano-Reggiano cheese, some freshly chopped thyme leaves and julienned basil, a sprinkle of flaky sea salt, and drizzle of Mike's Hot Honey. Cut into thick slices.
8. Serve immediately.

Notes: (1) Mike's Hot Honey is available in grocery stores, at Target, and on Amazon. (2) I used the Stonefire Authentic Flatbread Naan found at the grocery store. (3) You can make all of the elements of this appetizer several hours before assembling and putting into the oven.