Thursday, June 17, 2021

No Churn Raspberry Chocolate Chunk Ice Cream


Here in the Midwest the onset of summer means the long awaited return of berry season. Beautiful fresh, ripe strawberries, raspberries, blackberries, and blueberries start becoming readily available at the grocery stores and Farmer's Markets. From jams, to preserves, to pies, to muffins, to sauces, to galettes, to crisps, to ice cream, fresh berries sweeten the summer by amplifying the flavor of everything made with them. Especially homemade ice cream.


In spite of resurrecting my ice cream maker last year, I am still a big fan of no-churn ice creams. You can find recipes for Peach Ice Cream, Espresso No Churn Chocolate Ice Cream, No Churn Peanut Butter Ice Cream, and No Churn Strawberry Cheesecake Ice Cream on the blog. And I am predicting there will be a few more no churn ice cream options created (and possibly updated) and shared with you in the weeks ahead!


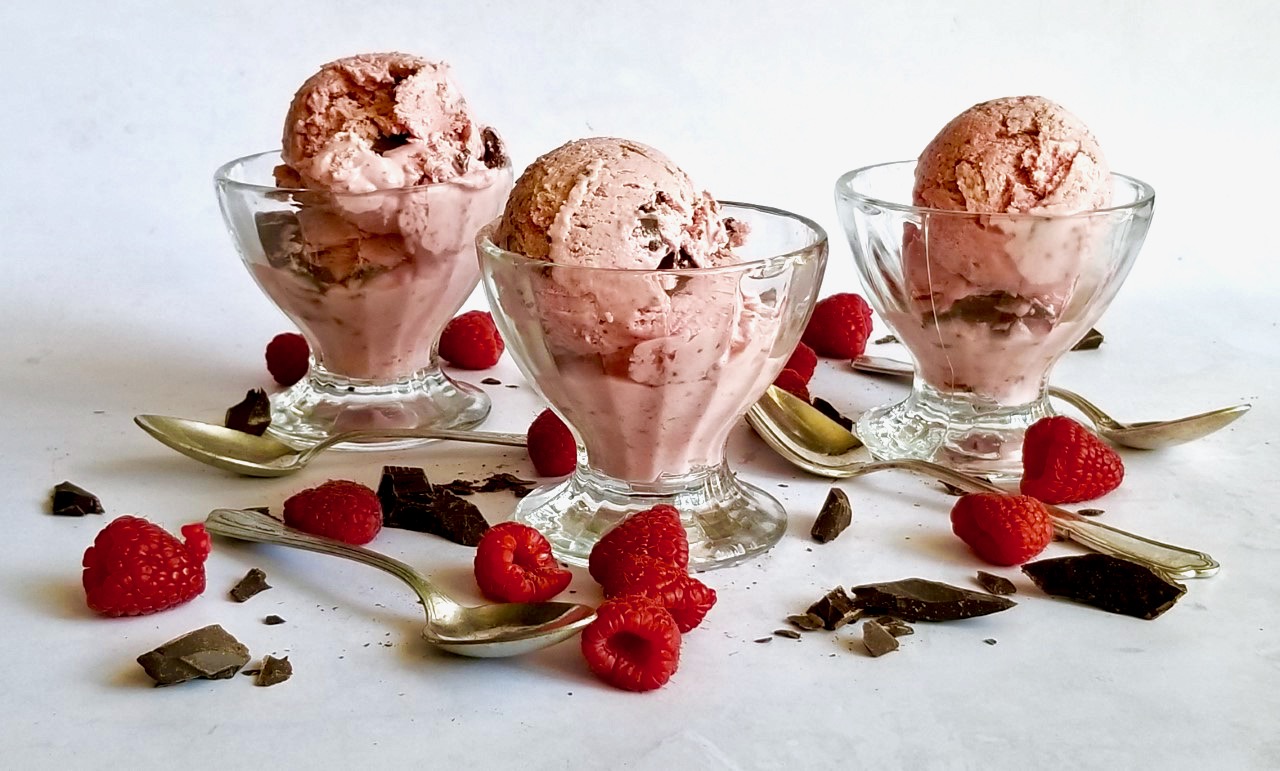
The combination of raspberries and (dark) chocolate is a match made in heaven. The flavors of slightly tart berries and rich chocolate paired together are sinfully ambrosial. Which makes this No Churn Raspberry Chocolate Chunk Ice Cream craveworthy delicious.


So how do you like eating your ice cream? In a waffle cone, in a cake cone, in a sugar cone, in a waffle bowl, in a dish, and/or maybe just right out of the container? Are you an ice cream purist or do you like to top it with a sauce or some of that Magic Shell scrumptiousness? 


Some raspberry ice cream recipes have you straining your cooked raspberry mixture and discarding all of the seeds. Not this one! Remember that 'more is almost always better' mantra? It's definitely applicable here. To deepen the raspberry flavor in the ice cream, the cooked raspberries are processed in a food processor until only a few of the seeds are detected. Using all of those raspberries makes for an insanely delicious raspberry ice cream!


Instead of using chocolate chips, coarsely chop up a semi-sweet or dark chocolate bar. Not only do the various sizes of the shards of chocolate more evenly distribute in the ice cream mixture, finding a big piece of chocolate in a bite of ice cream is akin to discovering a hidden treasure!


While the raspberry puree cools down in the refrigerator, make the ice cream 'base' in the bowl of a standing mixer fitted with a food processor. Cream cheese, sweetened condensed milk, Kosher salt, vanilla, and heavy whipping cream are whipped together until the texture is similar to luscious whipped cream. 

The raspberry puree followed by the chopped chocolate are folded into the ice cream base mixture until well blended before it all goes into the freezer to chill overnight. Aka the place where the magic happens!


If you don't have a freezer safe ice cream container, line a 9" loaf pan with plastic wrap before spooning in the ice cream mixture. Then tightly wrap the pan with plastic wrap (and some aluminum foil for good measure) and place in the freezer overnight.


No churn ice cream has a slightly denser texture than the air whipped ice cream made in an ice cream maker. Because of that, no churn ice cream needs to be removed from the freezer for about 10 minutes before it's scooped into the container of your choice! This No Churn Raspberry Chocolate Chunk Ice Cream has all of the creaminess, lusciousness, richness, and deliciousness of one of those high end, small batch, high end pints of ice cream you find at the grocery store! And on a hot summer's day is there anything better than cooling off with some ice cream? If you love ice cream, raspberries, and chocolate, you are going to be smitten with this No Churn Raspberry Chocolate Chunk Ice Cream! 

Recipe
No Churn Raspberry Chocolate Chunk Ice Cream

Ingredients
1 pound 5 ounces (600g) fresh raspberries (this is about 4 cups)
1/4 cup (50g) granulated sugar
1/4 teaspoon Kosher salt

14 ounces (396g) sweetened condensed milk
2 teaspoons vanilla
1/4 teaspoon Kosher salt
4 ounces (114g) cream cheese, room temperature
2 cups heavy whipping cream

5-6 ounces (140-168g) semi-sweet or dark chocolate (72% cocao), coarsely chopped

Directions
Raspberry Puree
1. In a medium sized heavy bottomed saucepan, bring the raspberries, salt, and sugar to a simmer over medium-high heat. Continue cooking the mixture for 5-7 minutes, pressing down the berries with a back of a spoon, until it has thickened (or lightly coats the back of a spoon).
2. Remove from the heat and let cool down slightly.
3. Process the mixture in a food processor until almost smooth (there will still be some berry seeds visible).
4. Transfer to a bowl and let cool in the refrigerator for 30 minutes.

Ice Cream
1. In the bowl of a standing mixer fitted with a whisk attachment, beat the cream cheese and sweetened condensed milk until smooth and creamy (about 2 minutes).
2. Add in the whipping cream and vanilla. Beat mixture until it has the consistency of a slightly stiffened whipped cream (about 4-5 minutes).
3. Fold in the raspberry puree with a spatula until almost no streaks remain.
4. Add in the chopped chocolate and fold until ice cream is completely blended.
5. Spoon the ice cream into your ice cream container or a 9" loaf pan lined with plastic wrap.
6. Seal the container or wrap the loaf pan well with plastic wrap (and a finish wrap of aluminum foil) and place in the freezer overnight.
7. Remove from the freezer about 10 minutes before you are ready to scoop into your favorite ice cream cone or into a dish. 
8. Optional: If serving the ice cream in a dish, pour some chocolate sauce or Magic Shell sauce over it.

Notes: (1) Use a good quality chocolate. I used a couple of bars of Trader Joe's Swiss Dark Chocolate but next time would probably use 2 1/2 bars. (2) No churn ice creams are best enjoyed within a week of being made.

Saturday, June 12, 2021

Marinated Goat Cheese


"There's no such things as a small act of kindness. Every act creates a ripple with no logical end." Scott Adams. I have been the fortunate recipient of a string of kindnesses going back to my recent trip to Colorado. From being 'rescued' from my lake mishap, to being protected from what turned out not to be a mountain lion, to being guided across a treacherous part of a trail, to not being abandoned when experiencing the exhaustive and delusional effects of heat stroke after a long 'hike' on an extremely hot/humid day, three of those kindnesses came from strangers and one came from a friend. Consciously or unconsciously, I genuinely believe we are all affected by the gift of an unexpected kindness. Not just in the moment, but long afterwards. Over the course of my lifetime I have been the beneficiary of some life changing, even some life altering unselfish kindnesses. The kind you never forget. In retrospect, I believe my thinking as well as my beliefs about kindness were and continue to be largely shaped by those kinds of events. I wish I could find that young couple from Houston, Texas who helped me out of the lake and the older couple originally from the UK now living in Estes Park who turned out to be my guardian angels on a hike to repay them with more than my words of gratefulness. If I had learned even more about them I probably could. Instead, others will have to be the recipients of their goodwill so I can continue to do my part in keeping the possibilities of a kinder world infinitely endless.


I don't know about you, but on a really hot, humid day, I would much rather graze on small plates or appetizers than have a regular meal. There is something so satisfying and fun about nibbling on small delicious bites. Like this Marinated Goat Cheese with Grilled Bread, for example. 


To be able to take a simple log of plain goat cheese and baguette and turn them into something exceptional is incredibly gratifying. This Marinated Goat Cheese happens to be much less inexpensive to make (and I would say even tastier) than anything you might be able to buy from the grocery store or your favorite cheesemonger.

A marinade of olive oil, bay leaves, flaky sea salt, Aleppo pepper, coarsely ground black pepper, and lemon zest creates one of the most luscious, impressive goat cheese appetizers. Perfect for schmearing over slices of a grilled baguette and pairing with a chilled glass of Prosecco, Chardonnay, or sparkling water.


Made in either a bowl or a jar, the Marinated Goat Cheese needs only to marinate at least 60-75 minutes at room temperature before it is ready to serve. Okay, how easy is that?

Ever since grilling slices of my Rustic No Knead Bread and serving with some honey whipped ricotta, I have become a huge fan of the flavor of grilled bread paired with cheese. Brushed or sprayed lightly with olive oil, it takes only minutes to transform the simple baguette into something you would find at a really good restaurant. We happen to have a gas grill, so grilling bread can always happen at a moment's notice. However, if you don't have a gas grill, toasting it in the oven or using a cast iron grill pan on the stovetop are the next best options. Any of these bread options are preferable to just serving the Marinated Goat Cheese with a sliced baguette.


As much as I love the flavor of goat cheese, I was beyond smitten with this Marinated Goat Cheese in the first bite. From the richness of the olive oil, to the tartness of the lemon zest, to the wow factor of the spices all infused together, make the craveworthiness of goat cheese exponentially enhanced. Quite possibly those not on the high end of the goat cheese aficionado spectrum will shift in that direction. And you know me, don't be so quick to point out it's goat cheese before they taste it. As I firmly believe preconceived notions about food affect one's ability to honestly taste it.


With hot, humid days in the foreseeable future forecasts, we may be grazing more than dining in the weeks and months ahead. Considering how easy this Marinated Goat Cheese is to make, I am predicting it will be served on regular repeat around here. So, if you are looking for an easy, incredibly delicious, beautifully presented appetizer to serve to family and friends or a way to repay a kindness, look no further. Because here it is!

Recipe
Marinated Goat Cheese

Ingredients
5 ounces (142g) log of goat cheese
1/3 cup extra virgin olive oil
Grated zest of one medium sized lemon
2 bay leaves
1/2 teaspoon flaky sea salt
Pinch of Aleppo pepper (or crushed red pepper flakes)
Several grates (or to taste) of coarsely ground black pepper

Optional: Sprigs of fresh thyme (for garnish)
Small baguette, sliced and grilled (or toasted in the oven)
Small bowl of olives

Directions
1. Place the cheese log in either a sealable jar or small bowl.
2. Top with the olive oil, lemon zest, bay leaves, flaky sea salt, Aleppo pepper, and black pepper. Cover and let marinate at room temperature for at least 60-75 minutes. 
3. Transfer the marinated goat cheese log to a serving dish. Pour over all of olive oil mixture. Optional: Sprinkle with some fresh thyme leaves.
4. Place serving dish on a platter. Arrange grilled bread on platter. Place small bowl of olives on platter. 
5. Serve at room temperature with some grilled (or toasted) bread. Maybe a small bowl of olives and definitely a refreshing beverage.

(1) I like to buy the plain 5 ounce goat cheese logs from Trader Joe's. It's really good and inexpensive. (2) Make up jars of the Marinated Goat Cheese to bring on a picnic or to serve at a barbecue.

Human+Nature Exhibition, Daniel Popper (artist), Morton Arboretum (June 2021)


Tuesday, June 8, 2021

Mixed Berry Crumble Cake


My favorite in the center of town movie theatre re-opened in mid-April, yet I haven't yet to go there to see a movie. Not because I have any concerns about sitting in a theatre (I don't) and not because there aren't any movies I want to see on the 'big' screen (there are), it's I just haven't put it back into my routine yet. But soon, very soon. Whether it's a book, a mini-series, or a movie, I love reading or watching a good story. The kind of stories that draw you in, make you take pause, and/or shift your thinking. Last night we finished binge-watching the compelling, complicated, a bit dark, destined to be award winning 'Mare of Easttown' on HBO. If you haven't yet seen it, put it on your absolutely must-see list. Then go out, buy some Rolling Rock beer, invite over your friends who also watched it, and spend the night talking about it. And afterwards serve this Mixed Berry Crumble Cake for dessert.


In all seriousness, you don't need a reason to make this Mixed Berry Crumble Cake. With summer berries coming into season, the timing for baking and serving this buttery, fruity, crumble crunchy topped cake couldn't be more perfect. It would be a crime if you didn't make it. 


As far as cakes go, this one falls in the 'so easy' to make, one that delivers 'very big' on flavor cakes!

Using a mixture of berries is only one of the things contributing to this cake's deliciousness. You can make it with only strawberries or a mixture of only two or three berries, but in the spirit of 'more is better' I would strongly encourage you to make it using more than one kind of berry. The only berry needing prepping is the strawberries. Depending on their size, they are cut into 6 to 8 pieces. Keep all of the other berries whole.

Sitting underneath the berry layer is the delectable cake layer. The use of heavy cream in the batter adds both moisture and richness to the slightly dense with a perfect crumb cake.


Last, but not least, is the crumble layer. Made only with butter, flour, and light brown sugar, the crumble topping brings both scrumptious flavor and a crunchy-like texture. Topping the crumble layer with a light sprinkling of flaky sea salt makes for the ultimate finishing touch. The key to getting that bakery finish look to your crumble topping is squeezing some of the crumble mixture together with your fingers before placing it on top of the fruit layer.


In a preheated 350 degree (F) oven, the cake is baked for 45 to 55 minutes or until the top is golden and a cake tester inserted into the cake comes out clean. 

The most challenging part of making this cake is waiting for it cool down enough so you can remove from the pan and transfer to a platter or cake stand. 

The Mixed Berry Crumble Cake is one of those everyday cakes that could easily be gussied up with some freshly whipped lightly sweetened cream. Quite possibly I could justify having a piece of this cake for breakfast. This may be a simple cake, but regardless if it's adorned or unadorned with a dollop of whipped cream, there is nothing plain about it.


If the day ever came where I wrote a cookbook, this gorgeous Mixed Berry Crumble Cake would definitely be one of the recipes included in it. Which should give you more than inkling as to how much I loved this beautiful, mouthwatering cake. Or rather I should say, this cookbook worthy cake. Make this cake your summer-go-to cake. The one you serve at gatherings, the one you bring to a gathering, the one you definitely serve at a mini-series or movie discussion. 
Recipe
Mixed Berry Crumble Cake
Makes one 9" cake - Serve 8-12 depending on how you slice it
Updated August 2021

Ingredients
Crumble (Option 1)
2/3 cup (86g) all-purpose flour
5 Tablespoons unsalted butter, room temperature, cut into cubes
1/4 cup (50g) light brown sugar

Crumble (Option 2)
1/4 cup (50g) granulated sugar
1/3 cup (67g) brown sugar
1 teaspoon cinnamon
8 Tablespoons (113g) room temperature butter
1 1/3 cups (174g) all-purpose flour

Cake
1/2 cup (100g) granulated sugar
8 Tablespoons (113g) unsalted butter, room temperature
3 large eggs, room temperature
1/2 cup + 2 Tablespoons heavy cream
1 1/2 cups (196g) all-purpose flour
1 1/2 teaspoons baking powder
1/4 teaspoon Kosher salt
2 teaspoons vanilla
10 ounces (282g) fresh strawberries, stemmed and cut into pieces (about 6-8 pieces per strawberry)
6-8 ounces (169-225g) fresh berry mixture (blackberries, blueberries, raspberries, blackraspberries)
Flaky Sea Salt, for topping the crumble

Optional but good: Slightly sweetened whipped cream

Directions
Crumble - Option 1
1. In a medium sized bowl, add in the flour, butter and sugar. Use a fork or your fingers to blend. Place in the refrigerator to chill while making the cake batter.

Crumble - Option 2
1. In a medium sized bowl, combine the sugar, brown sugar, cinnamon, butter and flour. Use a pastry blender, fork or your fingers to blend. Place in the refrigerator while you are assembling the cake batter.

Cake
1. Preheat oven to 350 degrees (F). Line a 9" springform baking pan with parchment paper. Butter or spray sides of pan and the parchment paper with vegetable spray. Set aside.
2. In the bowl of a standing mixer, beat the butter and sugar until fluffy and pale in color (about 5-6 minutes).
3. Add in the eggs one at a time, scraping down the bowl between egg additions.
4. Mix in the vanilla.
5. Mix in the heavy cream.
6. In a medium bowl, whisk together the flour, baking powder and Kosher salt. Add in all at once to the mixer. Beat on medium until flour is incorporated. Batter will be thick.
7. Spoon the batter into the cake pan. Smooth top with an offset spatula.
8. Spoon the fruit over the top of the batter.
9. Top with the slightly chilled crumble. Important note: Squeeze or pinch small amounts of the crumble mixture in your fingers before placing on top so you get those crumble clusters.
10. Very lightly sprinkle with flaky sea.
11. Place baking pan on a baking sheet and place in oven. Bake for 45-55 minutes or until the top is golden and a cake tester inserted into the cake comes out clean.
12. Let cake rest in the baking pan for 15-20 minutes before removing outside springform pan ring.
13. Once cake cools down considerably, transfer to a serving platter or cake plate
14. Serve slightly warm or at room temperature with a side a slightly sweetened whipped cream or eat plain. Either way, this cake is insanely delicious.

Notes: (1) You can make this cake with all strawberries or any fruit combination of your choice. If you can find black raspberries, definitely use them. (2) The crumble topping is the crunchiest on the day it is baked. If the cake is covered, the crumble topping softens just slightly but will still bring lovely texture to the cake.

Saturday, June 5, 2021

Cookies and Cream Cookies


Last year the pandemic changed many things. While some things are beginning to swing back to an old/new normal, my summer half-marathon training program isn't one of them. In spite of the much anticipated return of the in-person training program, I decided I would again run solo and train virtually. Not because I don't love running with friends (I do). However, being able to run on my own gives me the freedom to choose my routes and running surfaces (I prefer asphalt to a path), pick the time I go out for my runs (as early as possible on hot/humid days), get lost in music (I have never been able to master the run/talk thing), whine if I want to (and I sometimes do), and, last but not least, improve my running head game. Making the decision to run alone didn't come easy as there are numerous benefits to running in a group. Particularly the support, encouragement, motivation, and camaraderie that comes with running in a pack or has sometimes been the case, running in the back of a pack. My goal race is in mid-September, just three days after I turn sixty-six. And like my training program, I will be running a virtual half-marathon as my race (the Lululemon Seawheeze) will again not be an in-person event this year. Fingers crossed I stay healthy and strong enough to run that race in-person, in Vancouver in 2022. In the months ahead, I will keep you posted on my progress (as it will be another way to keep me accountable). Even though I should eat healthy carbohydrates prior to and/or after a long run, I am all about giving myself rewards when I meet a goal. Which means you might be seeing more than a few recipes for baked goods from now until September. And these Cookies and Cream Cookies may be the perfect way to get things started.


While hiking in the mountains in Colorado I received a photoless text from two friends living in Texas telling me about a cookie they couldn't stop eating. It wasn't until I was in wi-fi range that I could text them back to ask 'what was that cookie?'. Within minutes I not only learned it was a chocolate chip and chopped Oreos cookie, but I also received a copy of the recipe. The idea of combining chocolate chips and chopped Oreos in a cookie was definitely right up my cookie loving alley. So about a week after I got home I looked more closely at the recipe. I loved the concept of the cookie but decided to make some changes to the recipe they had used. Which I am pretty certain they knew I would.


Only when I went to make my version of these Cookies and Cream Cookies I almost created one I am pretty certain would have been a disaster. As luck would have it, I relooked at my recipe notes and remeasured all of the ingredients before making the dough. Thank goodness! My Cookies and Cream Cookie recipe significantly increased the amount of chocolate chips (it went from 1 cup to 2 1/2 cups) using an equal combination of both white and semi-sweet chocolate chips. In addition to shifting the ratios on the brown sugar and granulated sugar (I like a higher brown to white sugar ratio in chocolate chip cookies), I increased the amounts of Kosher salt and vanilla, along with adding some baking powder. Instead of baking the cookies immediately after the batter was made, I went with my scoop into substantially sized balls, tightly cover in plastic wrap, and chill overnight cookie baking method.

After making a variety of Levain style cookies in the past year, I have become a big fan of the 'big, ginormous' cookie. From their appearance, to their texture, to their taste, there is just something even more satisfying about eating a 'big' bakery style cookie. It's important to note that if you alter the cookie size of any given recipe (i.e., making a big cookie small or a small cookie big), you increase the possibility of altering everything about the cookie.


In spite of their size, these cookies bake in a preheated 350 degree (F) oven for only 14-16 minutes (my baking time was closer to 16 minutes). Allowing them to rest on the baking sheet for an additional five minutes, further crisps up the bottom and edges without affecting the perfectly baked interior. 


The combination of chopped Oreos, semisweet chocolate chips and white chocolate chips in a cookie is pure bliss. 


My friends were right. This is my definitely my kind of cookie! So glad I have people looking out for my best interests!


And at the moment these Cookies and Cream Cookies are now my favorites! 


It's been awhile since I dunked a cookie in milk (the concept borders on being a bit sacrilegious), but these cookies are dunkworthy. However, if the concept of dunking a cookie milk isn't one that appeals to you, not to worry. They are satisfyingly scrumptious all on their own!

If you are looking for a cookie to bring to or serve at a gathering, to cheer up a friend, to impress your family/friends, to reward someone training for a half-marathon or marathon, or for absolutely no other other reason than to satisfy a cookie sweet tooth, make these Cookies and Cream Cookies!!! What I am trying to say is you really, really need to make these cookies! 

Recipe
Cookies and Cream Cookies
Makes 16 very large cookies

Ingredients
1 cup (226g) unsalted butter, room temperature
1 cup (200g) light brown sugar
3/4 cup (150g) granulated sugar
1 Tablespoon vanilla
2 teaspoons Kosher salt
1 3/4 teaspoon baking powder
1 teaspoon baking soda
2 large eggs, straight from the refrigerator
3 cups (390g) all-purpose flour
18 regular sized (183g) Oreos, coarsely chopped (cut each cookie into 7-8 pieces)
1 1/4 cups (218g) semisweet chocolate chips
1 1/4 cups (218g) white chocolate chips
Flaky Sea Salt

Directions
1. In the bowl of a standing mixer fitted with a paddle attachment, add the butter, brown sugar, granulated sugar, vanilla, Kosher salt, baking powder, and baking soda.
2. Mix on low to moisten the ingredients, then increase speed to medium. Continue to beat until light, fluffy, and pale (approximately 8 minutes). Scrape the bowl down midway through.
3. With the mixer running, add in the eggs one at a time, letting each fully incorporate before adding the next one.
4. Reduce the mixer to low and add in the flour all at once. When flour is just incorporated, add in the chopped Oreos and chocolate chips. Mix until the dough is homogenous. 
5. Divide the dough into 16 equal portions using a large (2 1/4") cookie scoop. Place each scoop on a baking tray. Tightly wrap the tray with plastic wrap and chill overnight.
6. Preheat the oven to 350 degrees (F). Line two large baking sheets with parchment paper. 
7. Place 6 dough balls on the first cookie sheet. Lightly sprinkle with flaky sea salt. Bake for 14-16 minutes (rotating the tray midway through the baking process) until lightly golden on the edges. Let cookies rest on baking sheet for 5 minutes before transferring to a cooling rack.
8. Continue baking the rest of the cookies.
9. Enjoy the cookies warm or room temperature. Store cookies in a tightly sealed container or wrap individually in cellophane bags.

Notes: (1) These cookies can be made with all semisweet, all white, or milk chocolate chips. Or use a combination of any two or three of those chocolate chips. But the combination of the semisweet and white chocolate was insanely delicious. (2) The cookie dough balls weighed between 3 1/2 and 3 5/8 ounces or 100g-104g). (3) In spite of the fact that there are two teaspoons of Kosher salt in the cookie dough, these cookies are not overly salty.

Tuesday, June 1, 2021

Southern Style Oven Roasted Pulled Pork


After almost two years of not being able to enjoy one of my favorite passions, we are driving to an in-person antique show in Ohio this week. As I am on the hunt for a painted jelly cupboard. Although I may not be able to pass on an antique dry sink, bread boards, transferware, white ironstone plates, and/or redware to name a few. Having such a long absence from something I love to do, it is going to take alot of energy. or rather I should say a great deal of restraint, to quell my excitement or get caught up in the frenzy. Other than a piece here and there, I haven't added to any of my collections for what seems like forever. Which means my mantra for the day will undoubtedly need to be 'take a breath'. I easily get 'lost' when looking at things made in the early 19th century, the time period I seem to be strongly drawn to. My style and taste in antiques has evolved over the years and I am now much more discerning. In looking back to the time spent decades ago out east on antique excursions, I sometimes think 'if I knew then what I know now'. I still remember things I passed on either because they were outside of my resources or I didn't know better. 


My approach to looking for antiques is a bit similar to my approach when making new recipes. Learning about the provenance, history, and/or back story of a dish isn't just finding some interesting trivia. Knowing where and/or when a dish was first created significantly deepens my appreciation for it's endurance. Which brings me to this Southern Style Oven Roasted Pulled Pork. 


To be honest, if you would have asked me a week ago what was difference between North Carolina, Eastern North Carolina, South Carolina, Kansas City, Alabama, or Texas barbecue, I wouldn't have been able to tell you. Or if you would have asked me when 'barbecue' was first 'discovered', I wouldn't have been able to tell you that either. So let me share just a small amount of what I have learned. The little bit of knowledge I acquired in my 'research' prevented me from calling this recipe North Carolina Pulled Pork. But more on that in a minute. Sir Walter Raleigh has been credited with discovering barbecue in North Carolina in the late 16th century. Although if you ask anyone from South Carolina they would claim BBQ originated in their state. While Raleigh was there, a sketch of Croatan Indians "broyling their fishe over the flame-they took great heed that they bee not burnt" was drawn by one of his men, John White. In essence, the sketch depicted the Croatans using a 'barbacoa' or framework of sticks supporting meat over a fire, to smoke the fish. From smoking fish to smoking meat, the 'barbacoa' continue to evolve. Fast forward three centuries and historians believe German settlers traveling from Pennsylvania to the North Carolina Piedmont region influenced the style of barbecue associated with North Carolina today. Over time, two distinct styles of barbecue evolved in North Carolina: the Eastern and the Lexington or Piedmont. The simplest explanation between the two is that the Eastern BBQ style uses a lemon juice or vinegar, pepper-based sauce. While the Piedmont style uses meat from the pork shoulder with a vinegar, ketchup, and spice-based sauce. 


Without going into even more detail on the history and differences between the various kinds of barbecue, the recipe for this Southern Style Oven Roasted Pulled Pork pulls from techniques from various regions of the South. While it aligns somewhat closer to the Piedmont style barbecue, there are ingredients in the sauce more than likely not used way back when. So rather than commit to a specific barbecue style and risk making a barbecue faux pas, this version of pulled pork will simply be called a Southern Style Oven Roasted Pulled Pork. 


The best meat to use when making slow roasted pulled pork is a bone-in pork shoulder as you want a nice fatty cut of pork, one with good marbling so it will remain moist and tender as it roasts. A pork shoulder is not to be confused with a Pork Butt, however, some will use the later when making pulled pork. Studded with garlic cloves and rubbed with a spiced dry rub, the pork shoulder is wrapped in plastic wrap and refrigerated for at least twelve hours or overnight before it goes into the oven.


The sauce can be made at least one day ahead. And I would recommend this as the flavors further meld together. Thus creating an even better sauce for dressing the pulled pork. A thinly sliced yellow onion and minced garlic are first sautĂ©ed in olive oil until they are soft and lightly golden. After the remaining sauce ingredients are whisked together they are added to the onion/garlic mixture. Over low heat, the sauce cooks for approximately thirty minutes or until slightly thickened. Once the sauce is removed from the heat and cools down, it's transferred to a bowl, tightly covered with plastic wrap, and refrigerated until ready to use. Note: You can puree the sauce in a food processor if you don't want strands of onions in your sauce. Personally, I liked having those onion strands in my sauce so I didn't puree it or put it through a sieve. 


In a 250 degree (F) preheated oven, the marinated pork is roasted (uncovered) for 8-11 hours. Or until the pork has internal temperature of 185 or 190 degrees (F). As that is the temperature needed for the pork to break down enough to become pullable. Once the pork reaches that desired temperature it is removed from the oven, covered in aluminum foil and allowed to rest for 30 to 60 minutes. Note: The temperature of the meat will continue to increase when wrapped, so remove from the oven or wrap accordingly.


The rested pork shoulder is torn into shreds using a combination of two forks and your hands. 


You will have made enough sauce to coat the pulled pork and serve some on the side. For an almost seven pound pulled pork shoulder, use 1 1/2 to 2 cups of sauce to coat the meat. Serve the remaining lightly warmed sauce on the side.


To toast the brioche buns, butter their cut sides and place on a heated non-stick skillet. When they are toasted to your liking, remove them from the pan.

We all have our preferences as to what to put on a pulled pork sandwich. Some like them pure, pulled pork only. Others like them topped with some crunchy or creamy coleslaw (my personal favorite). While others like them topped with both pickles and coleslaw. What all this means is that serving the Southern Style Oven Roasted Pulled Pork with a big bowl of coleslaw and some pickles, preferably homemade, is a must when serving this to your family and friends. This way everyone gets to make it their 'way'.


Making Southern Style Oven Roasted Pulled Pork is a labor of love. Between the marinating and roasting times for the pork shoulder, you are looking at almost two days. Depending on what time of the day you plan on serving the pork, you might be getting up in the wee hours of the morning to put it in the oven (I got up at 3:00 a.m.). But it's definitely worth it. Seriously worth it. The tender, melt in your mouth pork smothered in a vinegary, highly flavored sauce served on a toasted brioche bun is nothing short of tasting a piece of heaven. And keeping barbecue history alive.


Recipe
Southern Style Oven Roasted Pulled Pork
Serves 8

Ingredients
Southern Style Sauce
1 medium-large yellow onion, thinly sliced
1 Tablespoon olive oil
4 cloves of garlic, minced
1 cup (200g) light brown sugar
2 cups ketchup
3/4 cup apple cider vinegar
1/2 cup soy sauce
2 Tablespoons Worcestershire sauce
1 teaspoon Aleppo pepper flakes (or red pepper flakes)
1 teaspoon dry mustard
1 Tablespoon finely minced/grated fresh ginger

Pork and Rub
5 large (sliced in half) or 10 medium sized cloves of garlic
6 3/4 to 7 1/2 pound pork shoulder roast (bone-in)
1/8 cup chipotle chili powder
1/8 cup chili powder (or use 1/4 cup of either the chipotle chili powder or chili powder)
1 Tablespoon black pepper
1 Tablespoon light brown sugar
2 teaspoons Aleppo pepper flakes (or use crushed red pepper flakes)
2 teaspoons garlic powder
1 Tablespoon fresh thyme, coarsely chopped (or one teaspoon dried thyme)

Brioche buns, lightly toasted
Cole Slaw
Homemade Pickles

Directions
Southern Style Sauce
1. In a large saucepan, heat the olive oil before adding in the sliced onions and minced garlic. Over low-medium heat, sauté the onions and garlic until soft and lightly golden (approximately 8-10 minutes). Stir frequently.
2. In a medium sized bowl, whisk together the brown sugar, ketchup, apple cider vinegar, soy sauce, Worcestershire sauce, aleppo pepper, dry mustard and grated ginger. Pour the mixture over the cooked onions. Stir until well combined.
3. Reduce the heat to low and cook for 30 minutes (covering the pan midway through the cooking process) until the sauce has thickened slightly.
4. Remove from heat. Let cool. Place sauce in a bowl, cover and refrigerate until ready to use.

Pork and Rub
1. Use a sharp knife to make 10 evenly distributed slits into the pork shoulder. Place a garlic clove half or whole piece of garlic in each one.
2. In a medium sized bowl, combine the chipotle powder, chili powder, brown sugar, black pepper, Aleppo pepper, garlic powder and thyme. Mix well. Then rub into all sides of the pork shoulder. Wrap in plastic wrap and refrigerate for at least 12 hours or overnight.
3. Preheat the oven to 250 degrees (F). Remove the plastic wrap and place the pork shoulder in a roasting pan (uncovered). Add about a 1/2 inch of water to the bottom of the pan. Roast the pork for 8 to 11 hours or until it reaches an internal temperature of 185 to 190 degrees (F).
4. Remove from the oven and lightly wrap with aluminum foil. Let rest 30-60 minutes before shredding. While the pork is resting, remove the sauce from the refrigerator and warm in a saucepan on the stove.
5. Toss the shredded pork with 1 1/2 to 2 cups of the sauce. 
6. Serve with toasted brioche buns, coleslaw, pickles, and extra sauce on the side.

Notes: (1) The inspiration recipe was shared by my friend Stacey Stegbauer Evans. She had adapted the recipe from the cookbook The Great Ribs Book by Hugh Carpenter and Teri Sandison. This version is a third adaptation of the original recipe. (2) I used a bone-in pork shoulder and did not remove any of the bottom fat before placing in the oven. (3) This is a slow roasted in the oven pulled pork recipe. I would not recommend making it a slow-cooker as you would loose the crunchy exterior achieved when roasted in the oven. (4) I did not puree the sauce or put it through a sieve as I loved having pieces of the onion in the sauce. If you want a smooth sauce, process it in a food processor or press it through a sieve.


Moose sighting in Rocky Mountain National Park (May, 2021)