Showing posts sorted by date for query peach tomato. Sort by relevance Show all posts

Monday, September 9, 2024

Peach Crisp (Small Batch)


Peach season is still lingering on and I am not at all mad about it. Baskets of ripe peaches are starting to be edged out by fresh picked apples at the Farmer's Market, but those beautiful, sweet, juicy fruits continue to compete for my attention. Summer might be considered peak peach season, but lucky for us here in the midwest it continues through late September. And what better way to say goodbye to summer and to kick off the start of the autumnal baking season than with a luscious, jammy Peach Crisp topped with a buttery, crunchy, spiced, toasted oat and pecan streusel. The kind of a dessert designed to tantalize our senses and ease us into those cozy fall vibes. From its' aroma to its' flavor packed deliciousness, this rustic, seasonal dessert is an indulgence of the senses and the epitome of pure bliss.

Made in small pie dishes (or ramekins), the recipe for this mouthwatering, shareable Peach Crisp was created to satisfy the sweet tooths of a minimum of two, maximum of four people. Making it one of those perfect, impressive small dinner party desserts. Aside from something chocolate, is there anything better than ending a great dinner than with a freshly baked seasonal dessert? I say there isn't. Especially if it's this Peach Crisp.


Topping the warm Peach Crisp with a large scoop of vanilla ice cream or bowl of freshly whipped cream takes it to a whole other level of deliciousness. Is there any easier way to transform a simple, rustic dessert into something divinely decadent than by simply topping it with ice cream or whipped cream? I say there isn't. 

This is technically not one of those make ahead desserts. Meaning it cannot be completely assembled in the morning and baked later in the day. While the oat-pecan streusel can be made early in the day (then covered and chilled in the refrigerator), the peach filling should be mixed together right before you are ready to assemble and bake in the oven. The reason for this being is the filling will become much too juicy to bake up properly if allowed to sit. With regard to the peaches, you can slice or cut them up peeled or unpeeled. Slice or cut them up into at least 1/4" thick pieces. I first sliced them, then cut the slices in half.

While I think this Peach Crisp is best served warm rather than at room temperature, you can put it in the oven right before you sit down for dinner. If kept covered when it comes out of the oven, it will retain its' warmth for at least twenty or so minutes. 


The baking time for the Peach Crisp ranges from 45-50 minutes or when the top is golden brown and the peach filling is bubbling along the edges of the dish. Allowing the baked crisp to rest for at least 5 to 10 minutes before serving helps to further thicken up the luscious peach filling.


For those of you who are peach crisp purists and want to savor only the flavors of the peaches, cinnamon, toasted pecans, oats, and brown sugar, by all means enjoy it without the addition of ice cream or freshly whipped cream. But for those of you who love a dessert with even more contrasting flavors and textures, top this peach crisp with only the best vanilla ice cream or homemade whipped cream. 


I strongly encourage you to binge on peaches while freshly harvested ones can still be found at the Farmer's Market or in the grocery stores. Whether you are making a Tomato and Stoned Fruit Salad with Honey Herbed Vinaigrette, a Tomato, Peach and Burrata Caprese Salad with Basil Drizzle, or a Grilled Peach, Burrata, and Arugala Salad with Balsamic Drizzle, make certain you find time to make this crowd pleasing, scrumptious Peach Crisp at least once, if not twice! Let's all enjoy every last ripe peach while we still can!

Recipe
Peach Crisp (Small Batch)
Serves 2-4

Ingredients
2 1/2 cups (440-450g) ripe peaches, peeled, pitted and cut into chunks or slices (from approximately 2 very large or 3 medium sized peaches (Note: weigh the peaches after they have been peeled and pitted).
1/8 cup (16g) all-purpose flour
1/4 cup (50g) granulated sugar
Pinch of Kosher salt
1 teaspoon freshly squeezed lemon juice
1/4 teaspoon vanilla

1/4 cup (50g) light brown sugar
1/2 teaspoon cinnamon
1/3 cup (44g) all-purpose flour
1/8 teaspoon Kosher salt
4 Tablespoons (56g) unsalted butter, chilled and cut into small cubes
1/3 cup (29g) old-fashioned oats (not instant)
1/3 cup (48g) pecan halves, toasted and coarsely chopped

Vanilla Ice Cream or freshly whipped cream for serving

Directions
1. Preheat oven to 350 degrees (F). Generously butter two 5" wide pie dishes or ramekins. Set aside. Note: If you only have 4" ramekins, make three crisps instead of two.
2. In a medium sized bowl, mix together the light brown sugar, cinnamon, flour, Kosher salt, unsalted butter, oats, and pecans. Use a fork, pastry blender, or your fingers to blend all of the ingredients into a crumble. Set aside.
3. In a medium-large bowl, combine the peaches, flour, sugar, Kosher salt, lemon juice and vanilla. Stir to combine.
4. Divide the peach mixture equally and spoon into the prepared baking dishes.
5. Divide the streusel topping mixture equally and spoon on top of the peach mixture.
6. Place the baking dishes on a baking sheet and insert into the preheated oven.
7. Bake for 45-50 minutes or until the top is golden brown and the peach mixture is bubbling along the edges of the dish.
8. Remove from the oven. Let the peach crisps rest for 5-10 minutes before serving.
9. Top each Peach Crisp with a generous scoop of vanilla ice cream. Alternately serve the warm crisp with a side bowl of freshly whipped cream. Or serve plain!
10. Cover and chill any leftovers in the refrigerator. Reheat in the microwave. Leftovers will good for up to three days.

Notes: (1) The crisp topping can be made the day before. Cover and store in the refrigerator. (2) The peach mixture cannot be made early in the day or the day before as their juices will start to break down. Make the peach mixture just before you are ready to bake in the oven. (3) You can make with crisp with either peeled or unpeeled peaches. I took the majority of the peels off. Use ripe peaches when making this crisp. (4) You can freeze a baked Peach Crisp for up to two months. The crisp should be at room temperature before you wrap well in plastic wrap and a freezer bag. Thaw the crisp overnight in the refrigerator. Reheat in a 350 degree (F) oven for 20 minutes. (5) You can double this recipe and bake in an 8" round baking dish (ceramic or glass). Baking time will still be 45-50 minutes. (5) I toast my pecans in a preheated 350 degree (F) oven for 7-8 minutes or until I begin smelling their aroma.

Thursday, June 23, 2022

Tomato & Stone Fruit Salad w/ Honey Herbed Vinaigrette


Many years ago I learned a really important lesson. Eating simply and eating beautifully are not mutually exclusive concepts. Sometimes we are so hungry we don't really care how the meal is plated. Or we don't think a meal for 'one' is worth the effort (spoiler: you are always worth the effort). But then there are those other times, when how the meal is plated suddenly makes us feel ravenous. Even if just five minutes earlier we weren't at all hungry. Proof that we always eat first with our eyes. 


I am going to cut right to the chase with this post. This is a very simple, very easy salad. No break the bank ingredients like prosciutto or burrata (although you could most certainly add them if you are looking to make a more substantial salad), no hours in advance of prep time, and other than a knife and a cherry pitter you don't need a multitude of kitchen gadgets. This Tomato & Stone Fruit Salad w/ Honey Herbed Vinaigrette is the kind of salad perfect to make on a hot day when you don't feel like turning on the oven, to bring to a summer gathering, to make as your 'house salad' whether or not you own a lake house, when you want to impress your friends, a reason to have a gathering, and easy enough to make during the week. In other words, this is one helluva salad! 

But there's more! The Tomato & Stone Fruit Salad w/ Honey Herbed Vinaigrette is best example of seasonal eating. Everything in this salad is now in season. Peaches, tomatoes, cherries, and fresh herbs. Even fresh peas, the optional ingredient that makes for an even more beautiful presentation. But if you can't find them, don't let that be a deal breaker. You really want this salad in your life. And you especially want the honey herbed vinaigrette!


I didn't intend to make this salad with two kinds of cherries but the Farmer's Market had them, so I thought why not! The salad can be made with all red sweet cherries, all Rainier cherries, or a combination of both. Use what's available (or on sale!). 


Yellow peaches cut into wedges were used here, but you could also use white peaches. I tend to like the slightly sweeter yellow peaches. In addition to cherry tomatoes, there were also a red, yellow, and heirloom tomato in the salad. I would recommend using at least two kinds of tomatoes for both color and flavor. A trip to the Farmer's Market or grocery store might help you decide which ones to use. The tomatoes are cut into wedges, but the cherry tomatoes are cut either in half or in quarters to add depth, interest and texture to the salad.


Making the Honey Herbed Vinaigrette is, yes, you guessed it, easy. All of the ingredients go into a jar (one having a lid that seals. After a few vigorous shakes your vinaigrette is done! That's it. I like using a canning jar to make this vinaigrette. If I make the dressing an hour or two before using, all I need to do is shake it al up again. And, if by chance there are any leftovers, the sealed jar goes into the refrigerator. If you are taking the salad over to a friends, the vinaigrette travels well in the jar. 

But let me talk a little more about this highly flavorful, herby vinaigrette for just a moment. From the lusciousness of the olive oil, to the sweetness of the honey tempering the sharpness of the balsamic vinegar, to the shallots and garlic giving it a subtle bite, and to the fresh herbs adding not only to its' aroma but to its' rather addictive flavor, this vinaigrette is to die for. In addition to serving it on salads, I could also see it being used a great dipping sauce for thick slices of bread. 

If you are serving the Tomato & Stone Fruit Salad w/ Honey Herbed Vinaigrette as either a first or main course, I would encourage you to serve it with some fresh or grilled bread. I grilled up some thick slices of leftover No Knead Rustic Artisan Bread brushed with olive oil. However, I would happily serve it with a baguette, some sourdough, or Italian bread. 


I honestly can't gush over this simple, yet gorgeous, scrumptious Tomato & Stone Fruit Salad w/ Honey Herbed Vinaigrette enough. I could probably do an 18 minute TedTalk about it because it's so spectacular. And just in case anyone needed convincing on just how mouthwatering delicious the combination of stone fruits, tomatoes and arugula is. Especially when they drizzled with an intoxicating honey herbed vinaigrette. 

Recipe
Tomato & Stone Fruit Salad w/ Honey Herbed Vinaigrette
Serves 4-5

Ingredients
Honey Herbed Vinaigrette
1/2 cup extra virgin olive oil
1/4 cup balsamic vinegar
1 Tablespoon honey
1 small shallot, minced 
1 clove of garlic, minced
2 Tablespoons, fresh basil, chopped
1 Tablespoon, fresh oregano, chopped
1 Tablespoon, fresh thyme, chopped
1/4 rounded teaspoon Kosher salt
1/8 teaspoon black pepper

Salad
2-3 large handfuls of baby arugula
2 large yellow peaches, cut into wedges (you should be able to get 10-12 wedges from each large peach)
3 dozen sweet cherries, pitted and cut in half (use all red cherries, Rainier cherries, or a combination of both)
8-10 cherry tomatoes, some cut in half, some cut in quarters
3 tomatoes, cut into wedges (choose a combination of red, yellow and/or heirloom tomatoes)
Fresh basil for garnish
Optional: Fresh peas in their pod

Fresh or grilled bread, for serving

Directions
Honey Herbed Vinaigrette
1. Put all of the ingredients in jar. Place lid on top and twist tightly. Shake until the vinaigrette is well blended. Use immediately or let sit on counter for several hours before using. 
2. Store any leftovers in the refrigerator.

Salad
1. On a large (about 10"x12" or 10"x14") preferably white platter, begin with creating a bottom layer of the salad with the arugula.
2. Arrange the cut tomatoes wedges and peaches on top of the arugula.
3. Then layer on the cut cherry tomatoes and cut cherries.
4. Drizzle on half of the dressing. Place the remaining the dressing in a bowl to serve on the side.
5. Top with some sprigs of fresh basil. And pea pods if using (not a deal breaker)
6. Serve immediately with thick slices of crusty or grilled bread.

Note: (1) I also topped this salad with fresh peas because they are in season. They are optional, but they make for an ever more beautiful presentation. (2) I liked the simplicity of this salad. But feel free to had some prosciutto and/or burrata to this salad if you are looking to having be more of a 'main course' salad.

Tuesday, August 24, 2021

Peach & Mozzarella Caprese w/ Honey Vinaigrette


It was on my birthday trip to Colorado last September where I first tasted the best, sweetest, juiciest peaches ever. Little did I know at the time how sought after those sweet Palisade peaches were. At first I thought I was suffering from extreme form of hunger after traveling all morning, then driving for hours on the Peak to Peak Scenic Byway. Making me wonder if anything I ate would have been declared the best ever. But everyday as I ate my way through the bag of Palisade Peaches bought from a roadside stand, my first reaction to them never wavered. They were 'best' worthy. So when peach season arrived here this summer, I began longing for those Palisade peaches. However, seeing the beautifully, freshly harvested Michigan peaches at my local Farmer's Market still brought joy to my peach loving heart. 


My love for peaches has inspired many (fourteen not counting this one) recipes here on the blog. From the Peach, Tomato and Burrata Caprese Salad with Basil Drizzle, Grilled Peach Salad with Honey Ricotta and Prosciutto, to the Grilled Peach, Burrata, and Arugula Salad with Balsamic Drizzle, to the Peach Cobbler, to the Peach Buttermilk Ice Cream with Raspberry Swirl, there are no shortage of salad and dessert recipes made with peaches. Except there has been one thing missing. A peach recipe for a dish that can be either an enjoyed as an appetizer or a salad. If you ask me, this Peach & Mozzarella Caprese w/ Honey Vinaigrette might be the best, simplest, refreshing, destined to be a memorable first bite moment peach appetizer ever.


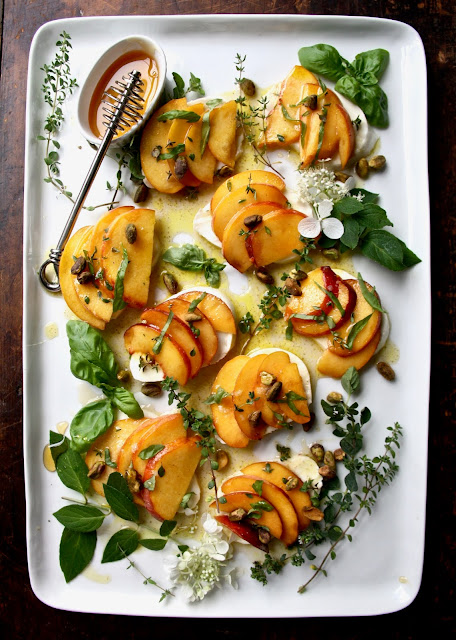
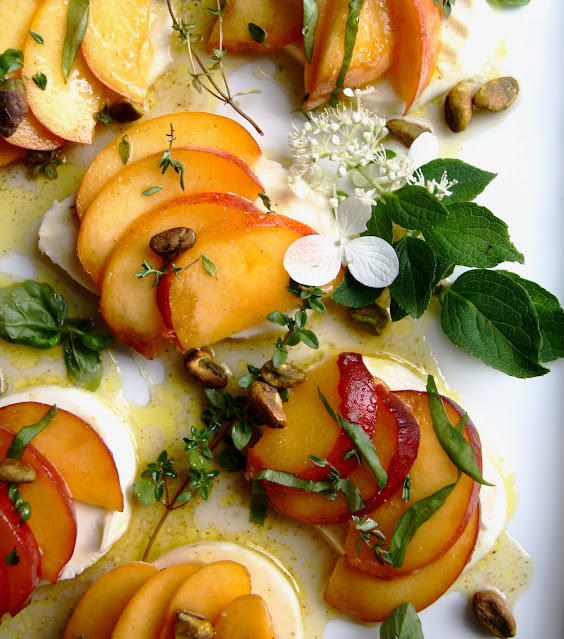
Made with fresh herbs (thyme and basil), ripe yellow peaches, fresh mozzarella, honey vinaigrette, pistachios, and a honey drizzle finish, this Peach & Mozzarella Caprese w/ Honey Vinaigrette is divine.


When buying peaches for this appetizer or if you prefer, this salad, look for smaller ones so your slices fit perfectly on the slices of mozzarella. Either buy them ripe or let them ripen on the counter. Peaches are one of those fruits best kept at room temperature, never refrigerated. 


Cutting the log of mozzarella at a slight angle at about a 1/4" of thickness will give them the look of a piece of crostini as well as help to give a bit more surface for the thinly sliced pieces to lay on.

The Honey Vinaigrette is made with extra-virgin olive oil, freshly squeezed lemon juice, Kosher salt, (white) pepper, and a good quality honey. For those of you have followed me for awhile, you know there is no shortage of personal opinions on a variety of things, but especially food preferences. So it might not surprise you when I say using honey from that cute little bear jar in this vinaigrette would be blasphemous. Not that there isn't a use for that honey, but this vinaigrette and the finishing honey drizzle finish isn't one of them. It deserves nothing less than a jar of a good quality honey. The kind from jars you find at a Farmer's Market, a speciality food store, and sometimes even the grocery store. Or if you are lucky, the jar your sister brings you back from Two Maples Farm in Oregon.

You can make the vinaigrette a couple of hours ahead of assembling the Peach and Mozzarella Caprese, but the entire appetizer (or salad) is best served immediately after it is assembled. Which takes all of about 10 minutes. Put a platter of this rustic, yet elegant Peach & Mozzarella Caprese w/ Honey Vinaigrette out on the table and almost instantly your gathering will feel a little bit celebratory. 


If you are looking for an almost effortless appetizer delivering great flavor, harnessing the best of seasonal ingredients, and making for an impressive beauty contest winning presentation, then this Peach & Mozzarella Caprese w/ Honey Vinaigrette is the one! If your lucky enough to live in Colorado, have access to those famed Georgia peaches, or have a local Farmer's Market selling freshly picked peaches from an orchard, you should run, not walk to go out to get some while they are in season! Bliss awaits you.

Recipe
Peach & Mozzarella Caprese w/ Honey Vinaigrette
Serves 4-6

Ingredients
2 teaspoons freshly squeezed lemon juice
1 very generous teaspoon of honey
1/4 teaspoon Kosher or Flaky Sea Salt
1/4 teaspoon white pepper (you can use black pepper too)
2 Tablespoons extra-virgin olive oil

3-4 small ripe yellow flesh peaches, cut into thin slices
16 ounce (453g) log of fresh mozzarella, cut on the diagonal in 1/4" slices
Fresh thyme chopped, somewhere between 1 and 2 Tablespoons
Fresh basil julienned, somewhere between 2 and 3 Tablespoons

1/4 - 1/3 cup of pistachios
Additional honey for the finishing drizzle

Directions
1. To make the honey vinaigrette, whisk together the lemon juice, honey, salt, and pepper until the honey is fully blended.
2. Slowly whisk in the olive oil until the mixture is well blended.
3. Use immediately or cover and store on the counter for several hours before serving.
4. Place the slices of mozzarella on a platter. Lay 4-5 slices of the peaches on each piece.
5. Spoon the honey vinaigrette over each piece.
6. Sprinkle the top with some thyme and basil.
7. Lightly drizzle each piece with some honey.
8. Top with some pistachios.
9. First swoon, then immediately serve and savor. 

Monday, August 3, 2020

Basil Pesto Pasta with Roasted Tomatoes and Burrata


For some reason March feels like it was here a life time ago and summer feels like it is flying by (but not necessary because I am having so much fun). I don't know about you but my concept of time is, for lack of a better word, a bit distorted and a little warped. We are five months into this Pandemic and I have yet to use time to clean out and organize all of my closets, reorganize all of my drawers, create order in my cabinets, declutter shelves, sort all of recipes collected over the too many years to count, or open up the bins containing my summer clothes. I did manage to pack up all of my winter running and everyday clothes. So what have I done with all of this unexpected discretionary time? It's a question I started asking myself this past week. If I reflect back on the number of books read, miles run outdoors, puzzles assembled, new recipes tested, blogs written and posted, cookies baked, packages sent, or meals cooked, I suppose I could make the case I wasn't completely unproductive. And while these were all things that brought some normalcy to an otherwise atypical year, I couldn't help but wonder if I should have been doing more, learning more in the last five months. But what good would come of going down the feeling unproductive 'not enough' rabbit hole? We all know the answer to that question. So I decided it might be more productive (and a better use of time) if I shifted looking at my use of discretionary time from one of things accomplished to perspectives gained.


Given all of the unknowns and paradoxes life has thrown at all of us, being able to maintain some sense of normalcy may be its' own kind of accomplishment. In other words, I should probably give myself gold stars for using all of this time differently to continue doing those things that I love, that bring joy, that energize me. Without the ability to travel to photograph new landscapes, I managed to find some familiar and unfamiliar ones closer to home. In other words, I discovered I didn't need to be hundreds or even thousands of miles from home to use my camera to capture nature's beauty. Without the ability to run with friends or challenge myself in races, I still put on my running shoes and ran. As many, if not more than those pre-Pandemic miles. And I learned three things: there were benefits to running alone, how much I missed listening to music while I ran, and I didn't need to be with others to push myself. Without the ability to share my love of creating gatherings around food, I found new ways of sharing my love of baking and cooking with others. I discovered the amount of joy experienced coming from delivering and/or sending surprise packages of freshly baked cookies, breads, and/or brownies to neighbors and friends was the same as or even a little better than creating a special meal for family and/or friends. It took me awhile but the gold star worthy epiphany finally came! Maintaining a sense of self-worth and practicing self-care was not only how the gift of this time was to be spent, it was probably more important than having perfectly organized cabinets, closets, and drawers. Although that would be nice too. So would a really great recipe for pesto.

Sometime during these past five months one of my friends if there was a recipe for pesto on the blog. Sadly I said there wasn't. Considering this blog has been around for a little more seven years now, it almost seemed unfathomable there wasn't a pesto recipe to be found. Certainly there are no shortage of pesto recipes to get inspiration from. I also happen to love pesto. So why hasn't there been one? Well most of you who follow this blog know I tend not to be a little a this, little of that, a bunch of that kind of cook. As the 'measure everything out' baker in me tends to influence how I cook.


 So when I recently saw a recipe for basil from Smitten Kitchen I knew there was at least one other person out there who also had an affinity for accuracy and a slight aversion to relying on guesswork. Someone else who believed weight measurements matter in a recipe. Especially if you are looking to achieve the same (great) results every time it's made. 


Pesto is derived from the Italian verb 'pestare' which translates to 'to pound, to crush'. Traditionally pesto is made using a mortar and pestle, however, you will find recipes for pestos made by hand simply using a knife, using a food processor, using an immersion blender, using a regular blender, or using a mezzaluna. There are no shortage of opinions on which method creates the best pesto.  According to a recent Food52 article "The Absolute Best Way to Make Pesto: According to So Many Tests" the mortal and pestle method was deemed to be the hands down winner. However, the basil pesto used in this Basil Pesto Pasta with Roasted Tomatoes was made in a food processor. And I'm not at all sorry about it. Maybe someday when I get a chance to travel to Italy and taste pesto made the traditional way will I possibly change how pesto is made here. But until then I am going to stick with the food processor method. 

While exact measurements matter, ingredients matter just as much, if not more. Freshly grated versus store bought grated cheese is always the best option. And as far as parmesan cheeses go, well nothing compares to the flavor of Parmigiano-Reggiano. Pine nuts (pignoli) are the traditional nuts used in pesto, although you will find recipes using walnuts, pistachios, or almonds. This recipe uses pine nuts toasted in the oven until they are lightly golden. I may not be a mortar-pestle purist, but when it comes to which nuts to use in pesto well I am a bit of a pine nut stickler. As far as olive oils go, just use one a good one. 


The recipe for the pesto makes enough to perfectly coat one pound of pasta. I used fettuccine but you could easily use linguine or any other sculpted shaped pastas designed to hold sauce. (See notes)


Roasted cherry tomatoes and burrata take an ordinary bowl of Basil Pesto Pasta and make it extraordinary.  More than just adding some color, they bring two layers of absolutely incredible flavor.


Some additional freshly grated cheese, a drizzle of olive oil, and a garnish of fresh herbs are the ultimate wow factor, taste bursting finishing touches to this Basil Pesto Pasta with Roasted Tomatoes and Burrata. Throw in some thick slices of a baguette and bottle of wine and no one sitting around the table will want to leave.

The use of fresh seasonal ingredients and a simple (great) recipe make this Basil Pesto Pasta with Roasted Tomatoes and Burrata the perfect weeknight, weekend, or dinner party worthy meal. Keep it vegetarian or serve with some grilled shrimp, roasted/grilled chicken, or a grilled ribeye or flank steak. There are no limits to the number of serving variations to this dish. With an abundance of fresh basil now available at the Framer's Markets, grocery stores, or if you are lucky from the gardens of your friends make this pesto dish at least once before basil season comes to an end!  Or at least make this bursting with flavor, better than store bought, gold star worthy pesto! You have waited long enough for it! 

Recipe
Basil Pesto Pasta with Roasted Tomatoes and Burrata (heavily inspired by the Pasta with Pesto Genovese recipe from Smitten Kitchen)
Makes slightly more than 1 cup of pesto, enough to coat one pound of cooked pasta.

Ingredients
Pesto
2 ounces (55g) Parmigiano-Reggiano, freshly grated
1/4 cup (35g) Pine Nuts, toasted (see notes)
4 cups (3 ounces/85) fresh basil, including stems
1/2 cup extra-virgin olive oil, plus more as needed
1 1/2 teaspoons kosher salt, divided
1/8 teaspoon black pepper
2-3 garlic cloves
Optional: 1-2 sprigs of fresh parsley

Roasted Cherry Tomatoes
11 ounces (311g) cherry tomatoes on stems, if possible but not a deal breaker
2 Tablespoons extra-virgin olive oil
Kosher salt
Black pepper

Burrata, preferably 4 two-ounce balls (8 ounces/225g)
Freshly grated Parmigiano-Reggiano, for finishing and serving
1 pound (454g) Fettuccine No.15 (See Notes)

Directions
Pesto
1. In the bowl of a large food processor, add in the garlic. Pulse several times or until the garlic is roughly chopped.
2. Add the toasted pine nuts, pulsing several times until they are chopped small but not a paste is created.
3. Add in 1/2 teaspoon kosher salt, black pepper, and basil (and fresh parsley if using).  Process until the basil leaves are finely chopped.
4. With the machine running, slowly add in the olive oil.
5. Add in the grated Parmigiano-Reggiano cheese and one teaspoon of kosher salt. Pulse just to combine. Taste to determine if you need additional salt. For a creamier pesto, add 1 or 2 additional tablespoons of olive oil.

Roasted Cherry Tomatoes
1. Place tomatoes in a roasting dish or small pan. Drizzle with two tablespoons of olive oil and season liberally with kosher salt and pepper.
2. Roast tomatoes at 400 degrees (F) for approximately 20 minutes or until they begin to blister. Reserve drippings.

Assembly
1. Make the fettuccine until al dente (or to your preferred desired state of doneness). Drain (reserve at least one cup of pasta water) and transfer to a large bowl.
2. Add 3/4 of the pesto and mix until the pasta is coated. Add more until the pasta is sauced to your liking (I used all of the pesto). For a slightly creamier pasta not making the tomatoes add 1/4 cup of the reserved pasta water).
3. Transfer to a large serving bowl.
4. Top with Roasted Tomatoes, burrata, and a generous grating of Parmigiano-Reggiano. Garnish with fresh herbs. Optional but a really good idea: Either drizzle with another 1 or 2 Tablespoons of olive oil or drizzle with the reserved olive oil from the Roasted Tomatoes.
5. Serve with some additional freshly grated cheese and some olive oil on the side.

Notes: (1) To toast pine nuts, preheat oven to 350 degrees (F). Spread pine nuts on a single layer on a baking sheet. Bake 4-6 minutes, tossing at least once during the short toasting process. (2) I used this pasta from Rummo, but use your favorite. For a Genovese style Basil Pesto Pasta use a Casarecce or any other pasta sculpted with curved hollows to hold the sauce. (3) If doubling the amount of pesto, make in two batches. (4) Instead of using the pesto to make a pasta dish, use on a Peach-Tomato Salad or one your favorite crostini! (5) The use of parsley is optional although some say it helps the pesto to keep its' bright green color when its' first made. (6) The pine nuts from Trader Joe's are the most reasonably priced ones!


Indiana Dune National Lakeshore (July 2020)

Friday, July 19, 2019

Grilled Peach, Burrata, and Arugula Salad with Balsamic Drizzle


For as long as I have lived near Chicago, I have yet to completely explore all it has to offer. Or easily navigate it without the use of a mapping application or the over-reliance on friends (even if I do sometimes second guess them). However, my familiarity with the streets is enough to make me annoyingly aware when a taxi driver takes the most circuitous route to my destination. I often feel like a tourist in my own 'hometown'. Still in awe of its' beauty as my love for it is deepened. On a good day the drive into the city is less than thirty minutes. In the height of rush hour, during construction season, or on a summer weekend, driving into the city in an hour would be miraculous. And while taking the train into the city is much quicker, it can be its' own kind of adventure for me. While less grandeur in scale, it always feels like I am in NYC's Grand Central Station whenever I am in Ogilvie Center. Being a little directionally challenged, I should probably carry a compass with me. Oh, there is probably an app for that too.

After the morning long run, a friend and I took the train into the city on Saturday afternoon. Our first stop was Eataly, a place she had never been before. While there, we had a glass of prosecco and some freshly shucked oysters, tasted more wine and spirits, had a great lunch, shared a dish of hazelnut and salted caramel gelato, shopped, and tasted a grilled peach and fresh mozzarella salad. One tiny bite of that summer rendition of a caprese salad and my mind began racing. I instantly knew I would be revising the recipe for the Grilled Peach and Burrata Salad shared on the blog almost four years ago. 


Initially I had planned to make the Grilled Peach and Burrata Salad with some fresh mozzarella. But when the cheese guy at the Farmer's Market had some freshly made burrata. And well, my plan changed instantly. 


Last summer the Peach, Tomato, Burrata Caprese Salad with Basil Drizzle was on regular repeat around here. Friends who either tasted or made it, raved about it. The combination of tomatoes and peaches was surprisingly delicious. This summer, this Grilled Peach, Burrata, and Arugula Salad with Balsamic Drizzle, may be the hit of the summer. And honestly, this updated version is so much better than the original. 


Peaches are just beginning to come into season here in the midwest. The ones I picked up at the Farmer's Market were salad ready. They were the slightly firm ripe, not that mushy ripe kind. If your peaches are too ripe, they will fall apart when you grill them. 


After cutting each peach half, cut each half into four pieces. If you have medium or even larger sized peaches, your pieces will be the perfect size and will hold up well on your grill pan. If you peaches are small, you might want to cut them in quarters or each half into three pieces.


Using a grill pan on your stove top makes grilling easier and less messy. Even with using this non-stick grill pan, I still used a cooking oil spray on the pan before placing the peach slices on the preheated pan. There were two lessons relearned in grilling the peaches. The first was to get the pan hot before grilling. The second, maybe the most important, was to work in batches. In other words, not put all of the peach slices on the grill pan all at once as the cooking time (about 2-3 minutes per side) is relatively short. You wouldn't want to risk burning them. 


The assembly of the Grilled Peach, Burrata, and Arugula Salad with Balsamic Drizzle is simple. The bottom layer is comprised of a couple of large handfuls of baby arugula, lightly drizzled with olive oil and sprinkled with some kosher salt. The grilled peaches and pieces of burrata are then arranged on the arugula base. After drizzling the salad with the balsamic crema (or balsamic glaze), it's sprinkled the basil chiffonade. How easy is that?

Balsamic crema (or balsamic glaze) is an aged (the longer the better) sweet, dense, almost syrupy vinegar. It's refined sweetness and mellow acidity make it the perfect finishing touch on this salad. If you have never had it before, it has a much deeper flavor profile than balsamic vinegar. You could eat it off a spoon. I bought my bottle of an imported aged balsamic crema at Eataly, but more than likely you can find a good one at a grocery or cooking store. 


If ever a salad benefitted from a do-over, this Grilled Peach, Burrata, and Arugula Salad with Balsamic Drizzle would be the one. And yet, even after making some changes to it, I may not have taken this salad  update far enough. Another one of my friends shared eating a similar version of this salad, although hers was also topped with thin slices of prosciutto. What a brilliant idea! How did I not think of that? Thank goodness for the kindness and generosity of friends!  So, if you are looking to take this salad up another notch, add some thin slices of prosciutto on top.

If you have never had a grilled peach before, you are in for the best treat of your life. And if you have never had a salad composed of grilled peaches, burrata, baby arugula, basil chiffonade, and balsamic drizzle your taste buds will be spinning. Given the choice between a traditional caprese salad and this one, I am placing my bets on your choosing this one. Serve it as a hearty appetizer or a side salad, but definitely put this salad on repeat rotation this summer while peaches are in season. Your friends and family will be blown away!

Every now and then updated, revised, better interpretations of a recipe emerge. The inspiration for them may come randomly. As if the universe is looking for a way to whisper in your ear. And last Saturday I heard it whispering to me.

Recipe
Grilled Peach, Burrata, and Arugula Salad with Balsamic Drizzle

Ingredients
Baby Arugula
Fresh medium sized peaches, ripe but not blemished or mushy (See notes)
Burrata cheese (or fresh mozzarella), cut into pieces
Basil, cut to a chiffonade
Extra-virgin olive oil
Balsamic Crema (or aged Balsamic Glaze)
Kosher salt

Optional: Thin slices of prosciutto

Directions
1. Cut peaches into 8 pieces, leaving the skin on.
2. Place grill pan over the burners set medium-high heat. Spray with olive oil or vegetable oil cooking spray.
3. Place the peaches on the hot grill. Grill each side for 2-3 minutes or until you have a nice char. Work in batches (i.e., 10 slices at a time) to prevent burning. Remove peaches from the grill pan and place on a platter. Set aside.
4. Layer bottom of a large platter with arugula. Lightly drizzle and toss with olive oil. Lightly sprinkle with salt.
5. Arrange grilled peach slices on top of the arugula, followed by pieces of burrata.
6. Scatter the basil chiffonade over the top.
7. Drizzle with the balsamic drizzle.
8. Swoon and serve.

Notes: (1) Use a high quality thick, sweet, syrupy balsamic crema or balsamic glaze. I used one imported from Italy found at Eataly (Antica Acetaia Dodi). (2) For a more substantial salad, roll each slice of prosciutto into a mound and then arrange them on the platter after you have drizzled with the balsamic crema. (3) The size of the salad will depend on how many you are serving. Use one medium sized peach per person. An 8 ounce ball of Burrata will be enough for 4 - 5 people.

Along the river on a summer day in Chicago (July 2019)


Saturday afternoon at Eataly in Chicago. (July 2019)