Showing posts sorted by relevance for query cheesy. Sort by date Show all posts

Sunday, December 20, 2020

Cheesy Potato Casserole


There have been quite of few foods trending or going viral this year. Like Homemade No Knead Artisan Bread, Dalgona Coffee, and now Chocolate Bombs. Whether or not any of these will endure over time is anyone's guess. Although if I were a betting person I would say the No Knead Artisan Bread will be with us for years to come. Because bread is a comfort food to many. And nothing soothes the soul better than indulging ourselves in some our favorite comfort foods. Not only do they have enduring and endearing qualities to them, they sometimes are the foods we gravitate toward when we are craving a mood boost. A Cheesy Potato Casserole is the legal, vegetable version of a psychedelic drug, otherwise known, as one of the best comfort foods to have ever been created. And no, I won't spoil it by telling you it's comes with a heavy dose of calorie overload. Life is short. We all need to make room for some in moderation indulgences in our lives.


Almost every family has 'their' version of the best recipe for a Cheesy Potato Casserole. When served at the holidays, gatherings or barbecues, it's usually the dish everyone gravitates towards. As it's often the dish first to go. Even those who maintain they live a clean, healthy eating lifestyle find it hard to resist.

Let me start by putting any sense of humbleness aside or tempering any bit of food arrogance I may have from time to time let rear it's not so pretty head. This Cheesy Potato Casserole is the most wicked, best ever, most crave worthy, most crowd pleasing comfort food to have ever been created. There, I said it. And I have no regrets because it's just that good. And since I am on a bit of a hubris roll, risking any lifelong friendships, or causing any family conflict, let me say it's destined to become the new family favorite.


If you allow yourself to go down the Cheesy Potato Casserole rabbit hole you will find hundreds of versions of recipes for them. Some are made with frozen shredded hash browns or cooked potatoes versus frozen diced potato hash browns. While others are made with a combination of cheeses versus Velveeta (which, yes loosely qualifies as a cheese). Some are topped with crushed Ritz Crackers rather than crushed corn flake cereal. And then some are made with a homemade cream sauce rather than a can of cream of chicken soup. But comfort food was intended to be simple and not the least bit pretentious. And this Cheesy Potato Casserole is the embodiment of simple and unpretentious. 


In addition to frozen diced hash brown potatoes, this Cheesy Potato Casserole is made with sour cream, melted butter, Velveeta cheese, cream of chicken soup, dried chopped or minced onions, some Kosher salt, and topped with a slightly crushed cornflake and (yes, more) butter mixture. It's creamy, cheesy, and crunchy. The trifecta of comfort food deliciousness.


If there was ever a reason to stock up on cream of chicken soup and frozen diced hash brown potatoes, it would be this Cheesy Potato Casserole. If there was ever a time when we needed some soul satisfying comfort food in our lives, this definitely would be it. With the holidays approaching there may be no better side dish to make than this Cheesy Potato Casserole if you are looking to bring some joy to your family and/or friends. Make it for Christmas and/or New Years. And then when it's safe to have large gatherings again, make a double batch and invite all of the friends in your life you have missed being with. I promise a real hug and this Cheesy Potato Casserole will bring the kind of euphoria we all are longing to again experience.

Recipe
Cheesy Potato Casserole
Serves 8-10 as a side dish

Ingredients
1 bag (32 ounces/907g) frozen diced hash brown potatoes, slightly thawed (see Notes)
1 can (10.5 ounces/298g) cream of chicken soup
16 ounces (454g) sour cream
8 Tablespoons (113g) unsalted butter, melted and cooled slightly
4 Tablespoons dried chopped or minced onions
12 ounces Velveeta cheese (338g), coarsely grated
1/2 teaspoon Kosher salt

4 cups (4 ounces/112g) corn flakes, slightly crushed
8 Tablespoons unsalted butter, melted and cooled slightly

Optional: Fresh herbs (thyme, parsley) for garnish

Directions
1. Preheat oven to 350 degrees (F). Butter a large baking dish (9" x 13") and set aside.
2. In a medium sized bowl, mix together the slightly crushed corn flakes and melted butter. Set aside.
3. In a large bowl, whisk together the cream of chicken soup, sour cream, melted butter, Kosher salt and dried onions.
4. Fold in the shredded cheese and then fold in the diced hash brown potatoes.
5. Spoon mixture into the prepared baking dish. Top evenly with the cornflake/butter mixture.
6. Place baking dish on a large baking dish and bake for 60-65 minutes. Note: Check at the 30 minute mark. If your cornflake topping is getting too brown, gently lay (do not wrap) a piece of aluminum foil on top and continue baking.
7. Remove from the oven and let sit for 10-15 minutes before serving. Garnish with some chopped fresh herbs (like thyme and/or fresh parsley).
8. If you are lucky enough to have any leftovers, cover tightly with plastic wrap and store in the refrigerator. This casserole heats up perfectly in the microwave.

Notes: (1) I used these Ore-Ida Diced Hash Brown Potatoes. Take the frozen diced potato hash browns out of the freezer while you start putting together the rest of the ingredients and preheating the oven. In my world this is what it takes to get them to a slightly thawed state.

Wednesday, December 30, 2015

Cheesy Hasselback Potato Gratin


While having a much too long overdue catching up lunch with friends this past weekend, the question 'what are your goals for the blog in the year ahead? came up. It was a timely question. Not only because the new year brings opportunities for reflection and goal setting, but the blog officially celebrates its' third birthday this week. Where I want the blog to go, what I want its' look and feel to be, and how I want it to evolve are some of the questions I have been mulling over recently. And sooner rather than later I need to come up with some answers!

There have been a variety of changes to the blog over the past three years, some subtle, others markedly discernible. From my perspective, one of the most significant transformations has been the evolution of the photography. Looking back at some of 'first' and 'second' year photos, I realize the bar for what I think is a 'good' photo has changed considerably. And a year from now, when taking another retrospective look back at the photos, I hope the vision I have in my head for the 'look and feel' of the blog is realized. Or is at least getting close. However, I have a feeling that as I change, my vision will change as well.

As you read this blog post your jaw might be dropping and you might be thinking 'well she certainly has her work cut out for her!' And I might reluctantly agree with you considering how I am feeling about these Christmas Day photos of the Cheesy Hasselback Potato Gratin. Which by the way was nothing short of a Herculean feat and a far greater challenge not fully anticipated until I was well into it. (oh well, live and learn). Being one to multi-task with the best of them, getting the holiday meal ready and trying to take photos along the way felt more like I was participating in some sort of holiday Olympics (consider this my sincere attempt at giving an explanation rather than trying to make any excuses). So while these may not be the shiny, perfect photos I envision will someday appear on the blog, I can honestly say this recipe for the Cheesy Hasselback Potato Gratin is pure potato gratin perfection.


Little did I know when I received the newly released The Food Lab: Better Home Cooking Through Science for my birthday earlier this year, that it would be one making multiple best, must-own cookbooks of the year lists. Written by J. Kenji Lopez-Alt, the Serious Eats guru (aka the brilliant nerd king of Internet cooking), the 958 page book will give both your mind and arms a serious workout. Literally and figuratively this book is a weapon. Dominated by more savory than sweet dishes, Lopez-Alt gives us the science underpinning the art of creating both classic and comfort foods. Work your way through this cookbook and your culinary prowess is destined to ascend to level so high your family and friends will brazenly ask, rather than wait or hope, for a meal invitation.

My starting point in what I am now calling an indispensable cookbook was the Cheesy Hasselback Potato Gratin. Paired with a beef tenderloin served with a port wine mushroom sauce, Roasted Balsamic Glazed Onions, and Roasted Brussels Sprouts Gratin, this potato gratin could not have been a more perfect side to help create a memorable Christmas dinner. If by chance you haven't yet fully committed to your New Year's Day menu, let me boldly suggest you make this Cheesy Hasselback Potato Gratin to go along with the ham, lamb, beef, or roasted chicken dish you traditionally make. In case you need to be swayed, I should probably tell you now this creamy layered potato casserole with it's crispy, cheesy browned top has officially achieved the distinction of being placed on my 'last meal' short list.


Potatoes, cheese, cream, garlic, and thyme. Five ingredients are all you need to create what J. Kenji Lopez-Alt calls the ultimate potato casserole. And he delivered on his claim. Russet potatoes peeled and cut into 1/8" slices, finely grated Gruyere (or Comte) and Parmigiano-Reggiano cheese, heavy whipping cream, minced garlic, and coarsely grated thyme come together in a such a way, you cannot help but have an even deeper, greater appreciation for the potato. The vegetable that 'permitted a handful of European nations to assert dominion over most of the world between 1750 and 1950' has a new kind of power in the 21st century.

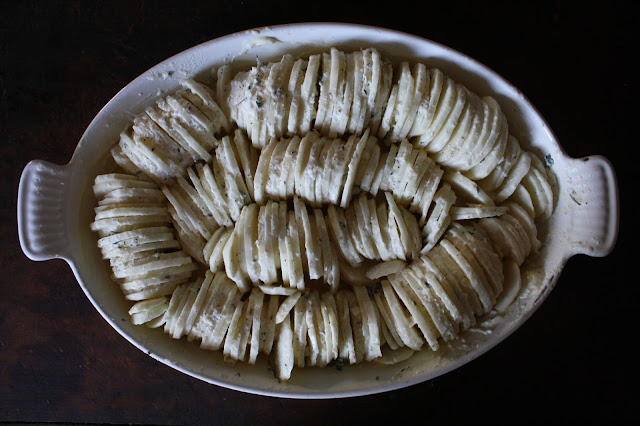
This Cheesy Hasselback Potato Gratin has the creaminess of a gratin and crunchiness of roasted potatoes. In my world, this means you don't have to make a choice, you can have it all! Having the potatoes go into the pan vertically versus layered horizontally combined with submerging the sliced potatoes in the cream-cheese-herb mixture (ensuring each slice gets coated with the mixture) is why this gratin is able to achieve the two textures. (Notes: (1) If you have a mandoline slicer, the cutting of the potatoes goes quickly and helps to keep the slices uniform. But if you have a sharp knife and good eye, you can achieve the same results. (2) When making the cream-cheese-herb mixture, use only 2/3 of the grated cheeses, saving the remaining 1/3 for sprinkling over the gratin in the final stages of baking).

After coating all of the potato slices, the remaining cream-cheese-herb mixture is poured evenly over the potatoes. I used an aged Gruyere cheese instead of the Comte for no other reason than one of my grocery stores was selling some great aged Gruyere cheese for the holidays at a great price.


The total baking time for the Cheesy Hasselback Potato Gratin is 90 minutes, broken up into three 30 minute segments. In a 400 degree preheated oven, the buttered casserole dish tightly filled with the potatoes are covered with foil and baked for 30 minutes. The foil is then removed and the potatoes return to the oven to bake for another 30 minutes. The reserved grated cheese is then sprinkled over the casserole and it bakes for the final 30 minutes. The finished gratin will have a deep golden brown, crispy top and the potatoes will be knife tender. Visually impressive and insanely delicious, this gratin is fancy dinner party or casual dinner worthy.

Had I assembled the gratin (but adding the remaining cream-cheese-herb mixture right before baking) the night before, I would have been less crazed Christmas morning. If there is one contribution I can make to this recipe, it is you can partially assemble the gratin early in the day (covering and refrigerating). I might go so far as to say you might be able to do this night before as well. However, since the overnight assembly theory hasn't been tested (the several hours in the refrigerator idea was), don't try to prove it right or wrong the first time you make the Cheesy Hasselback Potato Gratin.

Sometimes you don't fully appreciate a gift until you put it to use (or until you make it yourself) as the sentiment expressed in any form of thank you changes considerably (and I suppose it could go in either direction). Having now started working my way through some of the recipes in The Food Lab, I am even more grateful for having received it as a gift. This blog posting is more than just sharing a genius recipe with you. It's also a new kind of thank you note.
Recipe
Cheesy Hasselback Potato Gratin (recipe source: The Food Lab: Better Home Cooking Through Science cookbook written by J. Kenji Lopez-Alt)

Ingredients
4 - 4 1/2 pounds Yukon Gold or russet potatoes, peeled and sliced to 1/8 inch thick (Note: Highly recommend the use of Yukon Gold potatoes, unpeeled, and sliced on a mandoline)
3 ounces finely grated Gruyere or Comte cheese
2 ounces finely ground Parmigiano-Reggiano cheese
2 cups heavy cream (if mixture is too thick add up to additional 1/3 cup of heavy whipping cream or half and half)
2 - 3 medium cloves of garlic, minced
1 Tablespoon fresh thyme leaves, roughly chopped
2 Tablespoons unsalted butter
Kosher salt and black pepper

Directions
1. Preheat the oven to 400 degrees (F) and have one of the racks centered in the oven.  Spread 2 Tablespoons of unsalted butter evenly in a 2 quart (or 8"x10" or 9"x12") baking dish and set aside.
2. Combine the grated cheeses in a medium sized bowl and mix until blended. Remove 1/3 of the cheese mixture and set aside. 
3. Add heavy cream, minced garlic, thyme leaves to the bowl containing 2/3 of the cheese mixture. Blend together and season generously with kosher salt and pepper.
4. One at a time, add the sliced potatoes, opening slices to allow each one to be fully coated with the cream-cheese-herb mixture. Transfer fully coated potato to prepared pan, setting potato on its' side (aligned vertically).
5. Continue placing potatoes in the baking dish until the entire dish is tightly packed. 
6. Pour the remaining cream-cheese-herb mixture over the potatoes. Note: If assembling the gratin early in the day, wait to pour remaining mixture until ready to bake in the oven.
7. Cover tightly with aluminum foil, place on center rack in the oven and bake for 30 minutes.
8. Remove foil from baking dish and continue baking for another 30 minutes (uncovered).
9. Briefly remove gratin from oven, sprinkle remaining 1/3 cheese mixture over the gratin and return to oven for another 30 minutes of baking.
10. Finished gratin will be golden brown on top and potatoes will be knife tender. Remove gratin from oven. Allow to rest several minutes before serving. Note: If not serving immediately, cover loosely with foil topped with dry dish towel to keep warm.

Important Note: Having baked these potatoes at both the recommended 400 degrees (F) and due to extenuating circumstances 350 degrees (F), much prefer the creaminess and texture of the potatoes when backed at 350 degrees (F). 

Friday, January 6, 2017

Macaroni and Cheese, Version 2


Winter has barely started and we are already experiencing some bone chilling, painfully cold days here in the midwest. The kind of days where you don't really want to leave the house as you irrationally fear frostbite will immediately set in even by merely stepping in the cold for the minute it takes to bring the garbage containers out to the curb, to walk from the car into the grocery store, or to bring more wood in to keep the fire in the fireplace going. Days where cozying up with a good book (preferably sitting near a warm fire), binge watching all of those shows you couldn't find the time to watch, and/or eating comfort food are the simplest of life's pleasure. Yet somehow they feel more like one of those 'pinch yourself' moments of indulgence.


A couple of years ago, the Huffington Post shared their list of the 25 Best Comfort Foods. Number three on the list was Macaroni and Cheese. A dish listed somewhere on almost every other best or quintessentially classic comfort food list ever published. Not surprisingly the search for Macaroni and Cheese recipes increases as the temperature decreases. Seems everyone goes on the hunt for the creamiest, cheesiest, dreamiest version of the most addictive of all comfort foods when the weather turns wicked. But most of us want not just creamy and cheesy, we want some crunch! In other words, we want our Macaroni and Cheese to have it all.


Recipes for making Macaroni and Cheese fall into two general categories: (1) those completely made on the stove and (2) those baked in the oven. This creamy, cheesy version begins on the stove and finishes in the oven.


Traditionally Macaroni and Cheese is made with elbow macaroni. But nothing prevents you from changing out the type of pasta in this dish. Although choosing the right kind of pasta is critical as using the wrong kind of pasta will affect the dish. Select a pasta having nooks and crannies to catch and hold onto the cheese sauce. Pasta shapes like shells, cavatappi, and farfalle are good at trapping the cheese sauce and can transform your Macaroni and Cheese dish from a simple to an 'up-scale' one.

The foundation of the cheese sauce is a roux made with equal parts butter and flour. Warmed whole milk is slowly added to roux, turning the mixture into a bechamel sauce. By using slightly warmed milk, you will spend less time whisking to get the sauce to the desired consistency. Salt, pepper, some Tabasco sauce (I like Cholula Hot Sauce), heavy cream and grated cheeses will finish off the sauce.


Cook your pasta al dente (i.e., firm, but with some bite) as it will continue to cook in the sauce when baked in the oven. More often than not I cook my pasta about a minute longer than the recommended al dente time listed on the bag/box. But test it before adding any cooking time. To temporarily stop the pasta from cooking any further, rinse in cold water as soon as you drain it in a colander. Be sure to drain the pasta before adding to the sauce.


I used an aged white sharp cheddar (from Vermont Creamery) and gruyere in this Macaroni and Cheese as both are known for melting easily and complimenting one another. If at all possible, never use pre-shredded cheese as it will not deliver as rich of a taste as cheeses freshly grated do. If you don't have or can't find gruyere cheese, use Parmigiano-Reggiano, Fontina, or a mild Gouda to go with the white sharp cheddar.

As tempted as you will be to eat the sauced pasta right out of the pan (and you will be), you will be rewarded for your patience if you pour (all but one or two small bites) it into your buttered casserole dish.


Sprinkle the reserved half cup of grated sharp cheddar cheese over the top of the casserole, before evenly spreading the buttered bread crumbs. Instead of using boxed bread crumbs, put some (white, egg or brioche) bread and/or rolls in a food processor and process until the mixture is crumbly. One generous cup of bread crumbs mixed with four Tablespoons of melted butter covered the casserole perfectly.


The Macaroni and Cheese bakes for 25-30 minutes in a preheated 350 degree (F) oven. It's done when the bread crumbs turn a beautiful golden brown and some of the sauce is bubbling up along the sides of the dish. Allow to sit for at least five minutes before serving.


This is a creamy, cheesy macaroni and cheese. The combination of the sharp cheddar and gruyere cheeses blended together contribute to giving the finished dish a great depth of flavor. And the buttered bread crumbs give it the perfect bite of crunch.


This version of the Macaroni and Cheese is the perfect side dish to go with barbecue, burgers, or grilled chicken, however, it's one where it can be a meal all unto itself. Serve with a simple salad and some white wine and you have the makings of a dinner party. To take this dish up a notch or make it slightly more decadent, top the servings with some sautéed lobster medallions or top the entire dish with them. Regardless of how you serve it, it is destined to help you survive the winter as well as completely satisfy a macaroni and cheese craving for at least a week.

On a side note, this version of Macaroni and Cheese may be my most favorite. I don't think I will be looking for another recipe any time soon. If ever.

Recipe
Macaroni and Cheese, Version 2 (slight adaptation to James Beard's Macaroni and Cheese recipe as shared in his cookbook Beard on Pasta)
Serve 6-8 as a side dish. Serves 4 to 6 as a main course.

Ingredients
4 Tablespoons unsalted butter
4 Tablespoons all-purpose flour
2 cups whole milk, warmed
1/2 teaspoon kosher salt
1/8 teaspoon black pepper
1/2 teaspoon Tabasco, or more to taste (Note: My favorite is Cholula Hot Sauce.)
1/2 to 3/4 cup heavy cream 
1/2 pound cavatappi or elbow macaroni, cooked al dente
8 ounces white, aged sharp cheddar, freshly grated and divided (Note: An eight ounce block of cheese is equivalent to 2 cups of grated cheese)
1 1/2 ounces grated gruyere  
1 cup fresh bread crumbs
4 Tablespoons melted butter

Directions
1. Preheat oven to 350 degrees (F). Butter a 12 inch casserole dish and set aside.
2. Melt 4 Tablespoons unsalted butter over low heat. Add flour and stir with wood spoon or spatula until the roux is frothy and the taste of raw flour is gone (approximately 3 minutes).
3. Add warmed milk gradually to the roux, stirring hard all the while. 
4. Turn up the heat and cook, stirring constantly, until sauce is just to the boiling point.
5. Turn down heat and let simmer for several minutes. Stir in salt, pepper, and Tabasco.
6. Stir in one half cup heavy cream and simmer for a couple of minutes longer.
7. Mix in three quarters (1 1/2 cups) of the grated cheddar and all of the grated gruyere into the sauce. Stir until cheese has melted. Remove from heat. Note: If sauce seems too thick, add the remaining quarter cup of heavy cream.
8. Cook (to al dente), rinse in cold water, and drain pasta. 
9. Mix pasta into the sauce.
10. Pour mixture into prepared dish.
11. Mix bread crumbs with melted butter.
12. Top mixture with remaining 1/2 cup of grated cheddar cheese and the bread crumb mixture.
13. Bake for 25-30 minutes until bubbly and bread crumbs have nicely browned.
14. Allow to set for 5 minutes. Serve.

Notes: (1) The first time you make this Macaroni and Cheese, use the traditional elbow macaroni. (2) Top individual servings of the Macaroni and Cheese with lobster medallions to turn it into a lunch/dinner course. (3) Instead of using slices of bread, buy a fresh roll from your bakery or in the bakery section of your grocery store to make the bread crumbs. (4) Reheat leftovers on a low heat microwave setting.


Shadows on the canyon walls in the Lower Dells at Matthiessen State Park, Oglesby, IL (January 2017)


Sunday, November 14, 2021

Shells and Cheese (Fontina & Cheddar)


"There is nothing I would not do for those who are really my friends." Jane Austen When it comes to being loyal, it would be fair to say I extend my fierce faithfulness only to people. Or rather I should say some people. Even when that loyalty might be a bit misguided or unreciprocated. Yet, with very few exceptions, I am genuinely not particularly loyal to things. Specifically to recipes. I can already hear your gasps! But before you stop reading this post or worse yet, decide you will no longer be a loyal follower, give me a chance to explain. As is often the case when I learn something new or self-reflect, I sometimes shift my thinking. The best example of this might be with regard to what I now believe to be a really, really, really good chocolate chip cookie recipe (at the moment it's this one). Over the course of the last thirty something plus years my loyalty, so to speak, to chocolate chip cookie recipes has changed for a myriad of reasons. From the quality of ingredients, to ingredient ratios, to recipe techniques, I must admit my allegiance to a recipe on more than one occasion has been upended. It's not that I completely abandon them, it's that they just don't always make regular repeat appearances on my table. 


There are currently five recipes, five versions of macaroni and cheese on the blog. And to be honest, I still like all of them for different reasons. But, if anyone were to ask me what my favorite mac and cheese recipe is, I would have to say it's for THIS ONE for Shells and Cheese. One made with Fontina and Cheddar cheeses and topped with a crunchy gremolata. If I were making mac and cheese for friends/family or for Thanksgiving, without hesitation, THIS would be the one I would be making. And it's the one I am going to try to be loyal to for as long as possible. And who knows, it could very well be one of those exceptions to the loyalty rule dishes!


So what's so different about this one that has me all excited and swooning over? Maybe it's the combination of both Fontina and Cheddar cheeses. Because what is not to love about the medium-sharp, rich, soft, creamy Fontina to give that cheese pull when you spoon it out of the dish? Or maybe it's the gremolata made with Japanese panko, fresh parsley, grated garlic and lemon zest adding both texture and flavor that had my head spinning. Or maybe it's the slight heat created by the use of onion powder, garlic powder, and white pepper that had me say 'wow' each time I took a bite. I could probably go on a bit more on why this is the lollapalooza of mac and cheese dishes, but I will show some restraint.


Like many macaroni and cheese dishes this one begins with a roux. Like most other bechamel based cheese sauces, this one starts with butter and flour. Although instead of adding in a higher milk to cream or half-and-half ratio, this one is heavy on the half-and-half. 


Because there isn't any hard and fast rule on which is the best pasta to use when making a macaroni and cheese dish, you can choose to stay traditional and use elbow macaroni or be swayed and use the slightly more delicate shells. But whether you opt for either of these choices or choose another one, remember you want one that lends itself to being liberally coated with the creamy, cheesy sauce. Or maybe you want to make a 'mockeroni' version using lightly steamed cauliflower florets. 

When buying a block of Fontina cheese, buy one weighing slightly more than you need to take into account the weight of rind. When choosing your cheddar cheese, look for one that's sharp. But for this dish you don't need to buy the highest end, most aged sharp cheddar you can find. Find one you like, one you would gladly just eat or serve on a charcuterie platter.


After you make the rich, creamy, cheesy sauce, remove the pan from the stovetop and mix in the al dente cooked pasta Working quickly, pour the entire mixture into a generously buttered baking dish. Note: You can make the dish up to this point early in the day. Just cover and refrigerate, but take out of the refrigerator at least 30 minutes before baking.


While the Shells and Cheese are baking in a preheated 350 degree (F) oven, make the gremolata. I had considered topping the dish with some crispy bacon, but at the moment I am in love with the flavor and added texture this gremolata brings to the dish. I prefer using the large, plain Japanese style panko rather than the smaller versions of panko you might find at the grocery store as it gives a much better crunch to the gremolata.


The gremolata is sprinkled on top after the Shells and Cheese finish baking. The recipe makes enough to lightly sprinkle over the whole dish or generously sprinkled down the center. Everyone needs to get at least a spoonful of it.


I might have momentarily died and gone to heaven while eating this Shells and Cheese dish. 


If by chance the dish isn't completely devoured and you have any leftovers, this Shells and Cheese dish reheats beautifully in the microwave. Yet another reason why I might become a most loyal fan to a recipe.


I don't think I am going too far out on a limb when I say this might be THE showstopper side dish at your next gathering. Which is all the more reason why you need one more macaroni and cheese recipe in your life. 

Recipe
Shells and Cheese (Fontina & Cheddar)
Serves 8-10 as a side dish

Ingredients
1 Tablespoon and 1 3/4 teaspoon Kosher salt, divided
16 ounces (454g) pasta shells (see notes)
3 Tablespoons extra-virgin olive oil, divided
4 Tablespoons (67g) unsalted butter
1/3 cup (44g) all-purpose flour
3 3/4 cups half and half
1/2 cup whole milk
10 ounces (283g) Fontina cheese, grated and divided
8 ounces (227g) sharp cheddar cheese, grated and divided (see notes)
1 1/4 teaspoons onion powder
1 1/4 teaspoons garlic powder
1 1/4 teaspoons white pepper
1/8 teaspoon nutmeg
1/2 teaspoon black pepper
1/2 cup Japanese style Panko
1/2 cup freshly chopped flat leaf parsley
Zest of one lemon
1 large garlic clove, grated

Directions
1. Preheat the oven to 350 degrees (F). Generously butter a broiler safe 9" x 11" baking dish. Set aside.
2. Bring a large pot of water to boil over medium-high heat. Add in 1 Tablespoon of Kosher salt and the package of shells. Cook to al dente according to the package directions, but taste to make certain. Drain and transfer to a large bowl. Stir in 1 Tablespoon of extra-virgin olive oil to keep the pasta from sticking.
3. In a heavy bottomed saucepan, melt the butter over medium heat. Whisk in the flour and cook whisking constantly until the mixture is lightly browned (about 4 minutes).
4. Gradually add in the half-and-half and milk, stirring until the sauce is smooth. Bring the sauce to a simmer over medium-high heat (whisking regularly), then reduce the heat to low and continue cooking for 4-5 minutes or until the sauce has no floury taste (about 4 minutes).
5. Remove from the heat and gradually add in 6 ounces of the grated Fontina and 6 ounces of the grated sharp cheddar, whisking until smooth. Whisk in the onion powder, garlic powder, white pepper, and nutmeg.
6. Stir in the cooked shells. Season with 1 1/2 teaspoons Kosher salt and 1/2 teaspoon black pepper. 
7. Transfer mixture to the prepared baking dish. Top with the remaining 4 ounces of grated Fontina and 2 ounces of grated cheddar. Place dish on a large baking sheet and bake for about 20 minutes (or until the edges begin bubbling).
8. While the dish is baking, heat the remaining 2 Tablespoons of extra-virgin olive oil in a small saucepan over medium heat. Add in panko and cook until golden (about 3-4 minutes). Transfer to a bowl and let rest for 2 minutes. Stir in the chopped parsley, grated lemon zest, and grated garlic. Season with 1/4 teaspoon Kosher salt.
8. Increase the oven temperature to broil and cook until browned in spots (about 2-3 minutes). Again, remember to use a baking dish that can withstand a broil temperature.
9. Remove from the oven and let set for at least 5 minutes.
10. Top the Shells and Cheese with Gremolata. 
11. Serve immediately.

Notes: (1) Recipe heavily influenced by the Baked Shells with Gremolata Breadcrumbs recipe found in Food and Wine's Thanksgiving Issue, November 2021. (2) I used the N 105 shells from Granoro. (3) I used the Trader Joe's Unexpected Cheddar, however, if you want a slightly creamier dish use a softer sharp cheddar. (4) The other mac and cheese recipes on the blog can be found here: Gouda Mac and Cheese with Caramelized Shallots, Mac and Cheese East Coast Style, Baked Macaroni and Cheese, Macaroni and Cheese, Version 2, and Stovetop Mac and Cheese with Caramelized Shallots.


Scenes from Cape Cod (October 2021)


Saturday, May 2, 2020

Spinach, Mushroom, Swiss Cheese & Feta Cheese Quiche


Taking a ride on a virtual roller coaster might best describe what the last week felt like for me. Fortunately an extreme high came after an extreme low. After learning the much anticipated August Lululemon half-marathon in Vancouver was cancelled, I was heartbroken. To say that I was looking forward to this race and trip like a five year old looks forward to Christmas, would be an under statement. Filled with grief over this seemingly insignificant loss in light of all that is going on in the world, I took all my angst out by going out for a long run to stop me from feeling I was in a free fall. But it wasn't until I took a sixty mile drive to a semi-hidden woodland overflowing with bluebells in full blossom, did I feel such heart racing joy. Lavender, blue, and pink bluebells covered the entire forest floor. The scene felt like I was standing in either an ethereal fairy land or a Monet painting. It was the first time in weeks I wept tears of pure joy, actually wanted time to really stand still, and felt real roller coaster exhilaration. Hiking through the woods on a beautiful sunny day with my camera around my neck, taking in all of nature's abundant beauty was exactly the magic elixir my spirit so badly needed. I am unsure how I will ever express my gratitude to the friend who brought me there and who patiently waited while I took photo after photo. Nothing could change the incredibleness of the day. Nothing. Not even being pushed to a fall after my friend closed the social distance gap and jumped forward when she saw a snake. The mud on my sleeves and leggings were not only a fitting end to the week, they made the day even more memorable.


Speaking of memorable moments, this Spinach, Mushroom, Swiss Cheese & Feta Cheese Quiche is one of those memory making meal dishes. And one that will definitely bring joy to your day. Maybe even your week!


Among the list of 'good' things to come out of stay at home time has been my return to making quiche. Relatively simple to make (especially if using a store-bought refrigerated pie crust) and definitely a stress-free recipe, eggs-cheese-cream-spinach-mushrooms come together to make an abundantly delicious meal. It's great served hot out of the oven, slightly warm (my personal favorite), at room temperature, or even chilled in the refrigerator. But that's not all. It's an incredibly flavorful vegetarian dish even meat lovers will find hard to resist.


When it comes to buying cheese I tend to skew to the cheesy fussytarian side. Which means I like to grate my own cheeses and buy my Greek feta cheese from the deli counter at the grocery store. Freshly grated or freshly crumbled cheese are so much more flavorful than anything you buy pre-grated or pre-crumbled. 

After making several quiches in the past few weeks, I have now decided (post making this one) that I will partially bake the crust going forward. It adds an extra step, but having a crispier, less soggy crust will definitely be well worth the effort. 


In addition to the crust lesson, I have learned something else about making quiche. After the quiche has baked, I now immediately turn off the oven and let it sit in there for another 8-10 minutes. Instead of drying out the quiche, it helps to solidify all of the liquids. Or in other words it prevents you from having a 'weepy' quiche.

While I may admittedly be a bit biased, I think this is the best spinach-mushroom-cheese quiche I have ever eaten. The Swiss and Feta Cheeses not only work well together, they add a great depth of flavor to this quiche. Additionally the Swiss Cheese tempers some of the saltiness of the Feta Cheese usually found in Spinach Cheese quiches served in restaurants. So much so that I may never order another Greek-style Spinach quiche in a restaurant again unless it contains both of these cheeses. Selfishly I am glad there are only two of us living in this house, because there were leftovers! Which also meant I could get off the merry-go-round of cooking meals every day!


As one my friends said to me earlier this week 'it's a really, really hard time now. It doesn't mater about 'more' significant events. Grief is personal and valid. There is so much to grieve during this unprecedented time.' Those much needed wise words of comfort along with spending an afternoon soaking up the beauty of nature were reminders of how important it is to stay connected to friends you treasure and with your passions. So take care and feed both your body and soul with the things you love, the things that bring you heart-racing, good-old fashioned exhilaration and joy. 

Recipe
Spinach, Mushroom, Swiss Cheese & Feta Cheese Quiche
Serves 6-8

Ingredients
1 refrigerated or homemade pie crust
3 large eggs
1 large egg yolk
1 cup heavy whipping cream
1 cup whole milk
1/4 teaspoon ground nutmeg
5-6 dashes of hot sauce (such as Cholula)
1/4 teaspoon kosher salt
1/4 teaspoon white or black ground pepper
8 ounces (227) fresh mushrooms, thinly sliced, sautéed and cooled slightly
10 ounce (283) package of frozen spinach, thawed, drained and squeezed of it's liquid
One cup or 5 ounces (140 g) Swiss cheese, grated 
One cup or 5 1/3 ounces (150g g) fresh Greek Feta Cheese, crumbled (see notes)

Directions
1. Preheat oven to 425 degrees (F). Roll out or unroll the refrigerated pie dough and form into a 9" deep round baking dish. Pierce the bottom of the dough with a fork. Line the dough with parchment paper and fill with pie weights or dried beans. Bake for 15 minutes. Then remove the pie weights/beans and bake for another 5 minutes (unfilled). Let the par-baked crust cool while you make the quiche filling.
2. Reduce the oven temperature to 375 degrees (F).
3. In a large mixing bowl, whisk together the eggs, whipping cream, whole milk, nutmeg, hot sauce, kosher salt, and pepper.
4. Stir in the grated cheeses, spinach, and mushrooms. 
5. Carefully pour the quiche mixture into the par-baked shell. Place the quiche plate on a sheet pan and insert into the oven. Note: You may need to use some thongs to carefully break up the clumps of spinach/mushrooms so they are evenly distributed in the quiche. In other words, you don't want a dome of vegetables sitting in the middle of your quiche shell before it goes into the oven.
6. Bake for 55-60 minutes or until the quiche is puffed, lightly golden and slightly firm to the touch. Turn off the oven and let the quiche rest in there for 8-10 minutes.
7. Remove quiche from the oven. Let sit at least 10 minutes before slicing into wedges.

Notes: (1) If you happen to be cooking only for yourself, you can get 6 meals from this quiche. Wrapped well the quiche will keep in the refrigerator for 4-5 days. It reheats beautifully in the microwave or you could eat it at room temperature or chilled. (2) When buying Feta Cheese, choose a good quality imported Greek Feta for the most optimal flavor.

Bluebells in full bloom. Bourbonnais, IL (May 2020)