Showing posts sorted by date for query cheesy. Sort by relevance Show all posts

Sunday, April 28, 2024

Pimento Cheese with Red Pepper Jelly


Ten years ago I shared a recipe for Pimento Cheese. And for the past decade it's been my go-to recipe. Not unlike most 'firsts', it will always be a favorite. However, on a fun-filled, bourbon tasting inspired girl's trip to Louisville, Kentucky last week I discovered a twist on this beloved, classic spread. While having cocktails before dinner at Proof on Main, one of my friends ordered the pimento cheese appetizer. Considering the 150th running of the Kentucky Derby was just two weeks away, it couldn't have been a more perfect choice. Served in small canning jars, the Pimento Cheese was topped with Red Pepper Jelly. The contrast of flavors of the creamy, tangy cheese mixture with the sweet, spicy red pepper jelly was absolutely brilliant. 


As it turned out, I came home from the trip with more than multiple bottles of bourbon and a t-shirt from Churchill Downs. I returned home inspired. Rather than simply topping my pimento cheese recipe with red pepper jelly, I thought maybe I would make a new version of this highly addictive spread. 


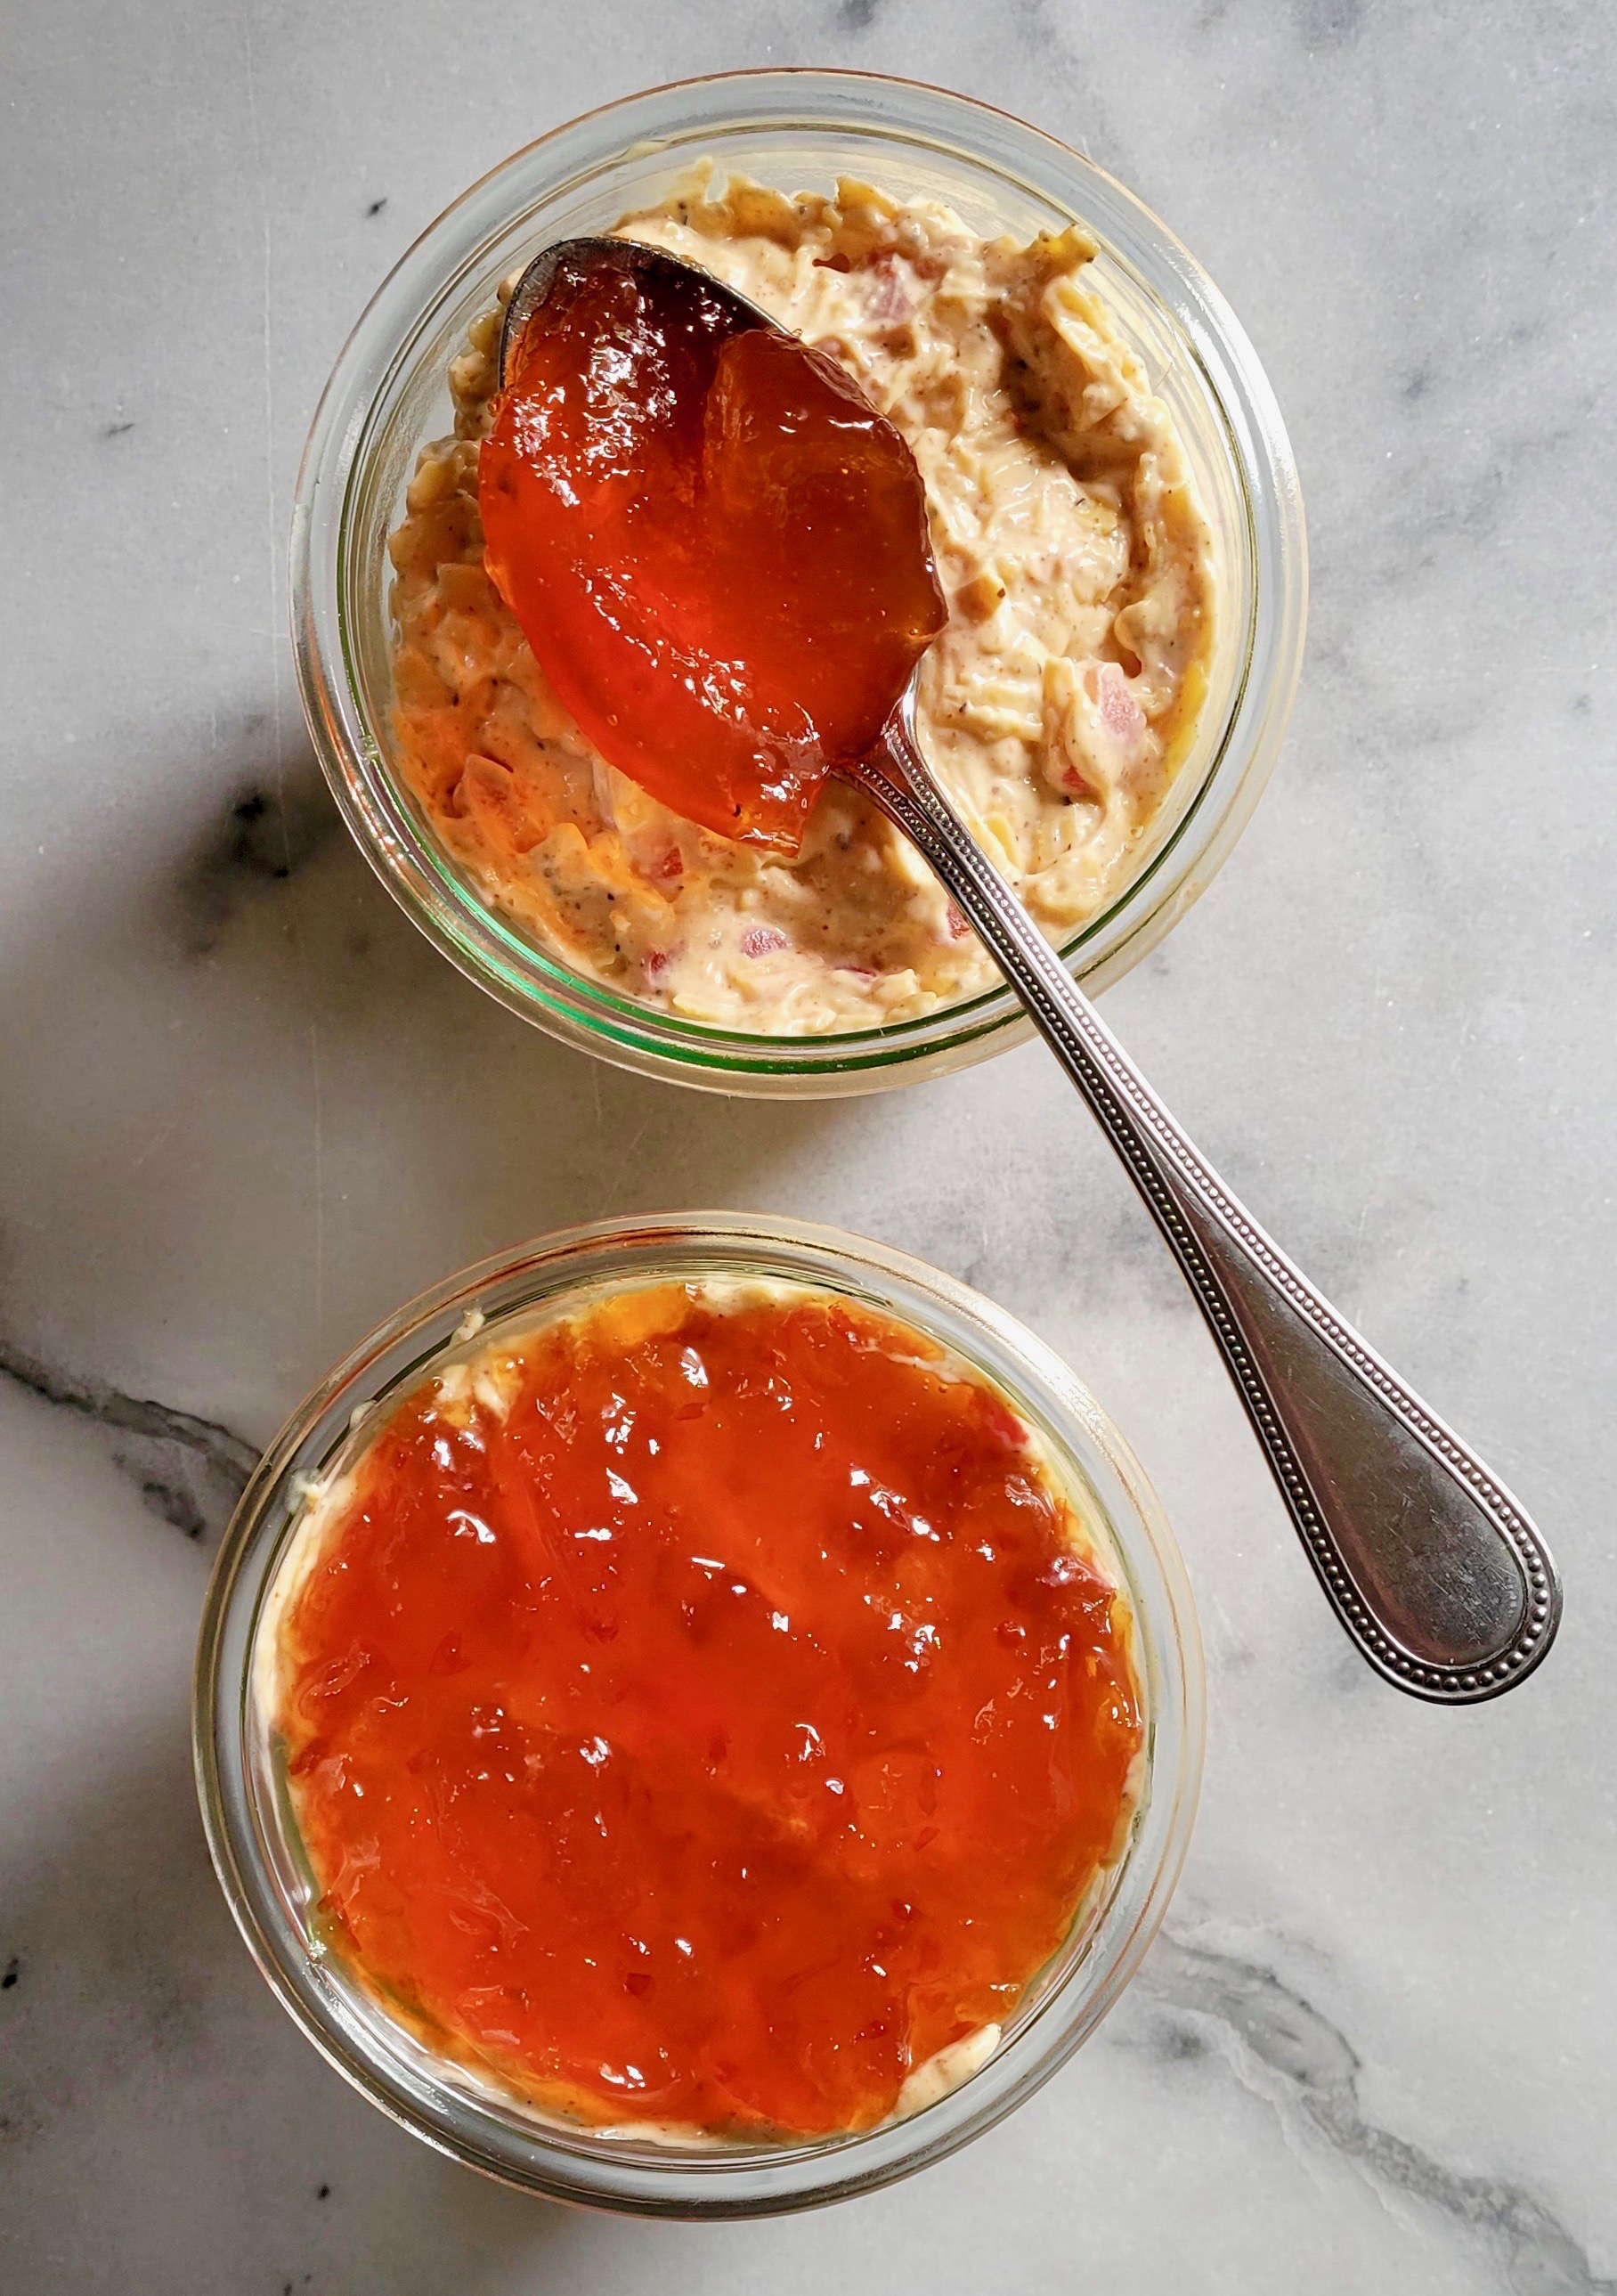
This time around I added a small amount of cream cheese to the mixture, omitted the green onions, was slightly more heavy handed with the hot sauce, and used smoked paprika instead of cayenne. However, I did not even consider swapping out the sharp (yellow) cheddar cheese with any other cheese. Nor did I even consider using anything other than Duke's mayonnaise. I was more than pleasantly surprised to discover how divinely delectable this new version was. And that was even before I topped it with the red pepper jelly!


Serving the Pimento Cheese with Red Pepper Jelly on crostini instead of on classic white bread also turned out to be an ingenious idea! It may have been forty eight years since I first tasted Pimento Cheese at the Kentucky Derby, but my affinity for it hasn't changed. Except maybe now I am even more smitten with it.

With the Kentucky Derby just around the corner (it's the first Saturday in May), now would be the perfect time to make this cheesy, tangy, sweet, spicy spread. This homemade version will invariably be far superior to anything you might find in the grocery store! Serving it in canning jar creates an irresistible, rustic presentation. There may no better way to pay homage to this celebrated humble spread.

Recipe
Pimento Cheese with Red Pepper Jelly

Ingredients
8 ounces (227g) sharp cheddar cheese (see notes), coarsely grated 
1/2 to 2/3 cup Duke's mayonnaise
4 ounce jar of pimento peppers, drained
1/2 teaspoon black pepper
1/2 teaspoon Kosher salt
1/2 teaspoon smoked paprika
2-3 dashes hot sauce
2 ounces cream cheese, softened
Several Tablespoons of Red Pepper Jelly
Crostini made from a baguette (using either the oven or grill method)

Directions
1. In a large bowl, combine the grated cheddar cheese, cream cheese, 1/2 cup mayonnaise, pimento peppers, smoked paprika, Kosher salt, black pepper and hot sauce. Use a large spoon or spatula to combine. Mix until you have a well combined, creamy spread. If it's not creamy enough, add in a little more mayonnaise and blend again. Note: I usually end up using 2/3 cup of mayonnaise.
2. Transfer the mixture your serving containers and chill in the refrigerator for several hours or overnight.
3. When ready to serve, top with a thin layer of Red Pepper Jelly (use 2-4 tablespoons depending on the size of the jar). Serve with some oven baked or grilled crostini.

Notes: (1) Do not buy pre-shredded cheese! Buy a good quality sharp cheddar cheese (I used Tillamook) and grate it on the large holes of a grater. (2) I used Stonewall Kitchen's Red Pepper Jelly, but use any good quality one. Or use one you make from scratch. (3) If you can't find Duke's Mayonnaise, use a homemade mayonnaise or Hellman's (Best Foods) Mayonnaise. Whatever you do, don't use Miracle Whip. (4) Use smaller or medium sized canning jars for serving. (5) If you have any leftovers, use to make Pimento Cheese Toast. A slice of bread spread with the pimento cheese and topped with softly scrambled eggs. Or make a grilled pimento cheese sandwich!


Grazing horse in rural Kentucky and Churchill Downs (April 2024)

Friday, March 29, 2024

Honey & Herb Baked Fontina & Gruyere in Puff Pastry


Rather than serving only one appetizer when hosting a dinner party, I have a tendency to serve an array of them. While isn't necessarily a bad thing, but sometimes all we need is just one show-stopping, appetite whetting, crowd pleasing appetizer. And this gorgeous, cheesy Honey & Herb Baked Fontina & Gruyere in Puff Pastry is one heck of a stunner. Not only does it promise to make all of your cheese loving friends deliriously happy, it will exceed all of their expectations. Worthy of putting in your appetizer rotation and ideal for a gathering of six to eight people, you too might come around to the idea that less is more. I know I finally have.

After everyone is finished dipping their crackers or sliced baguettes into the hot, gooey cheese, cut the cheese, honey, and herb laden golden, flaky puff pastry into wedges. Drizzled with some additional honey, you get double the pleasure from just one appetizer!  If there was ever a time when you don't want a single bite to go to waste, this would be one!


In addition to being able to assemble this appetizer earlier in the day, you get to decide on your cheese and herb ratios. You can use equal parts of cubes of Fontina and Gruyere cheeses or you can use a 2 to 1 ratio (I used the 2 Fontina to 1 Gruyere ratio). Both thyme and rosemary pair perfectly with these two cheeses. You can use a combination of the two or you can use one or the other (I used a thyme/rosemary combination, slightly heavier on the thyme). Puff pastry, minced garlic, honey, an egg and coarse sugar round out the ingredients needed.


My favorite, go-to frozen puff pastry is made by DuFour. While it's definitely not inexpensive, it's texture and flavor are heavenly. DuFour's puff pastry comes in a rectangular shape, but it can easily be cut into a square. You can use small cookie or canapé cutters to cut shapes out of the extra piece of puff pastry. I used a small star cookie cutter to decorate the top of the folded pastry.


Once the pastry is folded over the cheese, honey, garlic and herb mixture, it's brushed with a lightly beaten egg and generously topped with some coarse (not granulated) or sanding sugar. If not baking immediately, keep chilled in the refrigerator. Note: If chilling, wait to brush on the egg wash until ready to bake.

The Honey & Herb Baked Fontina & Gruyere in Puff Pastry bakes in preheated 425 degree (F) oven for 30-35 minutes or until the pastry is golden brown and cheese completely melted. The cheese should be hot and gooey.


Garnish with some fresh herbs (maybe even some edible flowers) and drizzle with some additional honey before serving. I loved pairing the (pricey) Rainforest Crackers with it, but Trader Joe's sells a less expensive version. A sliced baguette would be an equally good serving option.


This creamy, melted Fontina and Gruyere cheeses encased in an egg-washed, sugar crusted, flaky puff pastry is a sinfully delicious symphony of flavors. It has the perfect balance of sweetness, savoriness, creaminess, and flakiness. Having all of the hallmarks of a show-stopping, exceptional appetizer, it is destined to be a huge hit at your next gathering. 

Recipe
Honey & Herb Baked Fontina & Gruyere in Puff Pastry
Serves 6-8 as a hearty appetizer

Ingredients
14 ounce box of puff pastry, thawed (i.e., DuFour)
14-16 ounces of a mixture of Fontina and Gruyere cheeses, cut into 1/2" cubes (see notes)
2 large garlic cloves, finely minced
1 1/2 Tablespoons of fresh thyme and rosemary, minced (see notes)
3 Tablespoons good quality honey, plus more for serving
1 large egg, lightly beaten
2-3 Tablespoons coarse or sanding sugar

Directions
1. Preheat oven to 425 degrees (F). Line a 12" round pie plate with parchment paper.
2. Cut the puff pastry into a 10-11" square. Make 3" cuts (on the diagonal, horizontally, & vertically) on the pastry. Use the 2" extra strip of puff pastry by cutting out shapes with a small cookie or canapé cutter.
3. Place the large piece of puff pastry on top of the parchment paper.
4. Pile the cubes of the mixture of cheeses into the center of the puff pastry. 
5. Top the cheese with the minced garlic and herbs. Use your hands to lightly toss.
6. Drizzle the honey over the top of the cheese/herb/garlic mixture.
7. Fold the edges of the puff pastry over the cheese. Pinch the cuts along the edge of the puff pastry. Top the puff pastry with the extra pastry cutouts (if using).
8. Brush the puff pastry with the egg wash. Generously sprinkle with the coarse or sanding sugar. Do not use granulated sugar.
9. Bake for 30-35 minutes or until the pastry is golden brown and cheese has completely melted.
10. Remove from the oven. Place the dish on wood or slate cutting board. Garnish with some fresh herbs and/or some edible flowers. Lightly drizzle with some additional honey.
11. Serve with your favorite crackers, baguette slices and extra honey.
12. Once all the cheese has been scooped out of the cheese, use a knife to cut slices of the puff pastry to enjoy.

Notes: (1) I used a 2 part Fontina, 1 part Gruyere cheese mixture. You can also use a 50/50 cheese ratio. Fourteen ounces of cheese worked well. (2) I used a 2 part thyme, 2 part rosemary mixture. You can also use a 50/50 herb mixture ratio. Or use either all thyme or all rosemary. (3) If you can't find DuFour Puff Pastry, use another good quality puff pastry. The puff pastry from Trader Joe's is also highly rated. (4) Recipe inspired by one from Half Baked Harvest.
Directions

Tuesday, May 30, 2023

Baked Tortellini and Sausage Casserole


We all need to have easy to make, hearty, mouthwatering delicious, one dish wonders in our repertoire. Especially the kind worth turning the oven on for even when the warm weather returns. There may be no better crowd pleasing dishes than ones made with pasta. And this Baked Tortellini and Sausage Casserole will have everyone hoping there is enough left for seconds. 


Whether you are looking for a great weeknight meal, an impressive weekend entertaining dish, or the perfect Sunday supper, this Baked Tortellini and Sausage Casserole is one of those worth their weight in gold recipes you can make for any of them!


I am having one of those cooking moments where simple, semi-homemade(ish) dishes are the only things I want to make. No, I am not giving up my favorite, multi-step, semi-labor intensive recipes. I have just decided to give myself permission to see the beauty in simplicity. Yes, I have taken the proverbial fork in the road. Because if I have learned anything over the (many) years, it's this. With great ingredients, flavor is never sacrificed in simple recipes. 

And great ingredients doesn't always mean made from scratch. It means using fresh herbs over dried herbs; whole milk fresh mozzarella over low-moisture mozzarella; and freshly grated Parmigiano-Reggiano over packaged generic grated parmesan cheese. And believe it or not, there are even some great jarred marinara and pesto sauces out there (see notes). But if nothing compares to your made from scratch, homemade marinara sauce or pesto, then by all means make this Baked Tortellini and Sausage Casserole using them. When looking for the pasta, look for smaller sized cheese tortellini, not the large sized cheese tortelloni. 

When buying Italian sausage I tend to by the 'mild' sausage in the casings (versus in bulk). I shy away from the spicier Italian sausage mostly because I don't want some dishes overpowered by it's 'heat'. After removing the sausage casings, I break off bite sized pieces before browning them in a large skillet. Even though the casserole bakes in the oven, you want to make certain you cook the sausage pieces through. You don't want to them to have pink centers. 


You can mix everything together in a large bowl or in the casserole dish. Just mix in the shredded mozzarella cheese in last and remember to reserve 1/4 of the sauce. 

Once the mixture is transferred to the baking dish, it's topped with the reserved sauce and the bocconcini (cut in half). Instead of the bocconcini you can top it with freshly grated fresh mozzarella. The choice is yours.


One of the best things about this Baked Tortellini and Sausage Casserole is that you can make it early in the day. Cover and refrigerate until you are ready to bake it. Total baking time ranges from 45-55 minutes. For the majority of the baking time, you will keep it covered with aluminum foil. This will help to keep everything from drying out.

A generous sprinkle of freshly minced Italian parsley and dollops of basil pesto are the finishing touches to the Baked Tortellini and Sausage Casserole after it's removed from the oven. You can top it with some freshly grated Parmigiano-Reggiano or serve it on the side in a bowl. I opted for the on the side option here. 

This is one of those saucy casseroles enticing you to clean your dish with a thick piece of Italian bread. I would be surprised if everyone also dipped their bread in the casserole dish where rivers of sauce were left behind. 

One bite of this cheesy dish might leave you temporarily speechless as it's so incredibly flavorful. Sure you might feel dangerously full after you eat it, but you will never feel more satisfied. And isn't having your family and/or friends leave your table felling happy and full what it's all about? I seriously doubt you could find anything coming close to this 'great' in a restaurant. 

Recipe
Baked Tortellini and Sausage Casserole
Serves 6-8

Ingredients
1 to 1 1/4 pounds of mild Italian sausage, broken up into small bite sized pieces
24 ounces frozen small sized cheese tortellini, cooked al dente, drained and cooled very slightly
2 - 24 ounce jars of Tomato Basil Marinara, divided (see notes)
8 ounces of fresh (whole milk) mozzarella grated
8 ounces of fresh bocconcini mozzarella, cut in half (or use 4 ounces of fresh (whole milk) shredded mozzarella
7-9 basil leaves, julienned
1/4 cup fresh Italian parsley, minced
3-4 Tablespoons basil pesto (fresh or good quality jarred)
Freshly grated Parmigiano-Reggiano for serving

Directions
1. Preheat oven to 350 degrees (F) 
2. In large skillet, cook Italian sausage until browned and no longer pink. Remove from heat and cool slightly.
3. In a large bowl, mix together the cooked tortellini, 3/4 of the marinara sauce, julienned basil, and cooked sausage. Then mix in the shredded mozzarella. Transfer mixture to a large (heatproof) baking dish or pan (recommend a 10"x13" or similar sized pan)
4. Top the casserole with the remaining 1/4 (or half of one 24 ounce jar) of the marinara sauce and the bocconcini halves or shredded mozzarella. Cover with aluminum foil (keep the foil slightly doomed). 
5. Bake the casserole for 35-40 minutes.
6. Remove the aluminum foil and bake for additional 10-15 minutes or cheese has melted.
7. Remove from the oven. Top with minced fresh parsley and evenly dollop fresh pesto over the top. 
8. Serve with grated Parmigiano-Reggiano and thick slices of Italian bread.

Notes: (1) The inspiration for this hearty, scrumptious recipe came from Instagram food blogger Diane Morrissey. (2) I used Rao's Tomato Basil Marinara. (3) I generally buy my cheese tortellini from a local Italian store. Cooking times is about 3 minutes for the smaller sized frozen tortellini. (4) You can make this casserole early in the day. Cover and store in the refrigerator. Remove from the refrigerator about 30 minutes before placing in the preheated oven. Baking time might need to increase slightly.

Monday, May 8, 2023

Chicken Parmesan


Whether you call it Chicken Parmesan or Chicken Parmigiana doesn't really matter. They are the same thing. Mouthwatering deliciousness served either over fettuccini (my favorite pasta for this dish) or in a lightly toasted roll may be one of the most satisfying, flavorful dishes on the planet. Because seriously, what is not to love about a fried panko crusted chicken cutlet smothered in a luscious marinara sauce and topped with melted fresh mozzarella and freshly grated Parmigiano-Regianno?


Quite possibly the only reason you wouldn't put this dish near the top of one of your favorite comfort food meals is that you have been underwhelmed by ones you have tasted in a restaurant. And I get that. After years of being disappointed by the chicken parmesan served in a variety of restaurants (even in some good Italian ones), I am extremely hesitant to order it when dining out. But making Chicken Parmesan at home is a completely different story.  Here's the good news. You no longer have to settle for mediocrity or good enough. Because now can have the most spectacular, incredibly scrumptious, seriously craveworthy homemade version! This cheesy, crispy, hearty, saucy dish is one of those rare rustic, yet elegant dishes that is as much family dinner friendly as it is both Sunday supper and dinner party worthy. If there was ever a dish to put on regular repeat rather than relegating it only to special occasions, this is the one!

Served with a beautiful salad, some thickly sliced fresh Italian bread, and a great wine, a platter of Chicken Parmesan set over a bed of fettuccini is the makings of one of the most impressive, satisfying meals you can serve to your family and friends.


When it comes to breading the pounded, skinless, boneless chicken breasts (aka cutlets), there are no shortage of opinions as to which type of breading is best. Freshly made breadcrumbs, canned breadcrumbs, or Panko-style breadcumbs each have their own fan club. For me, it's Panko-style breadcrumbs as they add the right about of crispiness and crunch to the fried chicken breast. And rather than open up jars of dried spices to season plain panko bread crumbs, I prefer using (Italian) seasoned panko and adding additonal some garlic powder and freshly grated Parmigiano-Reggiano cheese to further boost the flavor.

Keys to getting a perfectly cooked, crisp, yet moist chicken cutlet include: (1) pounding the chicken breasts to a 1/2" thickness; (2) dredging the cutlets in flour, then egg, then panko breadcrumbs; (3) frying in olive oil; and (4) cooking the cutlets (in batches) in a cast iron skillet for approximately 2-3 minutes per side. Follow those simple rules and your golden brown Chicken Parmesan cutlets will be next level amazing!


If you have a favorite marinara sauce recipe, use it. But also feel free to use a high quality jarred marinara sauce (i.e., Rao's). It may sound a bit sacrilegious to even suggest using a jarred marinara sauce when making Chicken Parmesan, but there is much to be said about semi-homemade dishes. I mean, if Ina Garten (food goddess extraordinaire) can, well you can too! While the recipe below calls for only 24 ounces of marinara, I highly recommend you either make or buy more to serve warm on the side. As there will be some who like an even saucier Chicken Parmesan.


But when it comes to the mozzarella, use only fresh mozzarella for the absolute best flavor. Either the prepackaged one or the one you buy at your favorite specialty grocery store will work perfectly. Do not buy the ones labeled as low-moisture or low-fat mozzarella (this falls into the strong opinion category). 


When baking the Chicken Parmesan, begin by putting a layer of the marinara on the bottom of the heatproof baking dish before adding in the cooked chicken cutlets. Next, top with the slices of the fresh mozzarella. Finish with the marinara and freshly grated Parmigiano-Reggiano cheese. Bake the dish for 10 minutes at 400 degrees (F), then increase the oven temperature to 500 degrees (F) and bake for an additional 3-5 minutes or until you can see that the cheese has melted. Remove from the oven, top with more freshly grated Parmigiano-Reggiano, some freshly chopped parsley and maybe even some fresh basil. Note: When baking the Chicken Parmesan, make certain to use a baking dish that can hold up to high temperatures. 


There are many ways to serve this Chicken Parmesan. You can serve it directly from the baking dish (with pasta on the side) for a casual, slightly rustic presentation. You can serve it over a bed of cooked fettuccini tossed in olive oil (or marinara) for a kind of wow factor presentation. Or you can serve it on lightly toasted Italian rolls for a casual, yet hearty lunch option. The choice is all yours! 


Recipe
Chicken Parmesan
Serves 6-8

Ingredients
4 skinless, boneless chicken breasts (approximately 2 pounds), pounded to 1/2" thickness and cut in up to 8-9 even sized pieces
1/2 cup (65g) all-purpose flour + 1 teaspoon Kosher salt + 1/2 teaspoon black pepper
1 cup (88g) Italian seasoned Panko + 1/2 teaspoon garlic powder + 3 Tablespoons grated Parmigiano-Regianno
3 large eggs + 1 Tablespoon water
1/4 cup olive oil, plus more for finishing
1 pound (453g) fresh mozzarella, cut into generous 1/4" slices
24 ounces (680g) jarred marinara, highly recommend Rao's - SEE NOTES
1/4 cup grated Parmigiano-Regianno, divided (plus more for finishing)
1 pound (454g) fettuccini cooked to your liking and tossed with olive oil when placed on the platter
Fresh basil leaves and chopped fresh parsley for garnish

Directions
1. Preheat oven to 400 degrees (F).
2. Set up your dredging assembly line: (1) shallow bowl with flour, Kosher salt and black pepper whisked together (2) eggs whisked with water and (3) Panko mixed with garlic powder and Parmigiano-Regianno.
3. Coat both sides of the chicken breasts with flour (shake off excess). Dip into the egg mixture. Lastly dredge in the panko mixture. Transfer to a sheet pan and repeat until all of the chicken cutlets have been coated.
4. In a cast iron skillet, heat 1/4 cup of olive oil over medium heat. Placing 2 -3 pieces of the chicken in the pan at a time, cook 2-3 minutes per side or until lightly golden. Repeat until all pieces of the chicken have been cooked.
5. Pour approximately 1/3 of the marinara sauce on the bottom of a large heatproof baking dish. Arrange the cooked chicken cutlets on top of the sauce. Top each of the breasts with the sliced fresh mozzarella cheese. Spoon the remaining sauce over the tops of the cheese and chicken. Sprinkle on some grated Parmigiano-Regianno.
6. Bake for 10 minutes at 400 degrees (F). Increase the oven temperature to 500 (F) and cook for another 3-5 minutes or until the cheese has melted.
7. Remove from the oven. Grate more Parmigiano-Regianno on top, lightly drizzle with some olive oil, and garnish with fresh basil and parsley. Serve with the cooked fettuccini either lightly tossed with olive oil or additional marinara.
8. Alternate serving options: (1) Place cooked pasta on a large serving platter. Top with the chicken parmesan.  Grate some additional Parmigiano-Regianno on top, lightly drizzle with some olive oil, and garnish with fresh basil and parsley. (2) Make Chicken Parmesan sandwiches using lightly toasted Italian Rolls.

Notes: (1) Highly recommend having another 12-20 ounces or more of marinara sauce, heated and served on the side. The extra sauce can be used to toss with the pasta or slather on bread. (2) I tossed my fettuccini in olive oil before putting on the platter and served the extra sauce on the side. (3) I used BelGioioso presliced fresh mozzarella cheese here.


Sakonnet Vineyard, Little Compton, RI (April 2023)

Sunday, March 5, 2023

Baked Rigatoni w/ Sausage, Ricotta & Mozzarella

We dodged the blizzard bullet this past weekend. However, in anticipation of the predicted heavy snowfall, I thought the forecast called for comfort food to fortify our bodies and spirits. First up was replenishing the freezer with balls of dough made from my favorite chocolate chip cookie recipe. Followed by a trip to the grocery store to gather the ingredients for both pancakes and this hearty, soul satisfying, incredibly flavorful Baked Rigatoni w/ Sausage, Ricotta & Mozzarella. As it turned out, we didn't have to shovel any snow, but we ate pretty well. 


Beyond how satisfying it is, the Baked Rigatoni w/ Sausage, Ricotta & Mozzarella is a perfect, unfussy weeknight, weekend, Sunday dinner, or dinner party worthy dish. Paired with a fabulous salad, some warm crusty bread, and wine, you have all of the makings of a meal destined to make everyone sitting around the table feel both happy and content. 

There are technically two versions of this dish. The simple one and the more complicated one. The simple one uses a high quality store-bought arrabbiata sauce and store-bought pesto. The complicated one is made with homemade marinara and homemade pesto. The recipe below is for the simpler one. The simple, semi-homemade version makes it an even more enticing go-to dish.


With three kinds of cheese, could this Baked Rigatoni w/ Sausage, Ricotta & Mozzarella be any more irresistible? A ball of fresh mozzarella (cut up or broken up into pieces), grated mozzarella, and whole milk ricotta are the trifecta of cheesy goodness. If you want to give the ricotta even more body, I highly recommend you mix it with an egg yolk. Mild Italian sausage and arrabbiata sauce give this dish a bit of kick. However, if you want a slightly less spiced version, use chicken sausage and marinara sauce. 


Heavy cream and butter (should you decide to use it), adds both thickness and richness to the sauce. A small amount of butter goes along way, so one tablespoon is all you really need. When buying the pasta, I highly recommend using rigatoni, but you could also make it with ziti. But you should know there is a difference between the two. Rigatoni is usually made with durum wheat flour and is a tube shaped, ridged, flat end pasta. Ziti, on the other hand, is smooth with angled edges. Both work well in baked pasta dishes, however, the rigatoni has a slightly firmer bite than the ziti and it's ridges give the sauce something to cling to. I just happen to think the rigatoni makes the dish even more appealing.


The shredded mozzarella get mixed into the pasta, sauce, and sausage mixture, while the ball of fresh mozzarella gets cut up (or broken up) and evenly placed on top. Dollops of the enriched ricotta and pesto go on top of the pasta before it goes into the oven to bake.


In a preheated 350 degree (F) oven, the Baked Rigatoni w/ Sausage, Ricotta & Mozzarella is covered with foil and initially baked for 15 minutes. After fifteen minutes, the foil is removed and the pasta continues to bake for another 15-20 minutes. Or until the cheese has melted and it cooked through the center.

If you want to add even more cheesiness (and you should), top the baked pasta with shavings of Parmigiano-Regianno before serving. Bring a bowl of additional shaved cheese to the table for those who really love cheese!  And for an even more impressive presentation, garnish the top with some fresh basil before serving!

If you are craving comfort food or need an excuse to host a casual dinner party, make this Baked Rigatoni w/ Sausage, Ricotta & Mozzarella! It's an incredibly delicious, hearty, simple yet impressive, almost effortless to make dish. One destined to become one of your go-to favorites! 

Recipe
Baked Rigatoni w/ Sausage, Ricotta & Mozzarella
Serves at least 8

Ingredients
16-20 ounces (461-567g) Italian sausage, casings removed and broken in pieces (more is better!)
1 Tablespoon olive oil
1 pound (454g) rigatoni (see notes)
32 ounce (907g) jar plus 1/2 to 1 additional cup (125-250g) of high quality arrabbiata or marinara sauce, store bought (recommend Rao's) or homemade. Note: You will need between 4 and 4 1/2 cups of sauce for this dish.
1/2 cup heavy cream
1 Tablespoon unsalted butter (optional, but good)
1 cup (4 ounces/114g) shredded mozzarella cheese
8 ounce (230g) ball of fresh mozzarella
1 cup (228g) whole milk ricotta
1 large egg yolk
1/4 to 1/2 cup (62g-124g) homemade or high quality imported pesto (I used about 1/3 cup of pesto)
Freshly shaved Parmigiano-Regianno
Fresh basil for garnish

Directions
1. Preheat oven to 350 degrees (F).
2. Cook the rigatoni according to package directions. Drain and let cool slightly. Note: You want the rigatoni to be slightly al dente as it will continue to cook in the sauce when baked in the oven.  
3. In a large skillet, add the olive oil and cook the Italian sausage over medium-high heat until browned (about 10 minutes). Remove from the heat.
4. In a medium saucepan, whisk together the arrabbiata sauce and heavy cream and cook just until slightly heated. For an even richer sauce, add in 1 Tablespoon of unsalted butter. Cook until the butter has melted. Note: Begin with using 4 cups of sauce. If after mixing the sauce with the pasta and cooked sausage you feel you would like a saucier dish, mix in the remaining 1/2 cup.
5. Add the cooked pasta and sauce to the skillet with the cooked sausage. Stir to combine. 
6. Immediately transfer to a 9" x 12" baking dish and mix in the shredded mozzarella.
7. In a medium sized bowl, whisk together the whole milk ricotta and egg yolk. Evenly drop dollops of the enriched ricotta over the pasta.
8. Evenly insert pieces of the fresh mozzarella into the pasta dish.
9. Evenly place spoonfuls of the pesto on top of the pasta dish.
10. Place on the baking dish on baking sheet and tightly cover with aluminum foil. Bake for 15 minutes. Remove the foil and continue baking for another 20 minutes or until completely heated through.
11. Remove from the oven, garnish with fresh basil, top with some shaved parmigiano-regianno, and serve immediately.

Notes: (1) I used Rigatoni No. 50 from Rummo. (2) Four cups of store bought or homemade arrabbiata (or marinara) sauce is needed for this dish. I used a 32 ounce jar of Rau's Arrabbiata Sauce and used one cup from a 24 ounce jar. (3) You could assemble the dish early in the day, cover and refrigerate. Take the baking dish out of refrigerator at least 20 minutes before placing it in a hot oven.


Tuesday, December 6, 2022

Breakfast Hashbrown Casserole


The holidays give us even more reason to bake cookies, make edible gifts, extend invitations to gatherings, and/or bring a dish to a potluck (yes, they are coming back!). These are just some of the ways we honor long standing traditions, express gratitude and love to family and friends, and create memories. From cocktail parties, to dinner parties, to breakfasts, brunches and luncheons, food and beverages usually take center stage. In "The Omnivorous Mind" John S. Allen captured the connection between food and memories perfectly: "We all have our food memories, some good and some bad. The taste, smell and texture of food can be extraordinarily evocative, bringing back memories not just of eating food itself but also the place and setting. Food is an effective trigger of deeper memories of feelings and emotions....." No wonder so many of us put even more love and thought into the food we make and serve during the holidays. Especially if we seek to create good, maybe even great memories.


Many of us have a favorite Cheesy Potato Casserole recipe. One we like to make for and/or bring to a barbecue, potluck, and/or holiday meal. If our beloved recipe is made with frozen diced hashbrowns, Velveeta cheese, and topped with crushed cornflakes we don't (or I should say I don't) often make it for an early or late morning breakfast (in spite of its' crushed cereal topping). But a Hashbrown Casserole, one using frozen shredded country-style hashbrowns and cheddar cheese but sans a cereal topping, is absolutely made for breakfast and/or brunch. Hence the name Breakfast Hashbrown Casserole.


More often than not, when having breakfast in a restaurant I ask them to hold the hashbrowns. However, after running a Turkey Trot in Nashville, Tennessee on Thanksgiving morning we wanted a good breakfast. Frothy Monkey (one of our favorites) was closed for the holiday so we headed over to the legendary Loveless Cafe (iykyk). Fortunately we got there just before the long waiting line started. As I looked at the menu something told me I should probably get the hashbrown casserole to go with my poached eggs, thickly sliced country ham, and fried green tomato biscuit (I was starving!). Whether that something was hunger or a post race carb craving, ordering a side of the hashbrown casserole turned out to be one of those 'best ever' decisions. In one bite I was hopelessly madly in love. And happy I didn't skip the hashbrowns this time.


Upon returning home from the trip to Nashville, I immediately ordered a copy of The Loveless Cafe cookbook, Not only did I want to get my hands on their insanely scrumptious banana pudding recipe, I wanted their hashbrown casserole recipe too. Fortunately the book contains both of them. With the exceptions of making significant reductions to the amount of salt and pepper, slightly increasing the amount the cheddar cheese used, and increasing the baking time, this Breakfast Hashbrown Casserole comes really, really, really close to replicating the flavor and texture of the one I ate on Thanksgiving morning.

If there was ever a dish to prove simplicity can sometimes be underrated, it would be this Breakfast Hashbrown Casserole. Slightly thawed country style (shredded) hashbrowns, sour cream, mild cheddar cheese, cream of chicken soup, a finely minced yellow onion, Kosher salt and pepper gets mixed together and baked in a lightly buttered skillet. Five ingredients, not including the Kosher salt and pepper, create such irresistible, craveworthy deliciousness, you might even be tempted to take a second helping. Trust me when I say you will not want to take a hard hashbrown pass, if a skillet of this Breakfast Hashbrown Casserole is set on the table.


Unlike other hashbrown casseroles where the cheese and butter can make you feel like you are eating a potato version of macaroni and cheese, the hashbrowns remain the star of the show in this one. The cheese, sour cream, and cream of chicken soup don't smother the flavor of the potatoes, rather they elevate it. 

Paired with some scrambled eggs and bacon (or if you are lucky enough to live in the South and have access to country ham), you have the makings of an unfussy, yet incredibly fabulous breakfast. Add some fresh fruit, biscuits or bagels, juice, and coffee and you suddenly have everything you need for a weekend or holiday brunch. This is easy, (almost) effortless entertaining at its' best! 

Recipe
Breakfast Hashbrown Casserole
Serves 8

Ingredients
30 ounce (850g) bag of shredded country style hashbrown potatoes, slightly thawed
1 medium sized yellow onion, finely minced
8 ounces (226) to 10 ounces (283g) shredded Mild Cheddar Cheese (highly recommend going with 10 ounces)
10 1/5 ounce (298g) can of cream of chicken soup
16 ounces (454g) sour cream
2 teaspoons Kosher salt
1 teaspoon black pepper
2 Tablespoons room temperature butter for preparing the baking pan/dish

Directions
1. Preheat oven to 375 degrees (F).
2. Take the bag of hashbrowns out of the refrigerator for 20 minutes prior to mixing the casserole so they become slightly thawed. You don't want your hashbrowns to be completely frozen.
3. Butter a 12" round cast iron skillet or a 9" x 13" baking pan with two tablespoons of room temperature butter. Set aside.
4. In a large bowl, combine the soup, sour cream, shredded cheddar cheese, minced yellow onion, Kosher salt, and black pepper. Mix until well blended.
5. Add in the slightly thawed hasbrowns. Mix well. Transfer to the prepared baking pan/dish.
6. Bake for 45-55 minutes until the top is browned and the casserole is cooked through. Serve immediately. Note: Begin checking for doneness at the 35 minute mark, especially if you are using a  9" x 13" (glass) baking pan.

Notes: (1) You can assemble the casserole the night before. Cover and refrigerate. Take it out at least 30 minutes before putting it in the oven. (2) I usually like to grate my own cheese rather than buy the package of shredded cheese, but the packaged shredded cheese worked perfectly. 


Nashville, Tennessee (November 2022)