Friday, August 23, 2019

Best-Ever Zucchini Bread


This blog has been a passionate hobby, a creative outlet, an excuse to justify the acquisition of cooking and entertaining 'things', and, most importantly, the thing that pushes me further along on my culinary journey. It has of yet never been a business opportunity or the source of my livelihood. A decision I have fleeting moments of regretting. But whether creating my own recipes or making (and tweaking) recipes created by others, I have always (at least I hope I have) given credit where credit is due. Even if a recipe is a mash-up of dozens or even hundreds of reviewed recipes and essentially a 'new' recipe, I frequently cite who was my inspirational source. In my world it's always been the right thing to do. Many, many years ago I commented on a (now very famous) blogger's post on how much I too loved the exact version of a beloved food magazine's recipe. Maybe I should have never called someone out their claim of creating the recipe, maybe that was petty or even a bit snarky. Or maybe not. However after that, I decided I needed to worry only about my own integrity. I had better things to do than becoming the only member of the non-paying food blogging police force. Where am I going with all of this? Well, you see the Best-Ever Zucchini Bread recipe here is an ever so slightly nuanced version of Deb Perelman's (SmittenKitchen) Ultimate Zucchini Bread recipe. Without her recipe, I may or may not have ever told you the other Zucchini Bread recipe posted six years ago on this blog isn't any where near as good as this one. And oh, by the way, Deb just happens to be one of those food bloggers who sets a pretty high integrity bar.


So is it still possible for me to add anything to the Zucchini Bread recipe making world? I think there is. 


Besides, I am secretly hoping that someday Zucchini Bread will be one of those quick breads as beloved and coveted as Banana Bread, Pumpkin Bread, or even Cranberry Nut Bread. No one ever said I wasn't a bit of a dreamer.


In the quick bread world size really does matter. Those smaller Zucchini Breads you may have been making or receiving as a gift, can't compete with the huge loaves of those other more famous breads we happily and willingly pay $4.00 a slice for at a bakery or coffee shop. So, from henceforth, all of your Zucchini Breads need to be shown the respect they deserve. A 9" x 5" pan or even a 10" x 4" pan should be the only ones you ever use to make Zucchini Bread in again. Okay? Pinky swear promise?


Every year there are gardens across the country where zucchini grow to the size of small bunnies. Those are not the zucchini you want to use when making this Best-Ever Zucchini Bread. Save those for making zoodles with your vegetable spiralizer. Look for the smaller ones for zucchini bread making. The smaller ones are slightly more dense and don't hold as much moisture as the larger ones.

There are so many differences between the first zucchini bread posted to the blog and this one, I am only going to say this one has less sugar in it. But it uses two kinds of sugar: granulated and dark brown sugar. Have you ever known dark brown sugar to not give better flavor to pretty much everything? (Thank you Deb Perelman providing one of the missing Zucchini Bread recipe missing links!). But I am going to spend a bit of time calling out some of the relatively minor changes I made between Deb's recipe and this one. Instead of using safflower oil, I used canola oil. Both are neutral oils, but I generally don't buy safflower oil so I went with canola oil. Instead of fine sea salt or table salt, I used kosher salt. I never buy table salt. I used Turbinado sugar, but think Demerara sugar or a coarse sanding sugar would also work well in giving the top crust a really great crunch. I used unbleached all-purpose flour instead of regular all-purpose flour. There may be only subtle differences between the two, but I have recently been an unbleached all-purpose convert. I am certain regular all-purpose flour would work just fine. So that's it. Those are my teeny tiny changes. Hey maybe Deb and I should have a Zucchini Bread throw down. Her recipe versus her recipe with itsy bitsy changes.


How much is two cups of grated zucchini really? That would depend on if you press it down in somewhat firmly packed or moderately packed? Because we all have a different interpretation of what 'firmly packed' means, particularly when it comes to grated zucchini, I would encourage you to weigh it. Yes, this relatively hassle free quick bread recipe has one tiny hassle. But just one. 


What is not to love about a one bowl quick recipe where you mix everything with a fork? 


For some reason I have almost always baked my quick breads in a parchment paper lined baking pan. Which means I have been missing out on a slice with four, not just one, crisp edges. Non-stick baking pans and vegetable oil spray (or butter) will give your Zucchini Bread that bakery look finish (and taste!). 

Bake in a preheated 350 degree (F) oven for 55-60 minutes, then let the bread cool completely in the baking pan. Better yet, let the bread cool overnight. Covering it only with a light cloth (you don't want that crisp top to get soggy) after it is completely cooled. Why wait almost 24 hours to slice it up? Like a great wine, the taste of zucchini bread improves exponentially with time. Even if that means only 24 hours. If you don't believe me. Go ahead. Have a taste test. Eat a piece the first day, then eat a piece the second day. I already know what your answer will be.


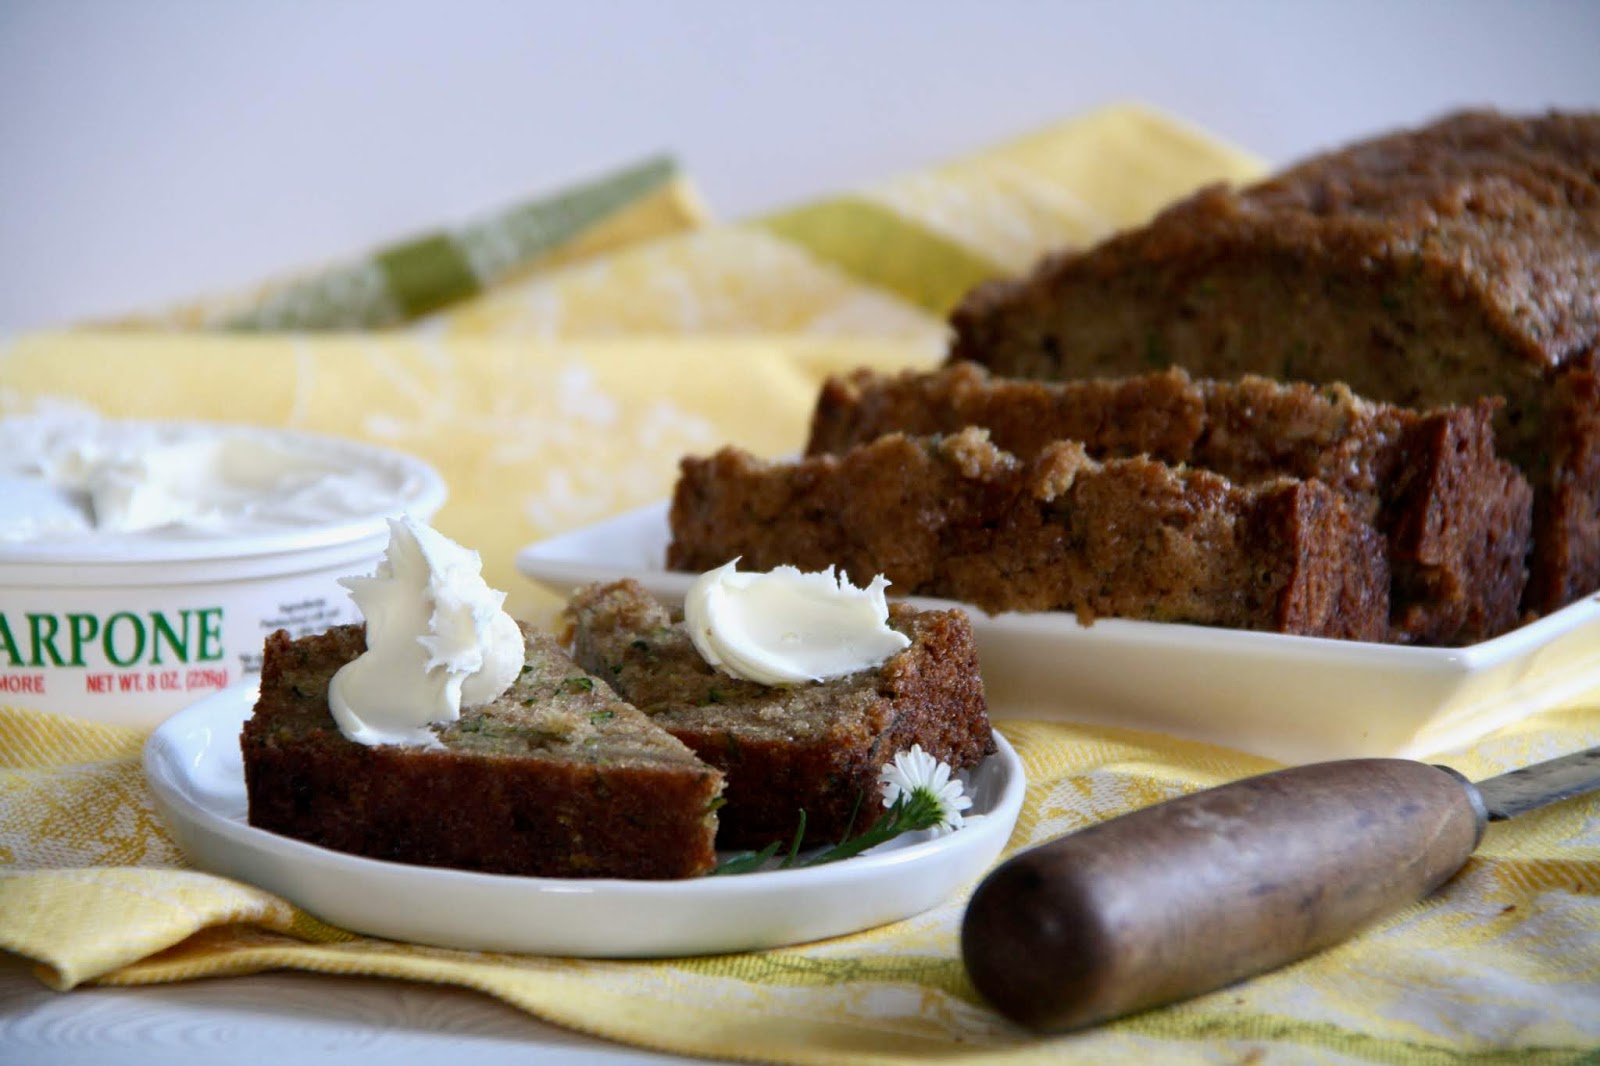
Could you add chocolate chips or toasted walnuts in this Zucchini Bread? Yes, you could. Your baking time may need to be adjusted. Could you serve thickly cut one inch slices plain? yes, you could. But a schmear of mascarpone cheese would make for one of those epic zucchini bread eating moments. You could also spread it with some softened, sweetened, or whipped cream cheese, Nutella, or even unsalted butter topped with flakes of sea salt. Any one of those choices might give you your personal epic zucchini bread eating moment. Which way you like to eat your Zucchini Bread really doesn't matter. What matters most is taking advantage of zucchini season and making as many loaves as possible. Some for you, some to give away.

Don't forget, when it comes to Zucchini Bread size matters. And bigger is definitely better. Big loaves, thick slices. Consider this a non-negotiable part of the Zucchini Bread making and eating experience. I can hardly wait for you to take a bite of this perfectly spiced, moist bread with the most incredible sugared top crust. 
Recipe
Best Ever Zucchini Bread - Ever so subtle changes to Smitten Kitchen's Ultimate Zucchini Bread recipe
Serves 8-10

Ingredients
2 cups (13 ounces or 370 g), grated on the large holes of a handheld or box grater (Do not squeeze any liquid out of the zucchini) - about 2 1/2 smaller sized zucchini
2 large eggs, room temperature
2/3 cup canola oil (or other neutral oil)
1/2 cup (95 g) dark brown sugar, firmly packed
1/2 cup (100 g) granulated sugar
1 teaspoon kosher or fine sea salt
1 teaspoon vanilla
1/8 teaspoon of grated nutmeg
1 1/4 teaspoons cinnamon
3/4 teaspoon baking soda
1/2 teaspoon baking powder
2 cups (260 g) all-purpose unbleached flour (or regular all-purpose flour)
2 Tablespoons Turbinado sugar, Demerara sugar or Coarse Sanding Sugar
Optional: 1 cup semi-sweet chocolate chips or 1 cup toasted coarsely chopped walnuts

Serving suggestions: Mascarpone cheese, cream cheese, Nutella, or unsalted butter topped with flakes of sea salt

Directions
1. Preheat oven to 350 degrees (F). Generously spray a 9"x 5" or 10" x 4" non-stick baking pan with vegetable spray or grease with butter. Set aside.
2. In a large bowl, first combine the grated zucchini, eggs, oil, dark brown sugar, granulated sugar, kosher salt, and vanilla. Stir with a fork to blend.
3. Add in the nutmeg, cinnamon, baking soda, and baking powder. Stir just to get in all combined.
4. Add in the flour, stirring until just combined.
5. Pour the batter into the pan. Top with the Turbinado sugar. Bake for 55-60 minutes or until done (a toothpick inserted into the center of the bread should come out clean).
6. Let the zucchini bread cool completely in the baking pan. Set a light weight towel over the top and let rest overnight.
7. Cut into generous one inch slices and enjoy.

Notes: (1) I like mascarpone cheese plain and I like it lightly sweetened with some confectionary sugar. To 8 ounces of mascarpone cheese I add 2-3 Tablespoons of confectionary sugar. Taste after adding 1 Tablespoon, to decide how much more you want to add.


Morton Arboretum, August 2019

Sunday, August 18, 2019

Grilled Peaches


While most everyone was physically traveling to their vacation destinations this summer, books were responsible for my virtual time and place vacations this year. With my head filled with so many thoughts along with some shifting perspectives and my heart bursting with so many emotions, I wouldn't even know where to begin if I had to write one of those back to school 'What Did You Do on Your Summer Vacation?" essays. As much as I consider myself an avid reader, the number of books read over the course of the last couple of months may have set a new personal reading record. My only regret is having read some of them a bit too quickly, not slowing down to savor the writing. A year or two from now I worry I won't be able to remember the endings of these books. In his article "The Curse of Reading and Forgetting" Ian Crouch captured my book memory loss fears perfectly. "Reading has many facets, one of which might be the rather indescribable, and naturally fleeting, mix of thought and emotion and sensory manipulations that happen in the moment and then fade. How much of reading, then, is just a kind of narcissism-a marker of who you were and what you were thinking when you encountered a text? Perhaps thinking of that book later, a trace of whatever admixture moved you while reading it will spark out of the brain's dark places." Quite possibly the only cure for the curse of such forgetfulness would be not to read a book more slowly but to to read it more than once. I don't think twice about making something I love more than once. I suppose I should start thinking about approaching books the same way I approach food. Especially desserts!


With the stone fruit season lasting only for another month, these Grilled Peaches drizzled with honey, sprinkled with flaky sea salt, and topped with slightly softened vanilla ice cream need to go on repeat. I wouldn't want my palate to forget the taste of or even miss out on the sweetness of grilled summer yellow peaches!

Whether choosing peaches to grill for salads or dessert, look for ones that are neither too hard or too soft. Once you get the feel for a 'just right' peach you will never forget it. 

White peaches have a slightly sweeter taste than yellow peaches, but do not hold up as well when baked or grilled. For that reason, I recommend the red-orange skinned yellow peaches be used in this dessert. Cutting the peach along and around the fruit's natural dimple makes it easier to twist them open.


Keeping the peels on the peaches helps to keep them intact. It also makes for one of the easiest desserts you will make all summer.


If you own a cast iron grill pan, you can make these inside. If not, make them on your outdoor grill. Because the grates on my gas grill don't create good grill marks on some fruits and vegetables, I usually place a stainless steel grill top, lightly oiled, on the grates. It works perfectly every time.


The oil will help to keep the peaches from sticking to the grill, but dipping the peach halves in melted butter adds another layer of flavor to the caramelization on the grilled peaches.


Simple ingredients create incredible flavors. A sprinkling of flaky sea salt, a drizzle of honey, maybe even some bits of honeycomb, and a generous scoop of vanilla ice cream take the grilled peaches from a simple dessert to an extraordinary one. Definitely one of those memorable ends to a meal. One bite will definitely leave an impression. But for a lasting impression, you need to eat an entire grilled peach. Of course with the honey and ice cream. It will definitely be one of those 'no regrets' moments in your life.

If you are looking to read any really good books in the weeks and months ahead, here are the ones I have read in recent weeks. Or rather besides eating grilled peaches, this is how I spent my summer vacation. More than a handful of them are ones I would put in the should probably read twice category. In no particular order, here they are: The Most Fun We Ever Had (Claire Lombardo); Running Home (Katie Arnold); Boy Swallows Universe (Trent Dalton); The Nickel Boys (Colton Whitehead); Searching for Sylvie Lee (Jean Kwok); This Is How It Always Is (Laurie Frankel); The Great Believers (Rebecca Makkai); The End of Loneliness (Benedict Wells); The Night Tiger (Yangsze Choo); Ask Again, Yes (Mary Beth Keane); and, When All Is Said (Anne Griffin)

Recipe
Grilled Peaches
Serves 6-8

Ingredients
6-8 perfectly ripe medium sized yellow peaches, cut in half and pitted
2-3 Tablespoons unsalted butter, melted
Honey
Honeycomb (optional)
Flaky Sea Salt
Vanilla Ice Cream

Directions
1. Heat grill pan (or outdoor grill). When ready to grill peaches, lightly brush with oil.
2. Place melted butter in a small shallow bowl. Dip each peach half in the melted before placing them face down on the hot grill. Grill for 3-4 minutes or until grill marks appear.
3. Turn peaches 90 degrees and grill for another 3-4 minutes or until grill marks appear.
4. Remove from grill and transfer to a serving platter.
5. Sprinkle grilled peaches with flaky sea salt and drizzle on some honey.
6. Either top peach halves with scoops of vanilla ice cream or serving grilled peaches in individual serving bowls and top with a generous scoop of vanilla ice cream.

Notes: (1) Take your vanilla ice cream out of the freezer when you start grilling the peaches so it has time to soften slightly. Not only does this making scooping easier, the vanilla ice cream will slightly melt creating a very rich sauce for the grilled peaches. Use a high quality vanilla ice cream. I use Ben and Jerry's Vanilla Ice Cream. (2) The recipe can easily be modified if serving less or more than 6 to 8 people. You can make just one grilled peach for yourself!

Wednesday, August 14, 2019

Banana Nut Muffins with Oat Streusel Topping


Earlier this week I was debating between making donuts and muffins. It wasn't a matter of making one or the other, it was deciding which one to make first. Muffins won this time. I bet some of you were thinking 'who in their right mind would choose a muffin over a donut'? Before you think I have completely lost my mind, I would like to go on record saying I believe I am not the only one on team muffin. But I suppose the answer to that question would depend in part on what kind of muffins or donuts are we talking about. So maybe I shouldn't tell you I made these Banana Nut Muffins with Oat Streusel Topping instead of chocolate iced cake donuts. Is there anyone left out there still on team muffin? What if I told you I had a bunch of really ripe bananas I couldn't bear to see go to waste? 

These Banana Nut Muffins with Oat Streusel Topping baked up beautifully. They had that swoonworthy doomed top, were golden brown, and visually exceeded all of my expectations. But would they taste as good as or even better than they looked? Or would they be all looks and have no substance? I am convinced their outward appearance was highly influenced by their inner beauty. Having just the right amount of sweetness, warmth from the nutmeg and cinnamon, a tender crumb, and crisp outer crust, these Banana Nut Muffins had everything I love in a muffin. 


After the first bite, I didn't for a second regret making them. 


These are (plain, non-fat) yogurt enriched muffins. The kind having a slightly sweet-tangy flavor and beautiful rounded top. Ones making it feel like you are having an indulgent, yet guilt-free muffin eating experience. The toasted walnuts, mashed bananas, and nutmeg add a depth of flavor you would expect of a really, really good Banana Nut Muffin. Especially one having an oat streusel topping.  


After each muffin tin is filled with a large scoop of the batter, they generously top with a buttery, brown sugar, cinnamon, oat streusel. Don't worry about the streusel spilling over onto the pan. As the muffins bake and expand, they will grab onto those little bits of deliciousness. Note: I used a large (about 2 1/2" wide) ice cream scoop to make eighteen regular sized muffins.


In a preheated 375 degree (F) oven, the Banana Nut Muffins bake for 25-30 minutes or until golden brown. 


After making these muffins in a lightly buttered muffin tin as well as in cupcake papers, I made a no turning back decision. As much as I love how pretty muffins look when baked in those white pleated cups, I love eating a muffin with slightly crisp edges even more. Especially when the muffin tin is greased with butter instead of vegetable spray! And these unpapered Banana Nut Muffins did not disappoint. 


Using a non-stick muffin tin along with lightly buttering the bottom and sides of the pan helped ensure all of the muffins release completely intact. Actually they came out almost bakery looking perfect. Note: For presentation purposes, place the baked muffins in a paper sleeve.


While these muffins are at their absolute best on the day they are baked, you can still enjoy them for several days afterwards. Especially if you store them wrapped in the refrigerator and then reheat them in the microwave before serving. The most significant difference between the first or second day is the change in the crunchiness of the streusel topping. 


If you love a rounded top, flavorful, tender, beautiful muffins, these are the ones for you. Serve these muffins warm out of the oven to your family, friends or guests for breakfast or brunch. A basket of the Banana Nut Muffins, a large pot of coffee, and platter of fresh fruit would made for a great, on the healthy side start to the weekend. Don't be surprised if someone asks for seconds. 

Recipe
Banana Nut Muffins with Oat Streusel Topping
Makes 18 regular sized muffins

Ingredients
Banana Nut Muffins
3 cups (390 g) all-purpose flour
1 Tablespoon baking powder
1/2 teaspoon baking soda
1/2 teaspoon kosher salt
1/2 teaspoon ground nutmeg
12 Tablespoons unsalted butter, room temperature
1 cup less 1 Tablespoon (187 g) granulated sugar (See notes)
2 large eggs
1 1/2 cups (350 g) plain low-fat Greek yogurt
1 1/2 cups (350 g) mashed ripe bananas (from approximately 3 bananas)
2/3 cup (65 g) toasted walnuts, coarsely chopped

Oat Streusel Topping
1/2 cup (52 g) old-fashioned oats (not instant or quick cooking oatmeal)
1/3 cup (44 g) all-purpose flour 
1/3 cup (68 g) light brown sugar, firmly packed
1 heaping teaspoon cinnamon
1/4 teaspoon kosher salt
4 Tablespoons unsalted butter, room temperature

Directions
Banana Nut Muffins
1. Preheat oven to 375 degrees (F). Lightly butter the bottoms and sides of the muffin tins. Alternately, if you must, insert cupcake papers in the muffin tins. Set aside.
2. In a medium sized bowl, whisk together the flour, baking powder, baking soda, kosher salt, and nutmeg. Set aside.
3. In a large bowl, cream the butter and sugar together using a handheld mixer until the mixture is creamy (approximately 2-3 minutes). Scrape down the sides of the bowl with a spatula.
4. Add in the eggs one at a time, beating well between each addition.
5. Add in half of the dry ingredients. Beat on medium just until the dry ingredients are incorporated.
6. Mis in half of the yogurt, until blended, followed by half of the remaining dry ingredients. Repeat with the yogurt and dry ingredients.
7. Mix in the mashed bananas and chopped walnuts just until blended.
8. Using a large ice cream scoop, divide the batter equally amongst the 18 muffins.
9. Generously top each muffin with the Oat Streusel Topping.
10. Place muffin tins on a baking sheet. Insert into the oven and bake for 25-30 minutes or until muffins are golden brown and they spring back when lightly pressing your finger on them.
11. Let cool on a wire rack for 5-10 minutes before removing from the muffin tin.
12. Serve warm or let cool and serve at room temperature.
13. Store muffins in an airtight container at either room temperature or in the refrigerator. If muffins are chilled. reheat in the microwave before serving.

Oat Streusel Topping
1. In a medium sized bowl, combine all of the streusel ingredients. Mash with a fork or use your fingers to bring all of the ingredients together until homogenous.
2. Refrigerate until ready to use.

Notes: (1) To toast the walnuts, preheat the oven to 350 degrees (F). Place walnut halves on a baking sheet. Roast for 8-9 minutes. Remove from oven. Let cool and coarsely chop. (2) Instead of using all granulated sugar, use 1/2 cup of granulated sugar and 1/2 cup of brown sugar.

Thursday, August 8, 2019

Chicken Enchiladas with Pico de Gallo


Earlier this week I tried a new Rice Pudding recipe. Without laboring over the details of this culinary endeavor, let me simply say it was an unsalvageable, epic fail. After convincing myself the recipe was flawed, I thought, well if that was the worst thing to happen to me this week, then the rice pudding had a purpose. I had every intention of attempting a major re-do on the recipe, harboring the fantasy I would be creating the throw down worthy version of this comfort food dessert. But I just wasn't feeling my ability to channel an inner Bobby Flay. So I decided it would be best if I put some time and distance between me and a new rice pudding recipe. Until or if that self-imposed moratorium comes to an end, I will go back to making the Almond Rice Pudding with Caramel Cream and Sour Cherry Jam. If there was ever a rice pudding recipe with a pretty high bar level of deliciousness, this would definitely be the one. The more I (over) think this week's rice pudding fiasco, the more I realize maybe I have already discovered the throw down worthy version. Maybe it was time to create a thrown down worthy version of something else.


Of the handful of recipes I have been doing an extended dissertation research on, it would be Enchiladas. With more a dozen different varieties of enchiladas, each with their own myriad of variations, I have literally spent years mulling over enchilada recipes. While many sounded enticing, very few of them seemed to be mouthwatering enough. Which explains why I have been looking for what seems like a very long time. I finally came out of the enchilada rabbit hole this week. thanks in large part to cookbook author and native Texan Rebecca Rather. Having made some of her recipes before, I had a very strong feeling her enchiladas recipe would not disappoint. Spoiler Alert: It didn't. 


More than likely, your enchilada preferences are ones somewhat influenced by where you grew up or where you now live. But, if by chance your enchilada preferences lean toward creamy chicken enchiladas topped with melted Monterey Jack cheese and served with sides of Pico de Gallo and avocado, then you are going to absolutely LOVE these. With a filling made with shredded store-bought rotisserie chicken, sautĂ©ed mushrooms/onions/garlic, fresh corn, black beans, green chiles, tomatoes with green chiles, sour cream, and whipping cream, these are hearty, mouthwatering enchiladas. Made with large (7"-8") tortillas, they make for a great dinner entree. But if made with smaller (6") tortillas, they would be the best cocktail party fare. 


If you don't want to make the Chicken Enchiladas, you definitely have to make this Pico de Gallo. Seriously, it may be the best pico I have ever tasted. Served with some homemade guacamole and chips along with some ice cold beer and/or margaritas, this classic salsa is a refreshing appetizer.  Made with only 6 ingredients (not counting kosher salt and white pepper), it can be made 15 minutes before serving or the night before. In other words, it could not be easier to make. One bite, and I am convinced you will never buy a store bought pico de gallo again. And it may be the only pico recipe you ever want to make.

In addition to being a great appetizer, the Pico De Gallo also made for the most delicious topping on the Chicken Enchiladas! I loved the contrast in flavors. So if you make the Chicken Enchiladas, you absolutely have to make the Pico de Gallo. 


These Chicken Enchiladas can be made early in the day, even the night before. Simply bake when you are ready to serve.


Use either corn or flour tortillas (I used a soft white corn tortilla), but i definitely recommend using soft their versions to make assembly easier. As with most recipes I come across, I either tinker with them slightly before or decide on what changes I want to make after eating them. The changes I made to the filling before were: increasing the amount of salt (from 1/4 teaspoon to 1/2 teaspoon), using fresh corn kernels, and adding rinsed/drained black beans. The changes I will make next time are: increasing the whipping cream from 1/2 cup to 2/3 cup, using grated Monterey Jack/Colby Cheese instead of only Monterey Jack, using only the smaller 6" tortillas (these enchiladas are hearty), not pack the rolled enchiladas in as tightly as I did, and use a larger, rectangular pan (or divide between two pans). If using a large pan, I might also want to put a few toothpicks in to help me identify which direction the tortillas are going in (a round pan made this challenging). You might not need to do this if using a rectangular pan.


If the recipes for the Chicken Enchiladas with Pico de Gallo taught me anything, it was to trust my instincts when looking at an ingredient list and cooking process. Photos can be deceiving as evidenced by the one I had taken of that disastrous, inedible rice pudding. 

These Chicken Enchiladas with Pico de Gallo may be one of the best, most versatile entertaining dishes on the blog. Hey, it's a two for one blog post! Either or both recipes are reason enough to invite your friends and family over for dinner or a cocktail party! And yes, this Chicken Enchiladas with Pico de Gallo is definitely throw down worthy. 

Recipe
Chicken Enchiladas with Pico de Gallo (several adaptations to the Sour Cream and Chicken Enchiladas recipe from Rebecca Rather's cookbook "The Pastry Queen Christmas")
Serves 6-8 for dinner or 8-14 for cocktail hour

Ingredients
Chicken Enchiladas
1 store bought rotisserie chicken (3-4 pounds), skin removed, shredded into bite sized pieces
4 Tablespoons unsalted butter
1 large yellow onion, chopped
8 ounces mushrooms, sliced
2 garlic cloves, minced
32 ounces sour cream
1/2-2/3 cup whipping cream
7 ounce can diced green chiles, undrained
10 ounce can diced tomatoes with green chiles (See note)
1/2 teaspoon kosher salt
1/4 teaspoon black or white pepper
1 cup fresh corn (from 3 ears of corn) or 1 cup of frozen or canned corn
15 ounce can of black beans, rinsed and drained (optional)
10 ounces grated or shredded Monterey Jack Cheese (or a Monterey Jack/Colby Cheese)
12 white corn or flour (7"-8") soft tortillas or 16-20 white corn or flour (6") soft tortillas (I used soft white corn tortillas)

Pico de Gallo
4 plum (Roma) tomatoes, seeded and diced
1/2 jalapeno pepper, seeded and minced
1/2 medium red onion, small dice
1/4 cup minced fresh cilantro and/or flat leaf parsley (Note: I used a combination of both)
1/2 teaspoon kosher salt
2 garlic cloves, minced
1/4 teaspoon white pepper
Juice of 2 limes

Garnish: Freshly chopped parsley and/or cilantro, sliced jalepenos, chopped avocado

Directions
Chicken Enchiladas
1. Preheat oven to 350 degrees (F). Lightly butter a large baking pan (at least 9"x13"). 
2. In a large skillet, melt butter over medium heat. Add onion, mushrooms, and garlic. Saute until onions are translucent and mushrooms are softened (about 4 minutes).
3. Stir in sour cream, whipping cream, green chiles, tomatoes, salt and pepper until smooth. Cook until mixture is warned through. Do not let mixture boil.
4. Remove 2 cups of the mixture. Set aside.
5. Add the corn, black beans (if using) and chicken to the sour cream mixture remaining in the pan. Remove from heat.
6. Spoon a very generous line of the chicken mixture down the center of each tortilla. Roll the tortilla up and place seam side down in the prepared pan. 
7. Pour the reserved sour cream mixture evenly over the tortillas.
8. Sprinkle with the shredded cheese.
9. Bake uncovered for 30-45 minutes or until the sauce bubbles and the cheese is melted. Note: If the enchiladas were refrigerated, recommend taking out of the refrigerator at least 15 minutes before baking. Baking time may need to be adjusted.
10. Top the Chicken Enchiladas with some chopped parsley, chopped jalapenos, and/or chopped avocado. 
11. Serve with a side of Pico de Gallo and some additional chopped avocado.

Pico de Gallo
1. In a medium bowl, combine the tomatoes, jalapeno, onion, cilantro/parsley, garlic, lime juice, kosher salt, and white pepper. Mix to blend.
2. Cover the pico de gallo and chill for at least 15 minutes or overnight before serving. Note: Covered and chilled the pico de gallo will be good for up to 3 days.

Notes: (1) I used a combination of flat leaf parsley and cilantro in the Pico de Gallo. (2) Rotel sells a 10 ounce can of diced tomatoes and chiles. If you can't find this 10 ounce can, use a 14 ounce can (reserving 4 of the ounces for another use). (3) Use a good quality store-bought rotisserie chicken. Choose one not seasoned with herbs like rosemary. (4) Don't pack the rolled enchiladas too tightly in the pan or you won't be able to spoon them out individually when serving.

Thursday, August 1, 2019

Pasta in Roasted Eggplant Tomato Sauce w/ Basil and Fresh Mozzarella


"Life is short, use more glitter." At the beginning of almost every yoga class, we are reminded to connect to a mantra, an intention so to speak, to guide our practice. More often than not, the yoga instructor shares one having meaning to them. For more than a year now my mantra has been "You are good enough". But after hearing the one shared last Sunday, the one where the 'use more glitter' was merely a euphemism for show more kindness, be more empathic, be less hubris, be more accepting, be more thoughtful, and so on and so on, I smiled. Seems like I wasn't there just to experience the satisfaction of surviving an hour of yoga in the brutally hot sun or reveling in that post yoga session euphoria. Instead, unbeknownst to me, I was really there to make a change to my mantra. From one focused less on self-validation to one centered more on self-awareness. While I may still need to remind myself from time to time that I am indeed 'good enough', everyone around me will be better served if I repeatedly say, as well as act on, the words "Life is short, use more glitter.". Trust me when I say redundancy has its' benefits.


Speaking of, there is no such thing as too much of a good thing, this Pasta in Roasted Eggplant Tomato Sauce w/ Basil and Fresh Mozzarella is one of the most crave-worthy, hearty pasta dishes I have had in awhile. From the perfectly roasted eggplant to the velvety tomato sauce to the fresh basil and mozzarella to the trecce pasta, every bite of this dish is deeply satisfying. If you love roasted eggplant, but don't necessarily want to spend hours making eggplant parmesan, you definitely want this pasta dish in your life. Pair it with a really, really good bottle of wine (because life is too short not to indulge yourself) and a simple salad and you have the makings of a memorable meal. Easy enough to make for a weeknight dinner, yet elegant and impressive enough to serve for a dinner party, this might be your new, favorite go-to pasta dish. Seriously, it's so freaking delicious.


A few weeks back I picked up a bag of some trecce pasta from Eataly. Now in retrospect, I should have bought two, maybe three bags of this pasta. It is my new favorite pasta! These short rolls of pasta look like braids of hair. And in Italian, trecce literally means braid. Made with semolina wheat flour, trecce pasta is an Italian creation. Having a slightly rough texture, it's surface is perfect for capturing and holding sauces once cooked. How have I lived without ever having this pasta before? See notes below for alternative pasta options for this dish.


Rather than look for one large eggplant weighing approximately one and a half pounds, I would highly recommend you look for the smaller, baby eggplants. I used five baby (Italian) eggplants (totaling one and a half pounds in weight) for this dish. Smaller eggplants are generally more flavorful and have a more tender flesh/skin than larger eggplants. When choosing eggplants at the market, look for ones having a smooth, shiny skin. While they are available year round, their peak season is from July through October.


Choosing the smaller, baby eggplants has yet another advantage in this pasta dish. Cutting the eggplant into one inch chunks ensures each piece has a bit of the skin on it. When roasted, the little bites of roasted eggplant are able to hold their shape rather than fall apart.


Tossed with a half cup of olive oil, a teaspoon of kosher salt, and some black pepper, the eggplant roasts in a preheated 450 degree (F) oven for 30-35 minutes. Midway through the roasting process, toss the eggplant on the baking sheet. Your eggplant is done when its' browned and tender. Three quarters of the roasted eggplant will be mixed in with the tomato sauce. While the remaining one quarter is reserved along with some additional fresh basil, grated Pecorino Romano Cheese, and olive oil to adorn the top of the pasta.


When making the Pasta in Roasted Eggplant Tomato Sauce w/ Basil and Fresh Mozzarella begin by making the tomato sauce. It can even be made earlier in the day or even the day before (and then reheated). This is a very simple, yet rich, velvety sauce. Garlic, olive oil, peeled whole canned tomatoes, some water, salt, pepper, fresh basil, and a tablespoon of unsalted butter are its' only ingredients. After simmering for approximately 45-60 minutes, the sauce thickens to the most perfect consistency. 

When the eggplant is well past the halfway roasting point, start making the pasta. Like most pastas, this one should be cooked to slightly al dente as it will continue to cook when mixed in with the tomato sauce, roasted eggplant, and fresh mozzarella. 


Freshly grated Pecorino Romano Cheese, a little more fresh basil, and a generous drizzle of olive oil are the finishing touches to this hearty pasta dish. Even though there is eight ounces of fresh mozzarella in the pasta dish, I threw on about a half dozen balls of Ciliegine, bite sized pieces of fresh mozzarella, as an additional garnish. Are you drooling yet?


In the spirit of 'life is short', eat more pasta. In spite of there not being any 'meat' in the Pasta in Roasted Eggplant Tomato Sauce w/ Basil and Fresh Mozzarella, it is a very hearty, rich, soul satisfying, impressive dish. We can thank the roasted eggplant for making this insanely delicious, vegetarian pasta dish one even 'meat' lovers will be taken in by. 

To keep things simple, serve Kahlua Affogato Sundaes for dessert. They would be the most perfect finishing touch to what will end up being an epic meal. Splurge a little by topping the sundaes with some Luxardo cherries. 

So pick up some baby eggplant, fresh basil, and fresh mozzarella this weekend. Look for some trecce pasta (or find something similar) and invite some friends and/or family over for dinner. Open up some of that great wine you have waiting for the right occasion to serve and get ready to have the most delicious evening.
Recipe
Pasta in Roasted Eggplant Tomato Sauce w/ Basil and Fresh Mozzarella
Serves 6-8

Ingredients
1 1/2 pounds of eggplant, cut into one inch cubes (See notes)
1/2 cup and 4 Tablespoons olive oil, divided
5-7 cloves of garlic, minced
1/4 teaspoon Aleppo Pepper or 1/8 teaspoon red pepper flakes
28 ounce can of whole peeled Italian tomatoes, crushed
1 cup water
1 Tablespoon unsalted butter
1/2 cup plus 1 Tablespoon fresh basil, cut into chiffonade
8 ounces fresh mozzarella, cut into 1/2 inch cubes
Kosher salt and black pepper
Freshly grated Pecorino Romano

1 pound bag of Trecce pasta (or other 
1/2 cup reserved pasta water

Additional olive oil for finishing
Optional: 7-8 balls of Ciliegine

Directions
1. In a large, heavy bottomed saucepan, heat 2 Tablespoons of olive oil over medium heat. Add the garlic and Aleppo pepper. Cook until garlic is golden and tender (approximately 3-4 minutes).
2. In a medium sized bowl, pour in the contents of the whole peeled Italian tomatoes. Squeeze the tomatoes with your hands until you break them apart into chunks. Pour one cup of water into the empty can and add to the tomatoes.
3. Pour the tomato/water mixture into the olive oil.  Reduce heat to low and simmer sauce for 45-60 minutes or until the sauce has thickened. Stir in one tablespoon of chopped basil, one tablespoon of unsalted butter, and season with kosher salt and pepper. Remove from the heat and set aside.
4. Preheat oven to 450 degrees (F).
5. Toss the eggplant with one half cup of olive oil, one teaspoon of kosher salt, and some black pepper in a medium sized bowl. Spread out onto a large, rimmed baking sheet. Roast until browned and tender (approximately 30-35 minutes). Midway through the roasting process, turn eggplant over with a spatula. Remove from oven when done.
6. Midway through the eggplant roasting process, make the pasta. Cook until al dente. Reserve 1/2 cup of the pasta water before draining the pasta in a colander.
7. Return drained pasta to the pan. Pour over the homemade tomato sauce, 3/4 of the roasted eggplant, 1/4 cup of chopped basil, the fresh mozzarella, and 2 Tablespoons of olive oil. Cook on low heat, just until the cheese begins to melt adding 1/4 cup of the reserved pasta water to loosen the sauce (approximately 1-2 minutes). If the pasta mixture is too thick, use remaining reserved pasta water to loosen it slightly. Immediately transfer to a large serving platter. (Note: I used only 1/4 cup of the reserved pasta water.)
8. Top the pasta with the remaining eggplant and 1/4 cup of fresh basil. Grate Pecorino-Romano over the top and drizzle some additional olive oil. Optional: Top with a half dozen fresh mini-mozzarella balls. 
9. Serve with a plate of some additional grated cheese and enjoy!

Notes: (1) The trecce pasta was made by an Italian company, Fratelli Minaglia, and bought at Eataly. If you can't find trecce pasta in any of the food stores you frequent, look for another short-shaped, ridged Italian pasta like fusilli, gamelli, rigatoni, or cavatappi. (2) This is already a rich, hearty dish, but you take to an even more impressive level by finishing with some burrata. Just saying. (3) The tomato sauce can be made early in the day or the day before. Reheat before mixing in the pasta.