Monday, May 8, 2023

Chicken Parmesan


Whether you call it Chicken Parmesan or Chicken Parmigiana doesn't really matter. They are the same thing. Mouthwatering deliciousness served either over fettuccini (my favorite pasta for this dish) or in a lightly toasted roll may be one of the most satisfying, flavorful dishes on the planet. Because seriously, what is not to love about a fried panko crusted chicken cutlet smothered in a luscious marinara sauce and topped with melted fresh mozzarella and freshly grated Parmigiano-Regianno?


Quite possibly the only reason you wouldn't put this dish near the top of one of your favorite comfort food meals is that you have been underwhelmed by ones you have tasted in a restaurant. And I get that. After years of being disappointed by the chicken parmesan served in a variety of restaurants (even in some good Italian ones), I am extremely hesitant to order it when dining out. But making Chicken Parmesan at home is a completely different story.  Here's the good news. You no longer have to settle for mediocrity or good enough. Because now can have the most spectacular, incredibly scrumptious, seriously craveworthy homemade version! This cheesy, crispy, hearty, saucy dish is one of those rare rustic, yet elegant dishes that is as much family dinner friendly as it is both Sunday supper and dinner party worthy. If there was ever a dish to put on regular repeat rather than relegating it only to special occasions, this is the one!

Served with a beautiful salad, some thickly sliced fresh Italian bread, and a great wine, a platter of Chicken Parmesan set over a bed of fettuccini is the makings of one of the most impressive, satisfying meals you can serve to your family and friends.


When it comes to breading the pounded, skinless, boneless chicken breasts (aka cutlets), there are no shortage of opinions as to which type of breading is best. Freshly made breadcrumbs, canned breadcrumbs, or Panko-style breadcumbs each have their own fan club. For me, it's Panko-style breadcrumbs as they add the right about of crispiness and crunch to the fried chicken breast. And rather than open up jars of dried spices to season plain panko bread crumbs, I prefer using (Italian) seasoned panko and adding additonal some garlic powder and freshly grated Parmigiano-Reggiano cheese to further boost the flavor.

Keys to getting a perfectly cooked, crisp, yet moist chicken cutlet include: (1) pounding the chicken breasts to a 1/2" thickness; (2) dredging the cutlets in flour, then egg, then panko breadcrumbs; (3) frying in olive oil; and (4) cooking the cutlets (in batches) in a cast iron skillet for approximately 2-3 minutes per side. Follow those simple rules and your golden brown Chicken Parmesan cutlets will be next level amazing!


If you have a favorite marinara sauce recipe, use it. But also feel free to use a high quality jarred marinara sauce (i.e., Rao's). It may sound a bit sacrilegious to even suggest using a jarred marinara sauce when making Chicken Parmesan, but there is much to be said about semi-homemade dishes. I mean, if Ina Garten (food goddess extraordinaire) can, well you can too! While the recipe below calls for only 24 ounces of marinara, I highly recommend you either make or buy more to serve warm on the side. As there will be some who like an even saucier Chicken Parmesan.


But when it comes to the mozzarella, use only fresh mozzarella for the absolute best flavor. Either the prepackaged one or the one you buy at your favorite specialty grocery store will work perfectly. Do not buy the ones labeled as low-moisture or low-fat mozzarella (this falls into the strong opinion category). 


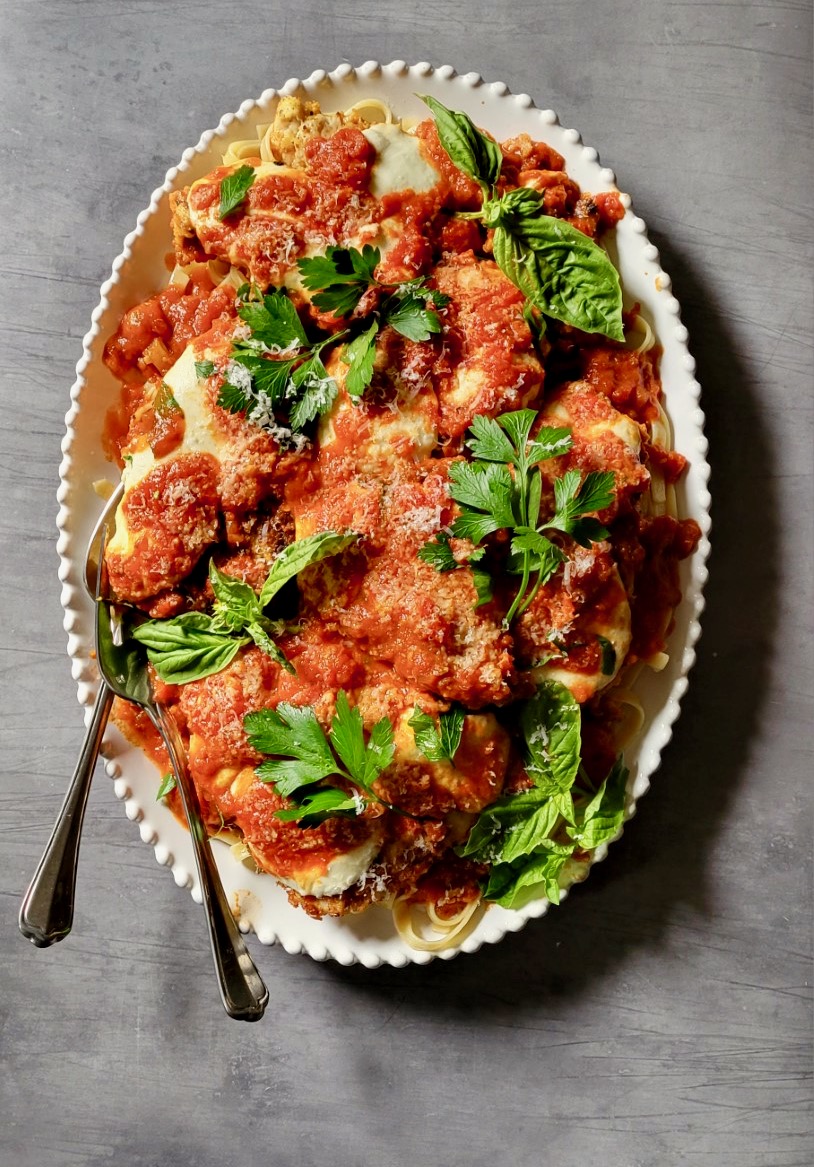
When baking the Chicken Parmesan, begin by putting a layer of the marinara on the bottom of the heatproof baking dish before adding in the cooked chicken cutlets. Next, top with the slices of the fresh mozzarella. Finish with the marinara and freshly grated Parmigiano-Reggiano cheese. Bake the dish for 10 minutes at 400 degrees (F), then increase the oven temperature to 500 degrees (F) and bake for an additional 3-5 minutes or until you can see that the cheese has melted. Remove from the oven, top with more freshly grated Parmigiano-Reggiano, some freshly chopped parsley and maybe even some fresh basil. Note: When baking the Chicken Parmesan, make certain to use a baking dish that can hold up to high temperatures. 


There are many ways to serve this Chicken Parmesan. You can serve it directly from the baking dish (with pasta on the side) for a casual, slightly rustic presentation. You can serve it over a bed of cooked fettuccini tossed in olive oil (or marinara) for a kind of wow factor presentation. Or you can serve it on lightly toasted Italian rolls for a casual, yet hearty lunch option. The choice is all yours! 


Recipe
Chicken Parmesan
Serves 6-8

Ingredients
4 skinless, boneless chicken breasts (approximately 2 pounds), pounded to 1/2" thickness and cut in up to 8-9 even sized pieces
1/2 cup (65g) all-purpose flour + 1 teaspoon Kosher salt + 1/2 teaspoon black pepper
1 cup (88g) Italian seasoned Panko + 1/2 teaspoon garlic powder + 3 Tablespoons grated Parmigiano-Regianno
3 large eggs + 1 Tablespoon water
1/4 cup olive oil, plus more for finishing
1 pound (453g) fresh mozzarella, cut into generous 1/4" slices
24 ounces (680g) jarred marinara, highly recommend Rao's - SEE NOTES
1/4 cup grated Parmigiano-Regianno, divided (plus more for finishing)
1 pound (454g) fettuccini cooked to your liking and tossed with olive oil when placed on the platter
Fresh basil leaves and chopped fresh parsley for garnish

Directions
1. Preheat oven to 400 degrees (F).
2. Set up your dredging assembly line: (1) shallow bowl with flour, Kosher salt and black pepper whisked together (2) eggs whisked with water and (3) Panko mixed with garlic powder and Parmigiano-Regianno.
3. Coat both sides of the chicken breasts with flour (shake off excess). Dip into the egg mixture. Lastly dredge in the panko mixture. Transfer to a sheet pan and repeat until all of the chicken cutlets have been coated.
4. In a cast iron skillet, heat 1/4 cup of olive oil over medium heat. Placing 2 -3 pieces of the chicken in the pan at a time, cook 2-3 minutes per side or until lightly golden. Repeat until all pieces of the chicken have been cooked.
5. Pour approximately 1/3 of the marinara sauce on the bottom of a large heatproof baking dish. Arrange the cooked chicken cutlets on top of the sauce. Top each of the breasts with the sliced fresh mozzarella cheese. Spoon the remaining sauce over the tops of the cheese and chicken. Sprinkle on some grated Parmigiano-Regianno.
6. Bake for 10 minutes at 400 degrees (F). Increase the oven temperature to 500 (F) and cook for another 3-5 minutes or until the cheese has melted.
7. Remove from the oven. Grate more Parmigiano-Regianno on top, lightly drizzle with some olive oil, and garnish with fresh basil and parsley. Serve with the cooked fettuccini either lightly tossed with olive oil or additional marinara.
8. Alternate serving options: (1) Place cooked pasta on a large serving platter. Top with the chicken parmesan.  Grate some additional Parmigiano-Regianno on top, lightly drizzle with some olive oil, and garnish with fresh basil and parsley. (2) Make Chicken Parmesan sandwiches using lightly toasted Italian Rolls.

Notes: (1) Highly recommend having another 12-20 ounces or more of marinara sauce, heated and served on the side. The extra sauce can be used to toss with the pasta or slather on bread. (2) I tossed my fettuccini in olive oil before putting on the platter and served the extra sauce on the side. (3) I used BelGioioso presliced fresh mozzarella cheese here.


Sakonnet Vineyard, Little Compton, RI (April 2023)

Monday, April 17, 2023

Herbed Tuna, Pea & Pasta Salad


It's been more than a hot minute since I posted a recipe for a main dish salad. But like the old adage says 'some things are worth the wait'! And in all honesty, the timing of sharing this recipe (one you are destined to put on repeat) could not be more ideal. With warmer temperatures finally arriving, cravings for cold, scrumptiously satisfying salads seem to go into overdrive. And for those of you looking for a new way to combine your loves of albacore tuna and salad, this Herbed Tuna, Pea & Pasta Salad is one worthy of rewarding your patience. If there was ever a tuna salad worthy of an endless litany of accolades, this version would be the one.


This Herbed Tuna, Pea and Pasta Salad might just rank up there as one of the best tuna pasta salads you will ever have. What could more perfect than an incredibly delicious, refreshing salad made of freshly chopped herbs, peas, celery, red onion, and albacore tuna all mixed together with a great real mayonnaise? Sharing it with friends is my guess. 


With so many different things competing for our time and attention, who doesn't want a recipe for a salad that can be made early in the day or even the night before? Resting and chilling time is necessary for the flavors to fully develop.


There are many tuna pasta salads out there using a variety of pastas. But in my opinion, farfalle or bowtie pasta is the absolute BEST choice for this salad. Not only does it hold the dressing well, it is aesthetically one of the most pleasing pastas to ever grace a platter. When the time comes for you to make this salad, start with cooking the pasta as it needs some time to cool down before being mixed in with the other ingredients.


This particular combination of ingredients is destined to be a timeless classic. With a milder flavor and firmer texture white albacore tuna is the best choice for salads in general, but for this one in particular. Choose an albacore tuna packed in water not oil. After draining the tuna, use a fork to break up into chunks (do not mash the tuna) so when it's mixd together there will be some nice sized bites. Frozen peas, either briefly rinsed under hot water or briefly dipped in the pasta water, are the optimal choice. Canned peas are too mushy and fresh peas require some cooking time. 

The chopped fresh parsley, dill, and chives are the herb trifecta in this salad. Each bringing a different kind of savoriness to the salad. Celery and onions add both crunch and flavor. While I prefer the flavor minced red onions brings to the salad, you could also use shallots. And, last but not least, let's talk about mayonnaise, real mayonnaise. Hellman's is my go to in salads. In other parts of the country it's packaged under the name of Best Foods Mayonnaise. Duke's is another real mayonnaise option. Miracle Whip is not an option. Helpful Hint: The pasta will absorb some of the mayonnaise (especially if you make it the night before) and affect the salad's creaminess. You can solve that problem by adding in another 1/4 cup of mayonnaise when you get ready to serve it. Additionally, take the salad out of the refrigerator at least 15 minutes before you get ready to serve it for the optimal eating experience.


The salad ingredients are blended together in three stages. First, the mayonnaise, Kosher salt, pepper, and herbs are whisked together. Followed by mixing in the tuna, peas, celery and onions. Lastly, the cooked pasta gets folded in until it's well coated. How easy is all of that? 


The finished salad can be garnished with some additional minced dill and chopped chives. Sprigs of fresh parsley and halved sugar snap peas make for a beautiful, but optional finishing touch garnish. 


The recipe makes enough to serve at least eight. However, it can easily be halved if you have a small household. Or make the full recipe, package half of it up and deliver to a friend!

Not sure why it has taken me so long to be someone who gets overly excited about salads. But this exceptional salad has me shifting my allegiances. I wouldn't be surprised if this gorgeous, game-changing Herbed Tuna, Pea & Pasta Salad becomes one of your most favorite crowd pleasing dishes! Even those who normally wouldn't choose a salad as a main dish or aren't big fans of salads in general will be surprised at how filling, flavorful, and delicious it is! You even might be surprised at how quickly it disappears.


Recipe
Herbed Tuna, Pea & Pasta Salad
Serves at least 8

Ingredients
16 ounces (454g) Farfalle Pasta (highly recommend Rummo #85 Farfalle)
2 to 2 1/4 cups mayonnaise (begin with 2 cups, add more if you want it creamier)
1 cup (138g) diced celery (from about 4 stalks)
2/3 cup (85g) diced red onion (from about 1/2 of a large red onion)
3-4 Tablespoons freshly minced parsley
3-4 Tablespoons freshly minced chives
2 Tablespoons freshly minced dill
2 cups (330g) frozen green peas (rinsed in hot water or briefly dipped in the hot pasta water)
2 cans (5 ounce/142g sized) Albacore Wild Tuna, drained and broken into pieces (e.g., Wild Planet)
1 1/4 teaspoons Kosher salt
1/2 teaspoon white pepper (or can use black pepper)
Optional: Sugar Snap Peas and additional chopped herbs for garnish

Directions
1. Cook the farfalle according to package directions. Rinse, drain, and set aside to cool.
2. In a large bowl, whisk together the mayonnaise, parsley, chives, dill, Kosher salt and pepper until blended.
3. Add in the celery, red onion, green peas, and tuna. Mix to blend.
4. Add in the cooked pasta. Use a spatula to mix everything together.
5. Transfer the Herbed Tuna, Pea and Pasta Salad to a serving dish. Cover tightly with plastic wrap and refrigerate for at least 4 hours or overnight.
6. Take the salad out of the refrigerator at least 15 minutes before serving. Give it a good stir and add the additional 1/4 of mayonnaise, if needed. Garnish the salad with some chopped chives, minced dill, chopped parsley, and (optional) halved snap peas.
 
Notes: (1) This was the tuna I used in salad. It's packed in water, not oil. (2) This was the pasta from Rummo I used. (3) If you don't like red onions, use shallots. (4) Use only fresh, not dried herbs in this salad. 


Morton Arboretum, Lisle, IL (April 2023)

Thursday, April 13, 2023

Whipped Goat Cheese w/ Honey Balsamic Fig Jam Crostini


Over the course of the next several weeks I will be heading back to two of my happy places. From ocean to mountain views, to exploring historic places, to spending time with friends, the anticipation of it all is keeping me awake at night. While my bucket list of places I would someday like to visit is long, the joy I feel when returning to beloved places is almost indescribable. Invariably there is always something new to discover or experience in the places feeling as intimately familiar to me as the town I live in. In spite of being one 'of those people' who likes trips with plans (always a plan a and plan b), my daily itineraries are still in development. Not because of procrastination, but because there are quite a few things I hope to squeeze in on these trips. If only the airline froze their rules sometime in 90's, I could bring a few bottles of my favorite wine and all of the ingredients for this Whipped Goat Cheese w/ Honey Balsamic Fig Jam Crostini. As this appetizer would make the perfect start to any trip, to any weekend, to any gathering.


If there was one new appetizer to add to your entertaining repertoire this year, it should be absolutely be this Whipped Goat Cheese w/ Honey Balsamic Fig Jam Crostini!

Not only is it easy to make, it's incredibly delicious. It's the kind of appetizer that can literally be whipped up in less than ten minutes. 


Chevre goat cheese has a bright, slightly tart, tangy flavor. When whipped with some extra virgin olive oil and drizzled with honey, the contrast of flavors is sublime. Whipping the goat cheese transforms it into the creamiest, dreamiest texture. Ideal for spreading on homemade crostini or crackers.


While the whipped chevre goat cheese topped with honey is scrumptious all on its' own, it's becomes epic when topped with a warm honey, an aged balsamic vinegar, fig jam mixture. Chopped praline pecans (or roasted pecans), flaky sea salt, and freshly chopped thyme leaves are the ideal finishing touches. 

When buying chevre goat cheese, fig jam and praline pecans, Trader Joe's is my go to place. No worries if you don't have one near you, because all of these ingredients are readily available at most grocery stores. If you can't find praline pecans, you have two options. You can make them (see notes) or you can simply roast pecan halves in your oven. The pecans add a nice bit of crunch to each bite. 


Homemade crostini can be made in the oven or on the grill. A baguette cut into 1/4" slices and brushed on both sides with olive oil is easily made either way. But again, if you don't have time to make your own crostini, serve the Whipped Goat Cheese w/ Honey Balsamic Fig Jam with some of your favorite crackers. Because when it comes to this appetizer, choose what brings you joy! 

The creamy whipped chevre goat cheese topped with honey balsamic fig jam slathered on a crostini is a combination of flavors and textures is pure bliss. And an appetizer destined to get you rave reviews from friends and family!

Recipe
Whipped Goat Cheese w/ Honey Balsamic Fig Jam Crostini

Ingredients
8.5 ounces (241g) chevre goat cheese, slightly softened
2 Tablespoons olive oil
1/4 teaspoon flaky sea salt
1/2 cup (139g) fig jam, spread, or preserves
2 Tablespoons of honey, divided
1 Tablespoon aged balsamic vinegar
1 Tablespoon freshly chopped thyme, plus a few sprigs for garnishing
1/4 cup (43g) praline pecans or toasted pecans, coarsely chopped
Flaky sea salt, for finishing
Crostini or crackers

Directions
1. In a small food processor, combine the goat cheese, olive oil, and flaky sea salt. Process until smooth and creamy.
2. Spread the whipped goat cheese on a 7" plate. Drizzle one tablespoon of honey over the top of the whipped cheese. Set aside.
3. In a small saucepan, add i the one tablespoon of honey, jam, and balsamic vinegar. Over low-medium heat, whisk the mixture until well blended and heated through (about 5 minutes)
4. Spoon the honey, balsamic, fig jam mixture over the top of the cheese.
5. Top with the chopped pecans, thyme and a light sprinkling of flaky sea salt.
6. Serve immediately with homemade crostini or crackers.

Notes: (1) If making your own praline pecans, use this recipe and omit the cinnamon. 


Cantigny Park, Wheaton, Il (April 2023)

Monday, March 27, 2023

Pink Lemon Drop Martini


"We've been friends for so long I've forgotten which one of us is the bad influence." This was the quote on the front of the birthday card sent from my dearest friend this past September. I couldn't help but laugh out loud. Not only because it was funny, but because it was kind of true. We both have our stories of the times when one of us were 'bad' influences on the other. Lucky for me this is my blog so you don't get to hear her stories, just mine. One of my favorites happened when we were attending a conference in San Diego many, many years ago. It was at a beautiful restaurant in Balboa Park where I had my first French Martini and at George's in La Jolla where I had my first Lemon Drop Martini. Apparently I loved those martinis so much, but particularly the Lemon Drop, I uncharacteristically (and a bit irresponsibly) drank several of them in a single day. To say all of my friends were shocked would be an understatement. Of course, I blamed my friend for my over-indulging deep dive into the martini world. Although secretly I was happy she introduced me to beverages I had been too intimated to try before. In addition to learning what my martini limit was (and I was then and still am a lightweight), I can never drink a martini without thinking about where I had my first ones and who it was that introduced me to them.


There are four martini recipes on the blog. But believe it or not, there isn't a recipe for a Lemon Drop Martini here! Many of you might have your own favorite Lemon Drop Martini recipe, but you might not have one for a Pink Lemon Drop Martini. So let me be the one to introduce you to this pretty in pink, delicious, slightly tart, refreshing cocktail. 


Great cocktails require and are made with great ingredients. In addition to homemade simple syrup, freshly squeezed lemon juice, and a fresh ripe raspberry, a high quality, smooth vodka and a great orange liqueur (e.g., Grand Marnier or Cointreau) are the keys to the absolute best Pink Lemon Drop Martini. The vodka is the bedrock of this martini, so choose wisely. I happen to like Grey Goose Vodka, but there other premium vodkas out there to help you create the most luscious, high-end martini. The kind found at bars that take making craft cocktails seriously.


The Pink Lemon Drop Martini might be the most perfect cocktail to welcome the return of warmer weather. Not only is it easy to make, it makes a great impression when served. The tartness of the lemon juice is slightly tempered by the sweetness of the simple syrup. While the combination of the vodka and orange liqueur round out all of the flavors to give the martini its' refreshing, balanced, smooth flavor. 


Vigorously shaking the ingredients in a shaker half filled with ice for about 30-35 seconds will give you a lemon drop martini in the most beautiful shade of pink. And just one fresh, ripe raspberry is all it takes to achieve that gorgeous color. 

If you are having a large group of friends over, make up a pitcher of them shortly before everyone arrives. So you can spend your time mingling rather than mixing.

More than likely the raspberry will break into pieces when it's shaken up in the cocktail shaker. If you want to serve a clear, pink martini, strain the mixture before pouring it into your martini or coupe glass (I strained mine). Then simply garnish the martini with some fresh raspberries or, if you prefer, a lemon slice or swirl.

Sometimes described as a 'tart adult lemonade' the Lemon Drop Martini, is a great cocktail if you enjoy ones having a hint of sweetness paired with a little bit of a pucker. But be aware the cocktail's sweet flavor can easily lead you down the path of over indulgence if you aren't careful. Take it from someone who knows!

The only real difference between this Pink Lemon Drop Martini and the classic Lemon Drop Martini is its' color. But the pink color is what makes this cocktail feel more festive, more celebratory, and even more alluring. If there is one 'new' cocktail you want to serve to your friends this spring and summer, it should be this one! This adult version of 'pink lemonade' is guaranteed to impress!

Recipe
Pink Lemon Drop Martini
Makes 1 delicious cocktail

Ingredients
2 ounces high quality, unflavored vodka
1/2 ounce chilled simple syrup (preferably homemade, see notes)
1/2 ounce Grand Marnier (or other orange liqueur such as Cointreau)
1 ounce freshly squeezed lemon juice
1 fresh raspberry
Ice cubes
2-3 raspberries for garnish

Directions 
1. Pour in the vodka, simple syrup, Grand Marnier, lemon juice, and raspberry into a cocktail shaker.
2. Add 8-10 ice cubes. Shake vigorously for 30-35 seconds.
3. Strain and pour into a coupe or martini glass. Garnish with fresh raspberries or a lemon slice or swirl.
4. Serve and enjoy! And as always, drink responsibly.

Notes: (1) To make the simple syrup mix equal parts water and granulated sugar (e.g., 1/2 cup water, 1/2 cup sugar0 into a saucepan. Bring to boil, stirring frequently until the sugar has dissolved. Immediately remove from the heat. Let cool. Pour into a jar. Cover and chill. (2) If you don't have any Grand Marnier or Cointreau, you could use Triple Sec but your martini may not have the same high-end martini wow factor. (3) If you like a sugared rim to your martini, slide a wedge of lemon around the rim of the glass and then tilt the glass into granulated sugar.

Friday, March 24, 2023

Honey Roasted Carrots w/ Honey Whipped Ricotta


One of the more common refrains heard around my childhood dinner table was 'eat your vegetables'. With the possible exception of creamed corn, I (unsuccessfully) did everything I could to get out of eating cooked canned vegetables. Back then vegetables didn't have the kind of siren call they have for me now. It took many years before I discovered how intoxicating the flavors of steamed, sautĂ©ed, and/or roasted fresh vegetables could actually be. Anytime anyone is feeling a bit nostalgic and says something like 'things were better when we were kids', I can't help but wonder if their rosy retrospection meant they grew up eating fresh vegetables. 


I can only imagine what my ten-year-old self would have thought about vegetables if a platter of these sweet, delicious Honey Roasted Carrots w/ Honey Whipped Ricotta were put on the table. I'd like to think  it would have been one of those life changing vegetable awakening moments. 
 

Roasting root vegetables, particularly carrots, brings out their natural sweetness. When roasted with a mixture of melted butter, honey, minced garlic, apple cider vinegar, Kosher salt, and black pepper, you end up with their most heavenly version. But wait. When they are set over a bed of honey whipped ricotta and topped with lemon zest, chopped parsley, chopped pistachios, and flaky sea salt, you will experience a kind of head-spinning, vegetable euphoria you never knew was possible.

Unlike many other vegetables, carrots do not fall into the 'seasonal' category as they are readily available year round. As an added benefit, they are generally one of the more inexpensive ones. Which means this is a side dish you can enjoy twelve months a year. Yet, in spite of their year round availability, carrots seem to have a special place on dinner tables during the spring. Between Easter and Passover, 'cooked' carrots are one of the traditional side dishes. 

Peeled, cut on the diagonal, and sliced lengthwise in half, carrots are tossed in a honey-butter-garlic mixture and roasted for about 30-35 minutes. Roasting carrots at a relatively high temperature not only intensifies their flavor, but completely transforms them.


There are two equally delicious elements to this side dish. With complimenting flavors and textures, I would be hard pressed to tell you not to serve the honey roasted carrots over the honey whipped ricotta. When served together, this side dish is on the slightly decadent side, yet it is not a heavy one. Those taking only a small portion will either immediately regret that decision and hope there is enough left over for seconds.


Once the deliciously sweet and tender honey roasted carrots are placed on top of the honey whipped ricotta, there is the final layer of flavors to bring it all together.

Freshly grated lemon zest, chopped fresh parsley, chopped pistachios and flaky sea salt add flavor and texture to the dish. To say they are the perfect finishing touches would be an understatement. 


The key to ensuring the most exceptional flavor in both the carrots and ricotta is to use a good quality honey. Whether it is store-bought or Farmer's Market bought, honey in glass jars ensures that honey is kept in its' natural state. Honey in plastic bottles will tend to lose its' water content and is subject to having chemicals leech into it. In other words, don't use the plastic bottles of honey for this recipe (or any recipe for that fact). 


The Honey Roasted Carrots with Honey Whipped Ricotta would be great paired with a roast chicken or lamb. Or they can be enjoyed all by themselves with some grilled bread. It's impressive as either a side dish or a main dish! Serve them for a weeknight meal or at Sunday or holiday dinner. I promise you won't have to remind anyone at the table to 'eat your vegetables'!


Recipe
Honey Roasted Carrots w/ Honey Whipped Ricotta
Serves 6-8

Ingredients
8-9 large carrots, approximately 1 1/2 pounds (681g), peeled, sliced on the diagonal, and cut lengthwise
4 Tablespoons unsalted butter
1/3 cup good quality honey
4 cloves of garlic, minced
1 teaspoon apple cider vinegar
1/2 teaspoon Kosher salt
1/4 teaspoon black pepper
Zest from 1 medium sized lemon (1-2 teaspoons)
2 Tablespoons chopped parsley
1/4 cup (38g) pistachios, chopped
Flaky sea salt

16 ounces (453g) whole milk ricotta
1 Tablespoon + 1 teaspoon good quality honey
Pinch of Kosher salt

Directions
1. Preheat the oven to 400 degrees (F). Line a large, rimmed baking sheet with parchment paper. Set aside.
2. In a small-medium sized saucepan, add in the butter and honey. Heat over medium-low heat until the butter has melted.
3. Add in the minced garlic and continue cooking for additional 30-45 seconds.
4. Add in the apple cider vinegar, Kosher salt and black pepper. Reduce heat to low and simmer fro 5-6 minutes. Mixture should have the consistency of a syrup. Remove from the heat.
5. Put the peeled, cut carrots in a medium sized bowl. Pour 1/3 of the honey syrup over the carrots. Stir until well coated.. Pour the carrots onto the prepared baking sheet.
6. Bake for 20 minutes. Remove from the oven. Drizzle over another 1/3 of the honey syrup. Return to the oven and continue roasting for another 10-15 minutes or until carrots are tender.
7. While the carrots are roasting, add the whole milk ricotta, honey, and Kosher salt to a medium sized bowl. Beat until smooth and creamy using either a whisk or hand held beaters.
8. Spread the honey whipped ricotta onto the serving platter.
9. Drizzle the remaining honey mixture over the honey whipped ricotta.
10. Spoon the roasted carrots on top. Top with the lemon zest, chopped parsley, and pistachios. Lightly sprinkle with flaky sea salt. Serve immediately.

Notes: (1) The honey mixture may need to reheated to loosen up before adding more to the roasting carrots and drizzling on top of the honey whipped ricotta. (2) If you have any leftovers, cover and store in the refrigerator. Head in the microwave in 30 second increments until heated through.

Thursday, March 9, 2023

Orange Olive Oil Cake w/ Whipped Mascarpone Icing


I first became aware of olive oil cakes while taking a cooking class taken decades ago. To be perfectly honest, I wasn't exactly ecstatic when I learned it would be the dessert we were making. Up until that point in my life I had never had an olive oil cake. Yet, for some reason any enthusiasm I normally have for desserts was replaced with an unfounded ambivalence. More than likely it was my obsession with chocolate that was leading me down an unfair pre-judgment path. However, it would be understatement to say I was reminded of one of life's valuable lessons that day. Never judge a cake before you taste it. 

The plain, simple, almost rustic olive oil cake turned out be an unexpected, incredibly delicious surprise. With a dense, tender crumb texture similar to a great pound cake, but a jillion times moister, I discovered why this seemingly unassuming cake has been around for centuries. With only a hint of sweetness, they are as perfect of a rustic finish to a rich dinner as they are to being served for breakfast or as mid-morning or afternoon snack. Now, years later after savoring my first olive oil cake, it seems they are returning back to the 'dessert' spotlight in great coffee shops and restaurants. And yes, there are even chocolate olive oil cakes!

Olive oil cakes can be served with a simple dusting of confectionary sugar or with a dollop of whipped cream and fruit compote or curd. Or this simple cake can be gussied up with a whipped mascarpone icing. But regardless of how you decide to finish it, there is something else you should know. Olive oil cakes get better with age. While you can enjoy the cake on the day you make it, it actually gets better on days two and three (it lasts up to five days) as the citrus flavors further meld together. In other words, it's one of those cakes that ages gracefully.


Almost all olive oil cakes call for the use of citrus as olive oil and citrus are fabulous together. From freshly squeezed juice, to freshly grated zests, to even some Grand Marnier, what is not to love about this cake? Consistent with the 'more is better' way of thinking, the recipe for this Orange Olive Cake calls for the use of all three. Each 'citrus' ingredient adds a different flavor profile to the cake: sweetness, zestiness, and a greater depth of orange flavor. Because olive oil is a key ingredient in the cake, it's important to choose wisely. Just as you would only cook with an olive oil worthy of finishing a dish or dipping your bread in, you want a good olive oil when baking. Any olive oil with an unpleasant flavor or odor will make their way into the baked cake. The olive oil does not need to be either the most or least expensive or priciest. But it should definitely be extra-virgin. By it's very nature extra-virgin olive oil has fruity undertones, making it the ideal 'oil' choice.

There are as many assembly techniques for olive oil cakes as there are recipes. While the earliest olive cakes were made by hand, the techniques used in this Orange Olive Cake require the use of a hand mixer and whisk. Key to making a great cake batter is ensuring it is not 'over beaten'.  


Baked in a 9" springform pan, the Orange Olive Oil cake bakes for 70-85 minutes. Test the cake for doneness by inserting a toothpick into the cake and pressing down on it lightly.  If the toothpick comes out clean and cake springs back, the cake is done. (To ensure the cake is not 'wet' in the center, err slightly on the side of a longer baking time.) Due to its' long baking time, the top of the cake may darken before the cake is done. To keep the cake from 'over browning' lightly place of aluminum foil over the cake sometime around the 40-45 minute mark. The baked cake should be placed on wire rack and allowed to cool for 30 minutes before being removed from the springform pan. Once completely cool, wrap the cake in plastic wrap and let rest. Note: Recommend baking the cake the night before or earlier in the day of serving. If finishing with the Whipped Mascarpone Icing, wait to put it on the cake until right before serving.

The Whipped Mascarpone Icing can be spread over the top of the cake, piped on with a pastry bag, or dolloped alongside of a slice of cake. While there is much to be said about the old adage 'fresh is best', in the case of this orange olive oil cake, seriously consider baking the cake the day before and icing it on the day you plan on serving it. Because if you have never had an olive oil cake before, I want your first bite to be the one causing you to fall in love. And who knows, instead of chocolate, you might choose to serve this simple, flavorful, moist, citrus olive oil cake at your next gathering. Remember, any leftovers will get even more delicious. 

Recipe
Orange Olive Oil Cake w/ Whipped Mascarpone Icing
Serves up to 12

Ingredients
2 1/2 cups (325g) all-purpose flour
1 1/2 cups (300g) granulated sugar
1 teaspoon Kosher salt
1/2 teaspoon baking soda
1/2 teaspoon baking powder
1 cup extra-virgin olive oil
3 large eggs
1 cup whole milk
1 1/2 - 2 Tablespoons orange zest (from 2 medium sized navel oranges)
1/4 cup freshly squeezed orange juice
1/4 cup Grand Marnier

1 cup heavy whipping cream
1/2 cup (66g) confectionary sugar sifted
1 teaspoon vanilla
8 ounces (226g) mascarpone cheese, room temperature

Optional: Sliced oranges for garnish; confectionary sugar for dusting; fruit compote for serving, freshly whipped cream

Directions
1. Preheat the oven to 350 degrees (F). Line a 9" springform pan with parchment paper. Butter the parchment paper and sides of pan. Lightly sprinkle the bottom of the pan with sugar. Set aside.
2. Sift the flour, Kosher salt, baking soda, and baking powder together in a medium sized bowl. Set aside.
3. In a small-medium bowl, whisk together the milk, orange juice, and Grand Marnier. Set aside.
4. In a medium-large bowl beat the the sugar, eggs, and orange zest until creamy (about 2 minutes). Slowly pour in the olive and beat until blended (about 1 minute).
5. On low speed, beat in half of the flour mixture. Just until incorporated. Then beat in half of the milk mixture. Just until incorporated. Repeat with remaining flour and milk mixtures. The batter should be smooth and creamy.
6. Pour into the prepared pan. Place the springform pan on a rimmed baking sheet and place in the preheated oven.
7. Bake for 70-85 minutes, carefully rotating midway through the baking process. Note: If the top of the cake is browning too much, lightly cover with aluminum foil. 
8. To check for doneness, insert a toothpick into the cake. If it comes out clean, the cake is done. Additionally, lightly press on top of the cake, if it springs back, your cake should be done.
9. Remove the cake from the oven. Place the springform pan on a cooling rack. Let cool for at least 30 minutes before removing from the pan.
10. Transfer the cake to a serving platter or cake stand. Note: When the cake is completely cool, cover well with plastic wrap. Highly recommend making the cake a day in advance and storing at room temperature.
11. To make the icing whip the heavy cream, vanilla and confectionary sugar until soft peaks form. Beat the mascarpone separately until smooth and creamy. Add the mascarpone to the whipped cream. Beat or whisk until well blended, smooth and fluffy.
12. Spread the icing top of the cake using an offset spatula. Or put the icing in pastry bags and pipe on top of the cake. Or serve the icing in a bowl and place dollops on cut slices of the cake.

Notes: (1) You can garnish the cake with fresh orange slices. (2) You can serve the cake with an orange curd or fruit compote. (3) If you ice the cake, keep covered and refrigerated after serving. (4) If you don't ice the cake, keep well wrapped at room temperature.