Saturday, February 16, 2013

Guacamole


Whenever I invite anyone over for a gathering the first question they usually ask is "Can I bring anything?".  Without hesitation my response is usually 'no thank you, just bring you."  However, there is one person for whom I usually say yes to and that would be my sister, as she is the wine connoisseur in the family and is always willing to share her incredible wine and port finds.

Keeping in mind this singular exception, there was a day years back it was a very busy week and I wasn't exactly certain I could get all of the appetizers made for a cocktail gathering for some of my staff.  One of my staff members must have caught me in a moment of weakness because I uncharacteristically said 'that would be great' to the question.

To this day I am eternally grateful that I loosened up a bit because the guacamole brought by this male guest turned out to be incredible. In the first bite, I immediately knew I had to have the recipe.  So I asked 'where did you get this great guacamole recipe?'  When he said it came from an old Good Housekeeping Illustrated Cookbook, my response was 'seriously?'.  He must have read my mind because he said he too was surprised at how good it was when it first made it, but that it had become his signature appetizer for the past twenty-five years.  When you are the recipient of someone's treasured recipe, you feel as if you have been given a priceless gift.
 
His recipe called for the addition of one medium tomato chopped and added to the guacamole.  Because you can only get really good tomatoes in the summer I will either omit this ingredient completely or use chopped grape tomatoes because they are perfect all year round.  Either with or without the tomatoes this is one killer guacamole.

There is a little store in my town that has a basket of perfectly ripe avocados year round.  They don't last long on the store's counter, so as long as I can stop there in the morning on my way to work I can always make up a batch of fresh guacamole when I get home.  If you are not lucky enough to have a store that carries ripe avocados, it usually takes a day or two for the firmer avocados you buy at the grocery store to ripen.


When you slice an avocado in half lengthwise it is easy to scoop out the flesh. I take a tablespoon to separate the avocado from the skin.  And with just a spoon you can remove the entire avocado half and place into a bowl.  Once all of the avocados are in a bowl you immediately add the freshly squeezed lemon juice.  The lemon juice not only adds flavor it helps to keep the avocado from turning brown.  I mash the avocados with a fork.  I like my guacamole chunky but if you prefer a smoother guacamole, this will the time for you to mash it to the consistency you prefer.


Red onions are my favorite onion of choice in this guacamole.  You only need a half of a medium red onion minced for this recipe.


What makes this guacamole recipe different from most others is the addition of the chopped mild green chilies.  Sometimes I buy the can of already chopped chilies, but I usually like to buy the can of whole green chilies so I can decide on the size of dice.  Whole chilies can minced to a small dice or they can be a more medium sized dice.  Again, the size of the dice will all depend on the guacamole texture you like.


Once the avocados are mashed and combined with the lemon juice, you add all of the other ingredients. Remember to use Kosher salt in this recipe.  Table salt and Kosher salt are not the same thing and in this recipe one cannot be substituted for the other.


Of course either mojitos or margaritas are my beverage of choice when serving guacamole.  But if you aren't a rum or tequila drinker, serve this guacamole with your favorite iced cold beer. You might want to make sure you have extra ingredients on hand as once your guests start eating this guacamole, it won't last long.

Recipe
Guacamole (adapted from the recipe appearing in a Good Housekeeping Illustrated Cookbook)
Photos updated February 2024

Ingredients
4 medium-sized  ripe avocados
3 Tablespoons of fresh lemon juice (from 1 large lemon)
1 1/4 teaspoons Kosher salt
1/2 medium red onion, minced
1 clove garlic, minced
1 four ounce can of mild green chiles, drained and chopped or 1 four ounce can of chopped mild green chilies
Optional:  1/2 cup chopped grape tomatoes or 1 medium ripe tomato seeded and chopped

Directions
1. Slice each avocado in half lengthwise, remove seed, and scoop into a bowl.
2. Mash avocado with lemon juice.  Leave chunky.
3. Stir in salt, minced onion, minced garlic and chopped chilies.
4. If adding tomatoes, stir into mixture.
5. Spoon into a bowl.  (Cover with plastic wrap if not serving immediately.)
6. Serve with your favorite chips.


It is hard to believe that it was just a week ago that we had a power outage creating blizzard here on the east coast.  It snowed again mid-week, only this time the snow was soft, fluffy and melted from the heat of the sun.  The landscape of freshly fallen snow at sunrise is breathtaking.  On my way to work I stopped to take some photos to try to capture the light as it came up from the horizon.  When you have heat, power and water, the winter landscape is truly beautiful.
 
Even though the winter can be wicked at times, I would never want to miss out on being able to take in this season.  I could certainly do without the blizzard experience, but there is nothing more mesmerizing that looking a beautiful winter sky, winter landscape. As much as I love warm weather, there is something about experiencing all four seasons that can be energizing.  This is one guacamole recipe that tastes great any season.  It might even be one that helps you get through those seasons that have a few less than pleasant days.

Monday, February 11, 2013

The Dutch Baby, At Last

Having grown up in the midwest and experienced my share of blizzards, I certainly thought that I was a seasoned blizzard surviver.  Apparently, the recent blizzard experience here on the east coast has made me realize I had erred in my thinking.  Maybe it was the three days of no heat, no power and no water was my reality wake-up call that my prior exposure to blizzards were just really a prelude to a 'real' blizzard.  I am afraid to say that I am now a seasoned blizzard survivor because I don't want to see how much a blizzard could actually get.

There was enough time to prepare as best as one could for the impending storm.  Like the calm before the storm, Thursday was a relatively mild day.  In preparation for the predicted storm, I had decided to get up early on Friday morning to get my car filled with gas and to go to the market to pick up a few things, but mostly some things I needed for the Dutch Baby I had planned to make on Saturday morning. Returning home from the store, I brought wood into both the house and the garage; filled up the tub with water; and filled up a cooler with ice just in case the power went out for longer than a day.  After all of that was done, I thought 'okay, I'm ready, bring it on Mother Nature'.  In retrospect, maybe I shouldn't have been so bold in speaking to Mother Nature in that tone.
The power went out late Friday evening, but I was confident, or at least hopeful, it would return sometime on Saturday, saving the Dutch Baby breakfast meal for either lunch or dinner. Little did I know I would be making the Dutch Baby for a very late breakfast on Monday, two full days later.  Thankfully I had my cooler filled with ice so the milk, whipping cream and eggs were all kept cold over the course of a three day power outage.  If I thought this Dutch Baby was delicious before this blizzard, the lack of hot food for three days only intensified how incredible it tasted.

So what exactly is a Dutch baby?  Well, it is a light, airy sweeter than a popover pancake that melts in your mouth.  Dutch babies are also called German pancakes. They are usually baked in a cast iron skillet at a very high temperature in the oven to allow the sides to puff up.  Simply sprinkled with confectionary sugar and served with whipped cream and freshly squeezed lemon juice or lemon curd, this food makes any breakfast (or lunch or dinner) feel like  a special occasion.
For a long time I was intimidated by the thought of making a Dutch Baby.  For some reason I thought it was difficult.  Maybe because when you order them in a restaurant there is usually this little disclaimer that says 'this could take up to 20 minutes before being served'.  If something took that long to make it had to be difficult, right?  Wrong! Little did I realize how simple a Dutch Baby really is to make.


It is truly amazing how five simple ingredients can be whipped up into something so spectacular, so delicious.  You use a blender to whip up the eggs, milk, vanilla, and flour.  The mixture should look a little frothy and should take you only about 45 seconds to get it to that consistency.


The quarter stick of unsalted butter is melted in a cast iron skillet that has been warming in a preheated oven.  I like using the ten inch Lodge Cast Iron Skillets from Williams-Sonoma for this recipe as it never seems to fail me.  Once the butter is melted and very lightly browned, you pour in the batter and allow to cook for 16-19 minutes.  This is when the magic happens.


While the Dutch Baby is cooking in the oven, the whipping cream and confectionary sugar can be whisked and turned into a thick, stiff peak whipped cream.  It is amazing how easy it is to whip these two ingredients together with just a whisk.  You can do this ahead of time and put in the refrigerator and/or if you don't want to whisk by hand you can always use a hand mixer.  If you have any whipped cream left over, you can always use it in a cup of hot chocolate, on ice cream or on top of a Bailey's on the rocks.  

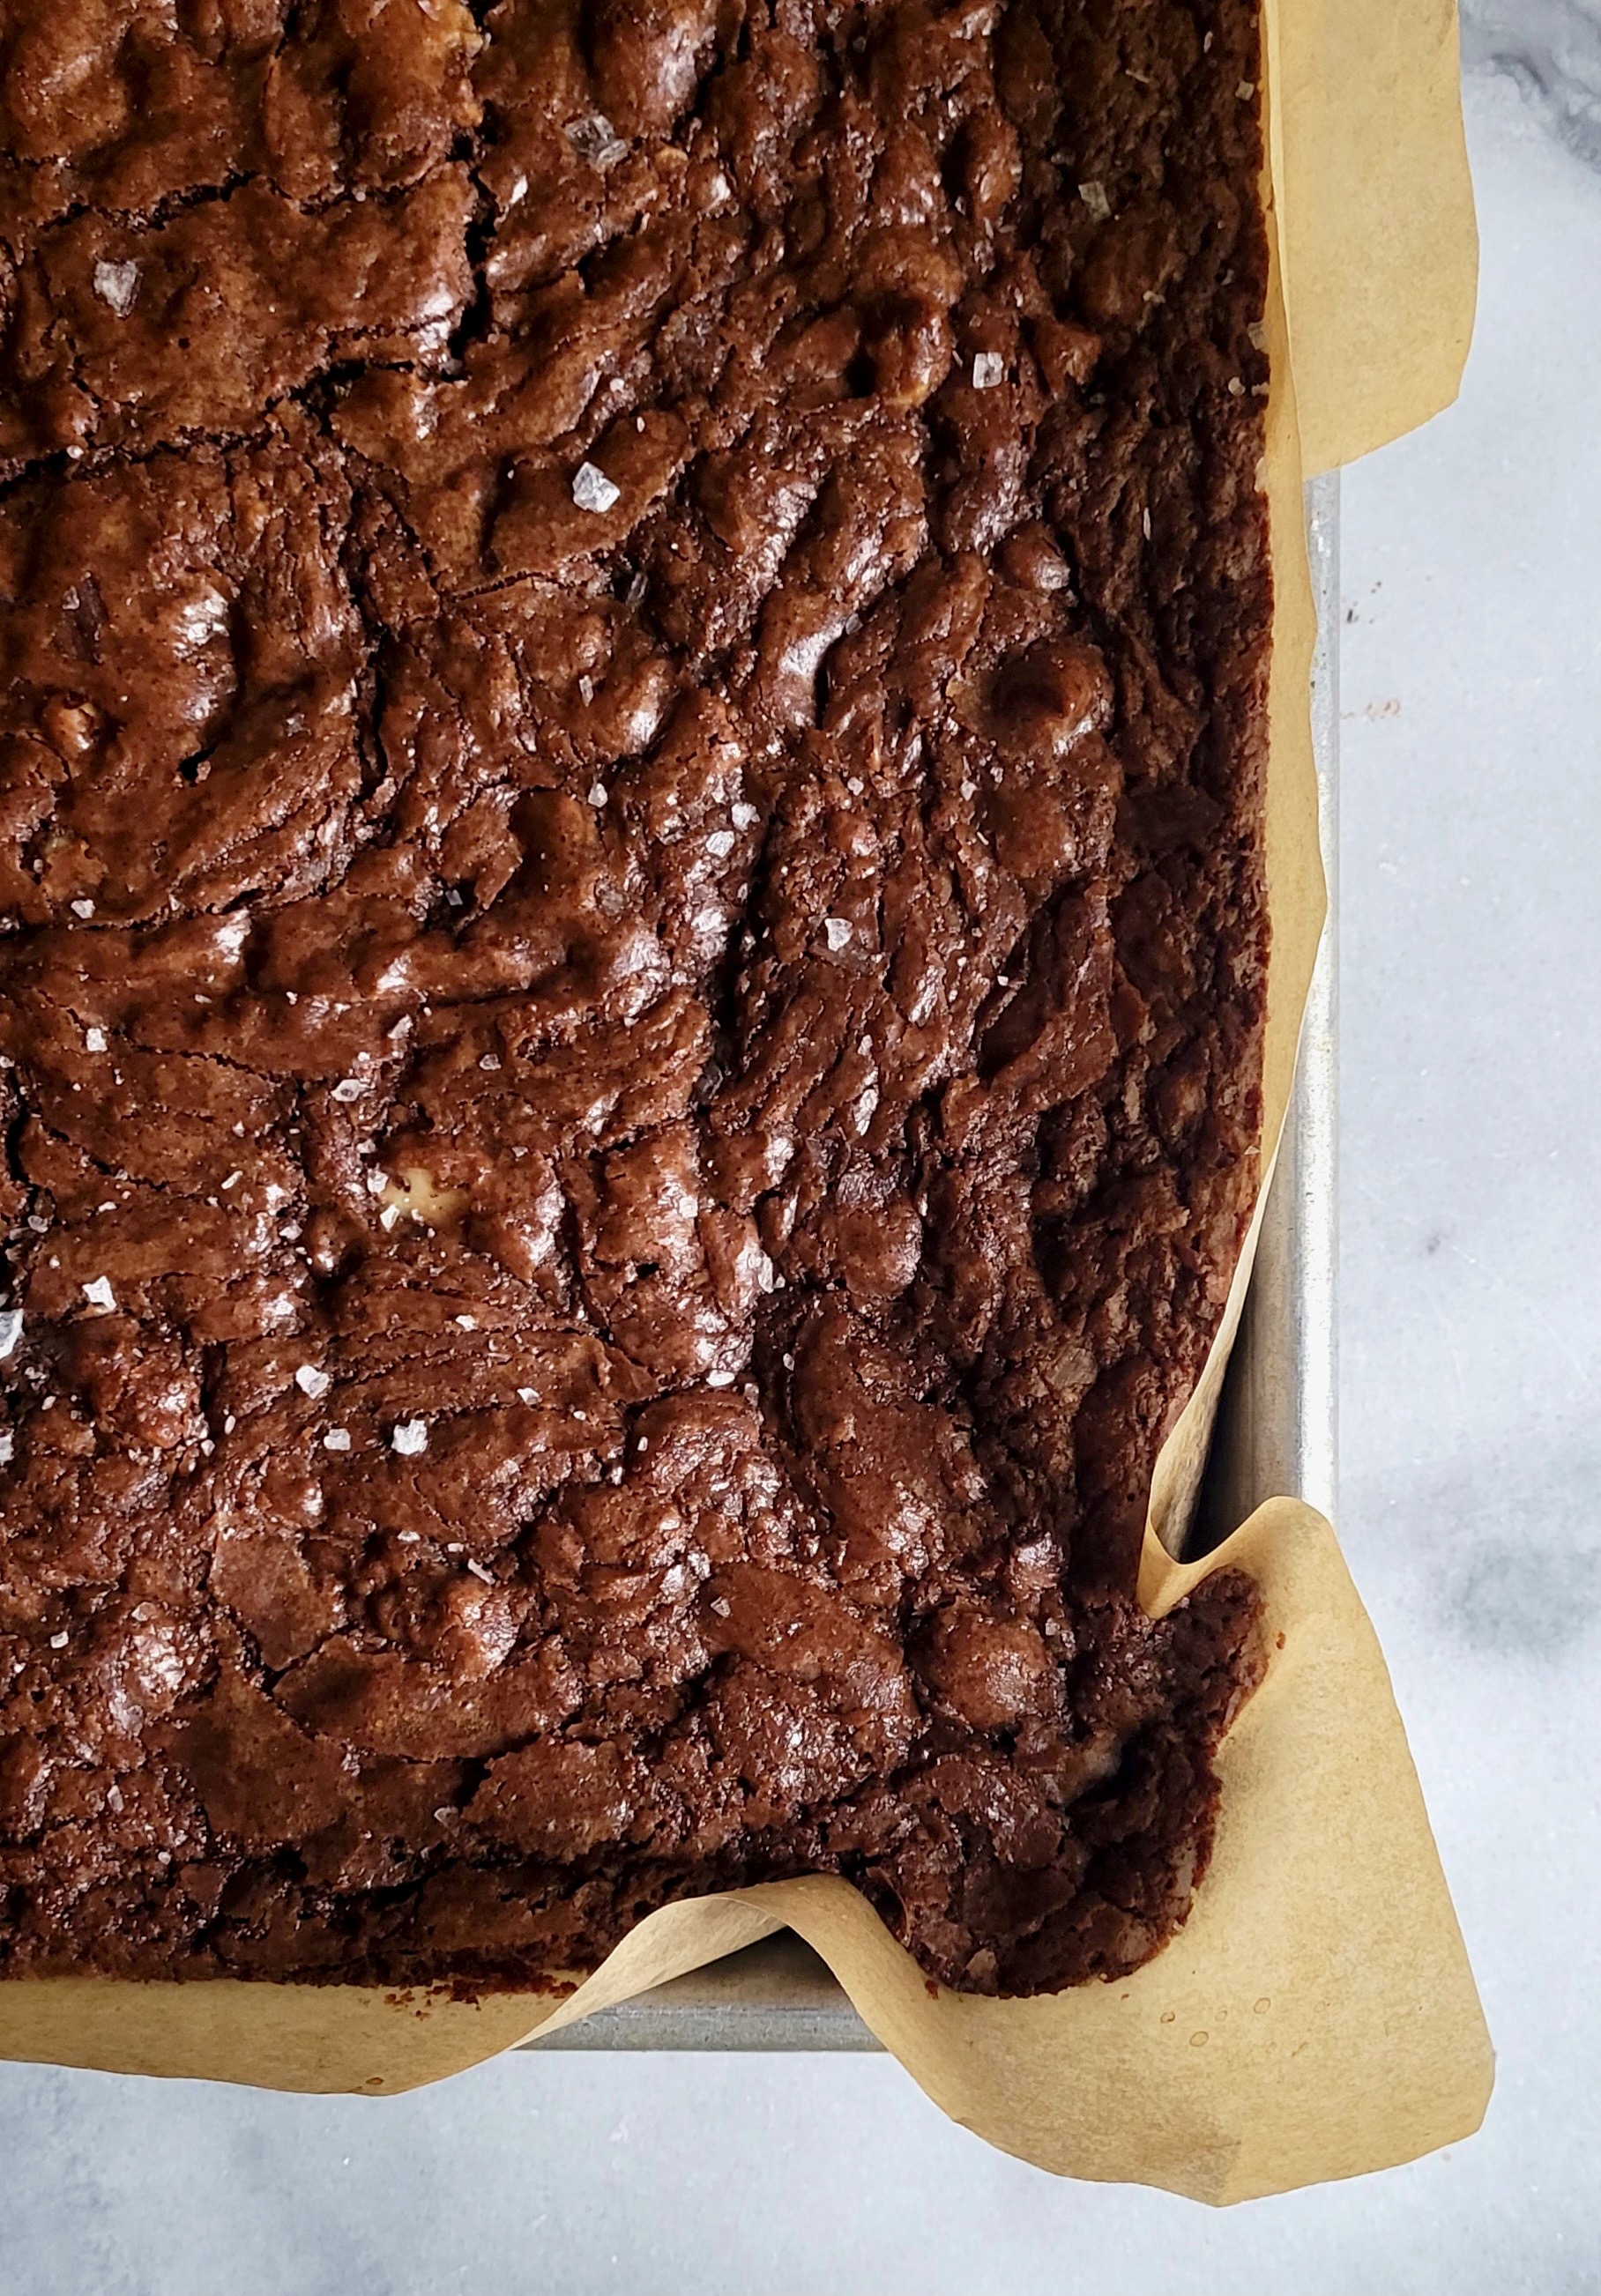
You will know the Dutch Baby is done when the sides puff up more than inch on the side of the pan and it has a light brown color.  Remove from the oven and cool for barely two minutes before sprinkling with confectionary sugar.  Bring the Dutch baby to the table immediately after sprinkling with the confectionary as the presentation of this dish is ooh and ahh worthy.  


The Dutch Baby comes out of the pan perfectly!  The combination of the crispy edges and softer inside makes this 'pancake' one that is the best of both worlds.

I like serving the Dutch Baby with a side of whipped cream and some lemon curd.  Homemade lemon curd would taste incredible, but a great substitution is the lemon curd made by Stonewall Kitchen.  If you have never had anything made by Stonewall Kitchen, you should try to rectify that sooner rather than later.  Their jams, jellies, chutneys, mustards, sauces, toppings, and dressings, to name a few, are all phenomenal. But if you don't have any lemon curd, freshly squeeze a lemon over the Dutch Baby before sprinkling with powdered sugar.  Both lemon options are equally delicious.


Whether you are eating a Dutch baby for breakfast, brunch or lunch, or even dinner, thick applewood bacon fried in a skillet is the perfect side.  I prefer baking bacon in the oven but when making the Dutch Baby and having only one oven, my only option is to cook bacon on top of the stove, in cast iron skillet just in case you have an extra one.
Recipe
Dutch Baby (Adapted Williams-Sonoma version of the recipe)

Ingredients
1 cup whipping cream
1/4 cup confectionary sugar plus more for dusting
3 large eggs
3/4 cup all-purpose flour
3/4 cup whole milk (no substitutions)
1 teaspoon vanilla extract
4 Tablespoons or 1/2 stick unsalted butter
Optional:  Lemons or Lemon curd

Directions
1. Place a 10 inch cast iron skillet in oven and heat oven to 475 degrees.
2. Put eggs, flour, milk and vanilla in a blender blending on high for 30-45 seconds or until frothy.  Set aside.
3. When oven reaches 475 degrees, put butter in skillet and allow butter to melt in oven.  Should take two to three minutes (check after 2).  The butter will be melted and lightly browned.
4.  Pour batter into hot pan and return to oven.  Bake until the Dutch baby is lightly browned and the sides have risen.  It will cook for 16 to 19 minutes of cooking time depending on oven.
5.  While Dutch baby is baking, whisk whipping cream and 1/4 cup confectionary sugar until thickened with stiff peaks form.  Set aside.  You can do this with a mixer, but it doesn't take long to whisk the whipping cream up with a whisk.
6.  When Dutch baby is puffed and lightly browned, remove from the oven.  Let rest for 2 minutes before sprinkling with confectionary sugar.
7.  Serve with the whipped cream and lemon curd.  If you don't have lemon curd, you can squeeze a fresh lemon over the center of the Dutch baby.  Or you can just enjoy the Dutch baby with the confectionary sugar and whipping cream.

So whether you are celebrating the return of heat and power or entertaining guests for breakfasts or just wanting to create a fun family weekend tradition, the Dutch Baby is a celebration worthy dish.  Not only is it simple, its easy and its so inexpensive to make.
I thought that when the Groundhog did not see its shadow and when the Medici's Almonds were on the shelves at Williams-Sonoma, that spring was within reach. It may be, but winter seems to getting in the way.


In spite of some of the whining you may have picked up in my writing, there was much beauty to behold over the last few days.  When the sun came out on Sunday, the sky was a most incredible blue making the ice on the branches look like chards of crystal.  The wind was relatively mild on Sunday so I went out to take photos of the snow, the sky, and winter landscape here on the east coast.  Capturing the beauty of nature was therapeutic for all of the angst I had been feeling.
Like everything, life is about finding or getting to a place of balance.  And even though it felt like I was living a chapter out of a Laura Ingalls Wilder "Little House on the Prairie" book over the last few days and completely out of my comfort zone, I survived.  And if this is the only hardship I have to experience this year, then I will be very lucky. These past few days have also served as a powerful reminder to me of the importance of appreciating and acknowledging the things and people we can often take for granted.
At last after several days I was able to make and enjoy the Dutch Baby.  From now on when I make this recipe it will take a whole new meaning for me.  Its back story of eating Dutch Babies in the days when I was really was a runner training for a marathon, is now replaced with the story of my first east coast blizzard.  When friends and family now come out to visit, the Dutch Baby will be the breakfast meal on at least one the days.  For me, it will be my way of letting them know how much I appreciate them, if not only in words, but in my actions.

Friday, February 8, 2013

Decadent Chocolate Brownies aka Outrageous Brownies


When you hear the phrase 'death by chocolate' associated with a recipe, are you someone who becomes giddy at the prospect of learning of an intense chocolate concoction or are you someone for whom this would be on the 'too much' end of the chocolate dessert eating continuum?  If you are on the giddy end of the continuum, you might just want to read on. And for those of you who are on the 'too much' end, maybe today is the day where you can appreciate just a small dose of 'too much'.

When Ina Garten's first cookbook, The Barefoot Contessa Cookbook, came out I did not want to share this new discovery with anyone until I had time go through many of the recipes.  Her recipe for Outrageous Brownies was one that I wanted to keep as a temporarily guarded secret. In retrospect I wonder what I was thinking.  

Everyone who has tasted these brownies has declared they were the best brownies they had ever eaten.   One bite of these brownies and you are immediately transported to an incredible euphoric state.
When I finally succumbed to sharing the recipe with others, almost everyone was amazed at how much chocolate was actually in them.  There was one person who upon reading the ingredients jokingly said 'my mortgage payment is less than the cost of the chocolate in this recipe'.  While there was some humor in this exaggeration, the recipe actually does call for a little more than two pounds of chocolate, which explains in part why these brownies are so insanely decadent.

There are many words to describe these brownies.  Dense, moist, chocolately, nutty, rich, and decadent are just some of them.  Served all by themselves or with some vanilla ice cream, they are a perfect death by chocolate eating experience.  Once you get rave reviews from your family and friends for this decadent brownie, I wonder if you too will want to temporarily guard the recipe.


The set of graduated glass bowls available from Williams-Sonoma are my favorites and I use them constantly.  They are the only bowls I use for melting chocolate over simmering water.

Once the butter and chocolate is melted, it is stirred until combined to a beautiful, thick, shiny consistency. Whisk this mixture gently.


For a long time I didn't believe that lightly toasted nuts made a difference to the taste of the finished product because it just seemed like one more step in a recipe.  But one day just for the heck of it I decided to just do a little taste test comparing a raw nut with a lightly toasted nut.  The difference was more than subtle for walnuts, pecans and macadamias.  From that point on if a recipe called for lightly toasting the nuts before combining with the rest of the ingredients, the additional step and time was well worth the effort.  Remember to always toast your nuts first before chopping them.


If you have ever made recipes from any of Ina Garten's cookbooks you will note she almost always uses extra-large eggs in her recipes.  So when shopping for the ingredients for these brownies, remember extra-large (not jumbo, not large) eggs.  


The original recipe called for instant coffee granules as one of the ingredients.  When I first started making these brownies I was using one of those instant flavored coffees. However, over the years shifted from instant coffee (Sanka) to instant espresso coffee.  The brand I like to use is Medaglia D'Oro as it not only works perfectly in recipes calling for 'instant coffee', it makes a great cup of instant espresso as well. The addition of the espresso adds to the richness of the chocolate and is the game changer ingredient that separates this recipe from all other brownie recipes.

The recipe calls for a one and a quarter cups of flour.  One cup is used for the batter and the quarter cup is mixed into the chocolate chips and nuts.  Coating the nuts and chocolate chips with flour prevents them from sinking down to the bottom of the brownies.  The result is a brownie with chocolate chips and nuts mixed perfectly throughout.

When finished baking the brownies should have a beautiful sheen to them.  If they come out with a dull finish, you have overworked the batter.
 
After the brownies have cooled they should be refrigerated before cutting.  The brownies should spend at least a couple of hours in the refrigerator.  You will them be able to simply lift up the parchment paper out of the pan and then cut them into whatever size of squares or rectangles you like. I like to put the cut brownies into white cupcake papers as it makes for a great presentation on a platter or stacked in a cellophane bag.

Recipe
Decadent Chocolate Brownies aka Outrageous Brownies (oh so slight adaption of Ina Garten's Outrageous Brownie recipe appearing in The Barefoot Contessa Cookbook)

Ingredients
1 pound (454g) unsalted butter
1 pound (454g) semisweet chocolate 
12 ounces (340g) semisweet chocolate chips
6 ounces (171g) bittersweet chocolate
6 extra large eggs, room temperature
2 Tablespoons instant espresso or 3 Tablespoons instant coffee granules
2 Tablespoons vanilla
2 1/4 (450g) cups granulated sugar
1 1/4 (163g) cups all-purpose flour, divided
1 Tablespoon baking powder
1 teaspoon salt
3 cups (340g) lightly toasted walnuts, chopped
Flaky Sea Salt

Directions
1. Preheat oven to 350 degrees (F).
2. Place walnuts on baking sheet and toast for approximately 6-8 minutes.  Cool and then chop coarsely.
3. Line a 12" x 18" x 1" rimmed baking sheet with parchment paper.
4. In a medium sized bowl placed over simmering water melt butter, one pound of semisweet chocolate and six ounces of bittersweet chocolate.  When melted, stir, remove from heat and let cool slightly.
5. Mix together the eggs, instant espresso granules, vanilla and sugar in a large bowl using a whisk.  Do not over beat.
6. Add slightly cooled chocolate/butter mixture.  Stir gently until mixed.  Set aside.
7. Sift together 1 cup flour, baking powder and salt.  Mix into batter.
8. In a separate bowl mix together the 12 ounces of chocolate chips and chopped walnuts with 1/4 cup flour.
9.  Add chocolate chips and nuts into the chocolate batter.
10.  Pour batter into prepared pan. Sprinkle lightly with flaky sea salt.
11.  Bake for 20 minutes.  Remove from oven and tap baking sheet at least twice on counter.  Return to the oven and bake for up to an additional 15 minutes or 20 minutes or until a toothpick comes out clean.  Be careful to not over bake as they are intended to be moist brownies.
12.  Once the brownies have cooled, cover, and place in the refrigerator.
13.  Cut chilled brownies into the size or shape of preference.  Serve room temperature or chilled.

Notes: (1) I used Ghiradelli chocolate bars and chips in these brownies. (2) To toast the walnuts, place them on a baking sheet. Bake in a preheated 350 degree F oven for 7-9 minutes. Allow to cool before chopping and mixing into the batter.

Unlike cooking there is a precision to the measuring of ingredients in the making and/or baking of desserts. European recipes usually list ingredients in weights where here in the US we generally use the measures of teaspoons, tablespoons, cups, etc.  However, there is a movement here now with some chefs like Thomas Keller who advocate for weighing ingredients when baking. Until I fully transition to the weighing of ingredients, I will use my trusty measuring tools to get the perfect measured spoonful or cup.

Last week I went looking for my favorite Williams-Sonoma measuring spoons and could not find them.  I was beside myself.  I tore apart every drawer not just once but twice and then looked in the dishwasher at least three times. I even looked in drawers where I would not even think to put my baking tools. I couldn't imagine that I would have inadvertently thrown them out, but my efforts to find them were unsuccessful.  If there was no rationale explanation for their whereabouts, maybe there was an irrational one.  I live in an 80 year old farmhouse so in my active imagination world, I momentarily wondered if the house had a ghost that 'took' these treasured measuring spoons from me.

After my unsuccessful search, I made the hour drive to the Williams-Sonoma in Wrenthem, Massachusetts to buy a new set of metal measuring spoons.  I couldn't just use any measuring spoons. Yes, I have an affinity for measuring spoons made not of thin, light-weight metal that bends easily or of plastic, but for spoons crafted with more substantial metal, making them difficult to bend out of shape.  All was again right with the world when I bought the new set of Williams-Sonoma spoons.  These simple little spoons had the amazing ability to make me happy.

Today as I was making the brownies I used my new measuring spoons to get the precision I wanted. In cleaning up the bowls and spoons, I opened the dishwasher, took out the KitchenAid bowl and to my amazement there were the measuring spoons I so frantically looked for last weekend.  I could hardly believe my eyes. So just in case there really is a ghost here, it now will have to hide two sets of spoons before I have the need or time to spend another two hours of my life buying a third set

Sunday, February 3, 2013

Eggplant Caponata Bruschetta


Recipe updated in September 2023.  Often on a long drive to make the time pass a little faster, we used to play a game. One where we each named the vegetables served at the dinner tables of our youth. Invariably when it was my turn, iceberg lettuce, tomatoes, onions, potatoes, carrots, cabbage, cucumbers, sweet potatoes, corn, peas, mushrooms and green beans were the only twelve things on my list.  And most, if not many of them, were the canned version only. There was some humor in this rather short, limited list as it now represents only a small portion of the vegetables I now eat and cook with.

It was my Italian best friend's family who nurtured my appreciation for eggplant. And without a doubt her eggplant parmesan remains the best I have ever tasted.  But other than eating eggplant cooked in this way, it was not a vegetable I knew existed in any other recipe until I was at a holiday open house one year, very long ago.  Quite by accident I tasted something called caponata. Not only had I not ever heard that word before, I had no idea what it was.  But at long last, I discovered that caponata was a dish that had eggplant as one of its main ingredients.  The deliciousness of eggplant caponata bruschetta is experienced in the first bite.  And eggplant went from being a "nice to have" to a 'must have' on my list of vegetables to be consumed.


It took me a while to get a copy of the caponata recipe from the person who had made it for the party, but persistence is one of my virtues or Achilles' heels, it's all a matter of perspective.  The recipe came from her aunt who had lived somewhere on the east coast.  When she had written the recipe out she titled it "Hennrietta's Caponata".  So for years I had a little piece of paper with the recipe on it.  Since I usually don't memorize recipes, I was beside myself one weekend when I looked for the recipe and couldn't find it.  Again I had to ask the same person to get me a copy of the recipe. No let me rephrase this, I had to relentlessly ask the same person to get me another copy of the recipe.  This time it was written out on a slightly larger piece of paper.  I figured out a way not to lose this recipe as I could not bear to ask for it a third time.


The recipe begins with preparing the eggplant, green peppers, onions and garlic.  I like using Italian eggplant in this recipe as its a little firmer and less seedy. However, you can use regular eggplant but you will just have to scoop out and discard the seedy parts.


Eggplant is a beautiful aubergine on the outside and when you cut it, it is a beautiful white on the inside.  Before getting the olive oil hot, make sure you prepare all of the vegetables: the eggplant, green peppers, onions, and garlic.  Once the oil is hot, you add all of your chopped vegetables, turn the heat to low, cover, and cook for approximately 10 minutes.  The vegetables will begin to soften slightly in this first phase of the cooking process.


Yes, this is another recipe with olives, this time the Spanish olives stuffed with pimentos. Measure out the olives before you cut them.  You can either coarsely chop or slice them.

The original version of the recipe called for dried oregano.  When I went to make the recipe I could not find my jar of dried oregano, even after tearing apart the cabinets thinking it might be hidden.  I did not want to drive to the store, so I went out to the herb garden to see if there was some fresh oregano still growing under the light covering of snow.  And yes, there were clusters of green leaves still growing. Guess it was my lucky day.


I know I shared that if a recipe calls for fresh herbs, dried herbs don't live up.  However, the inverse is not always true. The fresh oregano is definitely better than the dried oregano in this caponata.  The standard fresh versus dried conversion is for every one teaspoon of dried you use three teaspoons of fresh.
And oh by the way, I would not be surprised if within the next few months my cupboard has several bottles of dried oregano.  It will be like the pecans, when I go to the grocery store I will think 'do I have any dried oregano?' and then just throw a bottle in the basket.


You add the tomato paste, water, red wine vinegar, olives, sugar, salt and pepper all at once.  Continue to cook on low heat for approximately 15 minutes.  If you want the savory and sweet version of the caponata, you add a half cup of golden raisins in the last 5 minutes. Remove from heat, allow to cool to room temperature.

I like to cut the French baguette on the diagonal and then grill on the stove.  There is something about the grill marks that gives the dish a rustic look and feel to it.  Caponata is not a fancy food.  But not to worry, the bread will still taste delicious if you toast it in the oven.

Recipe
Eggplant Caponata Bruschetta (an adaptation of Hennrietta's Caponata)

Updated September 2023

Ingredients
1/3 cup extra virgin olive oil
1 medium or 2 small Italian eggplants for a total weight of 1 pound (472g), should yield 4 cups of peeled and diced eggplant
1 medium yellow onion chopped or 2/3 cup (88g) chopped yellow onion
1/3 cup (48g) chopped sweet green peppers
1 jar (4.5 ounces/127g) of sliced mushrooms, drained
2-3 cloves of garlic, minced
1 six ounce (170g) can of tomato paste
1/2 cup (75g) Spanish olives (the green pimento stuffed ones), first measured and then halved
1/2 cup water (add more as needed)
2 Tablespoons red or balsamic wine vinegar
1 1/2 teaspoons of sugar
1 1/2 teaspoons freshly chopped oregano (or 1/2 teaspoon dried oregano)
1 teaspoon Kosher salt
1/4 teaspoon pepper
1/2 cup (72g) golden raisins (my personal favorite addition, but they are optional)

French baguette, sliced on the diagonal, lightly toasted or grilled

Burrata or Whipped Ricotta

Directions
1.  Heat olive oil in large skillet (one that has a lid).  Add eggplant, onion, green pepper, mushrooms and garlic.  Cover and cook on low heat for 10 minutes, stirring at least once.
2. Stir in tomato paste, olives, water, vinegar, sugar, oregano, salt, and pepper.  Cover and simmer for 15 minutes, stirring several times and checking for consistency.

 Note: If the mixture gets too thick, add in small amounts of water. The consistency of the caponata should be chutney like.
3.  If adding the raisins, add them in the last 5 minutes.
4.  Remove from heat, cool to room temperature.
5. Transfer to a bowl placed on a platter.  Surround the platter with the bread.  Serve caponata at room temperature.
6. Optional:  Serve with burrata cheese or whipped ricotta to kick it up a notch.

Notes: (1) Most of the updates in the recipe include small and weight specified changes to the ingredients. Additionally, I originally recommended the Eggplant Caponata Bruschetta be served with burrata. Now I would also highly recommend it be served with Whipped Ricotta as option. (2) I prefer the caponata warm at room temperature. So, if you make it ahead, bring to room temperature before serving.


Two years ago we celebrated the 21st birthday of my best friend's daughter in New Orleans.  On our first day there we had lunch at A Mano, one of the city's Italian restaurants.  We ordered Caponata Bruschetta as a first course to share.  Their version of the recipe had golden raisins in it and was topped with burrata cheese.  When I tasted this sweet and savory caponata topped with the burrata cheese, I like everyone at the table, suddenly wanted the entire appetizer for themselves.  We had to place a second order.
If you have never had burrata cheese you should absolutely, definitely, add it to the list of cheeses you eat. Really, seriously, this cheese is that good. The name burrata means 'buttered' in Italian.  And what is not to like about butter?  It is actually a fresh Italian cheese made from mozzarella and cream.  The outer shell is solid mozzarella but when you slice it open the thick, rich cream oozes out.  Burrata and mozzarella are two very different cheeses. Once you taste burrata you will immediately know the difference.

So if you can find burrata in the grocery store you must buy it.  The addition of this cheese when serving will completely change your experience eating the Eggplant Caponata Bruschetta.  Trust me, the Eggplant Caponata Bruschetta is wonderful all on its own, but with the addition of the burrata, well, let me just say that your palate and appreciation for eggplant will never be the same again.  And if eggplant wasn't on your vegetable list growing up or on your current list, what are you waiting for?

Saturday, February 2, 2013

Fig, Olive and Walnut Tapenade

Ever since I discovered the tangy, creamy taste of goat cheese, I have been immediately drawn to any recipe that calls for it as an ingredient. And if there isn't a recipe using it, I find a use for it. I love goat cheese on scrambled eggs, on roasted asparagus, on pasta, and in salads.  Thank goodness goat cheese is now so readily available in the grocery store so I don't have to drive far to buy some or wait for the cheesemaker at a weekend Farmer's market.
So when I discovered a recipe for a fig based tapenade served with goat cheese in a Bon Appetit magazine many, many years ago, I knew it was one that I had to make.  From the first bite of this tapenade I was in love, if there is such a thing as being in love with a food. The combination of the figs, olives, and capers along with the balsamic vinegar, olive oil, thyme and walnuts is absolutely heavenly.  Then topped over a sliced baguette spread with softened goat cheese, this tapenade will make you think you have actually died and gone to heaven.  This is food for the Gods.


This morning when I went to my favorite market to pick up a package of dried Calimyrna figs there wasn't a package to be found, or least that is what I thought. I first looked in the section with dried fruits, no luck.  I then went to the produce section as containers or bags of dried fruits can often be found there, again no luck.  So I asked the produce manager if he had any.  He went over to a rack containing packages of dried fruit only to tell me that they must be out, however, he would look in the back but returned empty handed.  Not certain if Turkish figs were the same as Calimyrna figs, I started to do a google search using my phone (ah, if I only had an iPhone where I could ask my questions and have them answered instantaneously).  Between the two of us, I entered every possible question to get the answer I wanted, but to no avail.  So I thanked the produce manager for his time and continued to do some other shopping.  As I was shopping on the other side of the store, I looked up and there was the produce manager holding a bag of the dried Calimyrna figs.  After making a small gasp, I didn't know whether to hug him or high five him.  I went with the high five.  Was this luck I wondered, the finding of this last bag of figs on the rack he had first searched?  Maybe, but his persistence was my good fortune today.
Tapenade was originally a dish consisting of pureed or finely chopped olives, capers, anchovies and olive oil.  Its name comes from the Provencal word for capers, tapenas, and is a food often served with bread as an appetizer.   There are so many different variations of recipes for tapenade, however, without a doubt, the addition of figs and walnuts and the omission of anchovies makes it divinely delicious. If I only took French in high school instead of Spanish, I might have had my first taste of tapenade way back when on a day when everyone would be asked to bring in a French food to serve in class.

Hopefully you will have an easier time finding the dried Calimyrna figs or you will come shop in a store with great customer service.  They really are not that hard to find. Trader Joe's and Whole Foods usually carry them.  For this recipe, a 7 ounce bag will give you a few more than you need, leaving you with a couple to snack on.  The figs are chopped into little bite size pieces.  Try to go for uniform  pieces if you can, but by no means 'do not obsess about this'.

The chopped figs are cooked with some water.  The figs are perfectly softened when the water evaporates.  Because they hold their shape during this cooking process, the little bites add to the texture of the tapenade.

Once the figs are softened they are put into a bowl where you then add the chopped olives, chopped capers, olive oil, balsamic vinegar and chopped thyme.  And oh, don't forget the very slight pinch of sea salt.  Kosher salt works too, but the sea salt just melts into this mixture.  If you are making this recipe early in the day, stop here, cover the bowl and refrigerate.  If you are making it before your guests arrive, you add in the chopped toasted walnuts.  The mixture is then placed on a platter prepared with goat cheese medallions arranged in a circular pattern.
I must warn you about something.  Be careful not to take more than one taste of the tapenade at this point. I guarantee you will not be able to stop.  The sweetness of the figs combined with the tartness of the olives, capers and vinegar is an absolutely wonderful combination of one bite flavors. Remember you are making this as an appetizer.  Explaining to your guests that you had made a fabulous tapenade earlier in the day, but then something went awry.  After sharing you made them something but are not able to serve it, won't get you any points for good intentions.  Particularly if you consumed the tapenade yourself.
So if you can show restraint and are able to refrigerate the mixture at this point, you will need to bring to room temperature to finish before serving.  This tapenade is good cold, but at room temperature it is a completely different dish.  All of the flavors come through when it is room temperature.  Remember to take your goat cheese out for a little while so that it spreads perfectly on bread or crackers.

Recipe
Fig, Olive and Walnut Tapenade (oh so slight adaptation from the Fig and Walnut Tapenade recipe appearing in Bon Appetit, 2001)

Ingredients
1 cup dried Calimyrna figs chopped (about 5 ounces)
1/3 cup water
1/3 cup chopped pitted Kalamata olives
2 Tablespoons extra-virgin olive oil
1 Tablespoon balsamic vinegar
1 Tablespoon drained capers, chopped
1 1/2 teaspoons fresh thyme, chopped
1/2 cup walnuts, toasted and chopped
Pinch of sea salt

10-12 ounces of soft goat cheese 
1/4 cup toasted walnut halves for garnishing
Fresh thyme springs for garnishing

French baguette or crackers

Directions
1. Chop figs into small pieces.  Combine with water in a heavy saucepan and cook at medium to high heat until water evaporates and figs are softened, about 5 to 7 minutes.  Remove from heat and transfer to a bowl.
2. Add olives, capers, olive oil, vinegar and thyme. (If not serving immediately stop here and put in a covered dish in the refrigerator for up to 2 days.  If you refrigerate you must bring to room temperature before continuing.)
3. Mix in 1/2 cup toasted chopped walnts.
4. Arrange goat cheese medallions in a circular pattern on a platter.  Spoon tapenade into center of the large goat cheese circle.
5. Garnish with 1/4 cup toasted walnut halves and fresh thyme sprigs (optional)
6. Serve with sliced French baguette or your favorite crackers.  
7. Remember to serve room temperature.

I like to serve things that are a little out of the ordinary but have ingredients that are familiar to most.  Sometimes there is comfort and safety in serving the more predictable appetizers.  And sometimes this can be a little boring.  So I encourage you to show your family and friends that you are a little unpredictable.  Could it be a good thing to keep everyone just a little off balance about you?  Maybe, it just might depend on your friends.
And oh yes, this tapenade is so good that it may enable you to make converts out those who are not wild about olives. This may sound a tad wicked, but unless you have guests who are allergic to olives, don't tell them what is in this.  Let them first have the experience of this tapenade.  It could there lucky day! It may even give those who have never eaten goat cheese a reason to.  Such gifts you would be giving your friends in this one simple appetizer!
Served with a french baguette sliced you have a perfect appetizer for a dinner party, cocktail party or just an impromptu gathering of friends.  Thank goodness I had enough restraint to take only one taste this morning.  Otherwise, it might be just the usual cheese platter tonight!

Tuesday, January 29, 2013

Cinnamon Glazed Pecans

There just had to have been a reason why I had so many bags of pecans in the cupboard.  I must have had overly ambitious, unrealized goals of making Cinnamon Glazed Pecans to add to gifts over the holidays. 

And then there is the pecan pie recipe I have been wanting to try for awhile now.  Or maybe I could just never remember if I had pecans each time I went to Costco or Sam's Club and so I just threw another bag in the cart. Whatever the reason or reasons, I thought it was time to put some of those bags of pecans to good use (god-forbid I let them expire) and make a batch of the Cinnamon Glazed Pecans.  The pecan pie recipe will just have to wait.

Yes, this is the second nut recipe I am posting on the blog in less than a month.  You must be thinking 'what's up with the nuts?'  Not sure I have a good answer for that question, however, with a relative high degree of certainty please know there will be some savory and spicy recipes with nuts as the main ingredient posted on saltedsugaredspiced in the months ahead.
The first time I tasted a cinnamon glazed pecan was when a very talented baker brought them to work.  They were devoured within a couple of hours of being put out on the table, one strong indicator that they were well received. Recipes for baked nuts had previously not been on my radar but after I tasted those nuts, I realized I had never seen a recipe for them.  This would have been in the days before online versions of food magazines, FoodNetwork recipes, foodblogs, and the proliferation of recipe postings on the internet were readily available. I received her recipe the old-fashioned way, written on a piece of paper.  
With a new found interest in cinnamon glazed pecans, I have since discovered a few more recipes along the way.  My favorite recipe version at the moment is one found in a Nordstrom cookbook. This recipe could not be easier or more simple.  Pecans, egg whites, sugar, and cinnamon.  More on the cinnamon in a bit.  Baked in the oven on a relatively low temperature, these nuts are transformed into an addictive little treat.

The egg white and water are whisked until foamy and no liquid remains.
You will find that a room temperature egg combined with water can attain a pretty good volume of foam. There is no need to pull out a mixer, you can do this with a whisk.  Even my whimpy mixing arm can get the egg whites to the perfect foamy texture.  But feel free to pull out the mixer if you are not up for the whisking challenge. The pecans are then added to the whisked egg mixture.

All cinnamons are not created equal.  My hands down favorite is often marketed as Saigon cinnamon (also known as Vietnamese cinnamon). Vietnamese cinnamon is generally sweeter so it can be eaten like candy and its spiciness is often judged to be full-bodied without a hint of bitterness. If you have yet to use this cinnamon in your baking and/or cooking, you just might want to try it, so you too can experience the difference.  The sugar, salt and cinnamon are mixed together and added to the pecan mixture.

For the best results when baking, I always bake nuts in the top third of the oven in order to get that beautiful dark brown coloring.  There have been times when I haven't paid attention, threw the pan in the oven and was disappointed with the outcome.  There is nothing worse that having to throw out a pound of baked nuts. Okay, yes there are worse things.

Recipe
Cinnamon Glazed Pecans (slight adaptation of the pecan recipe appearing in the Nordstrom Entertaining at Home Cookbook)

Ingredients
1 pound of pecans 
1 large egg white (room temperature if possible, but not a deal breaker)
1 Tablespoon water
1 cup sugar
1 teaspoon of ground Saigon cinnamon
1 teaspoon of Kosher salt

Directions

1. Preheat oven to 225 degrees (F)
2. Whisk together egg white and water until the mixture is foamy and no liquid remains.  Add pecans and toss to ensure all pecans are coated.
3. Mix together the sugar, cinnamon and salt.  
4. Add the sugar mixture to the egg white covered pecans stirring to ensure all pecans are covered.
5. Scatter pecans on a parchment paper lined baking sheet and put in top third of the oven.
6. Bake pecans for approximately one hour, stirring every 15 minutes. Pecans will be a dark brown and nicely glazed when finished.
7. Remove from oven and allow to cool.  Or spread on a platter and serve warm.
8. If allowed to cool, store in a covered container or put in cellphone bags tied with ribbon.

I would characterize these cinnamon glazed pecans as having a you need to eat more than one quality to them. Not only are they great as snacking food, they are equally wonderful served with cocktails, added to salads or sprinkled on top of vanilla ice cream. I love putting them in cellophane bags tied with a beautiful ribbon as they make a great hostess, housewarming, or a 'just for the fun of it' gift.

This blog is now officially one month old, not yet anniversary or birthday celebration worthy, but a milestone worth noting.  Since its launching saltedsugaredspiced has had more than 500 viewings. I am thrilled, I think. Because I really don't know whether this is a thrill worthy number or not as I have no basis of comparison. It could be there are just ten of you out there who have looked at this blog fifty times or maybe there were a hundred of you who each looked at it five times.  Whatever the real number of viewers or return visitors actually is may not really matter. The number itself is inspiring enough for me to keep going on this journey of sharing my passion for baking and cooking.

Have you ever been simultaneously energized and overwhelmed when you are learning something new?  I am at that place and feeling a little off-balance at the moment or I should say a little more off-balance than normal.  But not to worry as I have decided to look at this blogging world adventure as a marathon and not a sprint.  Being someone who really has never really adapted to the concept of 'pacing oneself', much to the chagrin of a few, I am focusing on the many unintended benefits of this new experience.  Where this blog goes, I really don't know, although there is one thing for certain. I genuinely believe the possibilities are endless.
Lastly, I have a confession to make.  For those of you who have looked at the blog more than once, you may sometimes notice I do some post publishing editing. Sometimes I get a post publishing epiphany and sometimes I see some glaring errors.  As much as I try to proof the writing, I am a little too close to it at times to catch all of the missing words and/or grammatical errors.  So to those of you who wanted me to know there were some tweaks to be made, particularly the ones I had missed, I thank you for your supportive eye, for your encouragement.