Monday, September 13, 2021

Sheet Pan Bratwurst, Sweet Peppers and Onions


Up until the relatively recent trend of using a single sheet pan to make dinner, there were any number of ways bratwurst was cooked. From grilled, to cooked in beer on the stove, to pan fried, to baked, to even boiled, there have been no shortage of recommended methods as to how to make bratwurst. Whether you were born and raised in Wisconsin (aka home of the beer brat), look forward to celebrating Oktoberfest, or just love a good brat, more than likely you have very definitive opinions on not just the best way to cook bratwurst, but how it should be served. And, of course, there are no shortage of recommended toppings for you to choose from. Everything from ketchup, yellow mustard, stone ground mustard, coarse grain mustard, grilled onions, raw diced onions, sauerkraut, coleslaw, relish, sautéed peppers, cheese, to yes, even jalapeños (no thank you). The topping decisions you make will reveal much about you. Last, but not least, what you put your brat "in" is an equally important decision and not one without a plethora of opinions. Because not all buns are created equal, one must choose their buns wisely. Some will shudder at the thought of serving, let alone eating, a bratwurst in a pre-sliced hot dog bun, whether or not it's lightly toasted. Maybe the best advice one can give with regard to selecting a great bratwurst bun is to make certain its' one that will hold up to the liquidity of the toppings and condiments as well as be strong enough to hold the bratwurst. 


In other words, how one makes and eats bratwurst can be serious, rule-laden business for some. Who knew, right?


With all due respect to those of you having a strong allegiance to a certain bratwurst cooking technique and the selection of garnishments, let me try enticing you with this Sheet Pan Bratwurst, Sweet Peppers, and Onions dish. One easy enough to prepare for a delicious week night meal, impressive enough to serve at a weekend gathering with family and/or friends, and optimizing the flavor of bratwurst! If, by chance, you have yet to jump on the sheet pan dinner bandwagon, here's your opportunity! And for those of you looking for simple to make, highly flavorful, satisfying meals, this Sheet Pan Bratwurst, Sweet Peppers and Onions is calling your name. 


Sweet bell peppers, sweet onions, olive oil, Kosher salt, black pepper, and bratwurst. Six ingredients all get mixed together on a (non-teflon) sheet pan before going into a preheated oven. How easy is that?


The total cooking time will range from 46-48 minutes. The sheet pan will first go into a preheated 375 degree (F) oven and bake for 20 minutes. After rotating the tray, the oven temperature is increased to 400 degrees (F) and it all gets baked for another 20 minutes. To finish it all off, the oven temperature is increased to 500 degrees and the mixture bakes for another 3-4 minutes. After the bratwurst over, the oven temperature is increased one last time to broil (or left at 500 degrees) for the final 3-4 minutes of cooking. After this multi-step baking process, the bratwurst should look beautifully browned and the peppers and onions cooked perfectly tender.


I have gone on endlessly about presentation in prior posts. So what I am about to say may surprise or rather shock some of you.


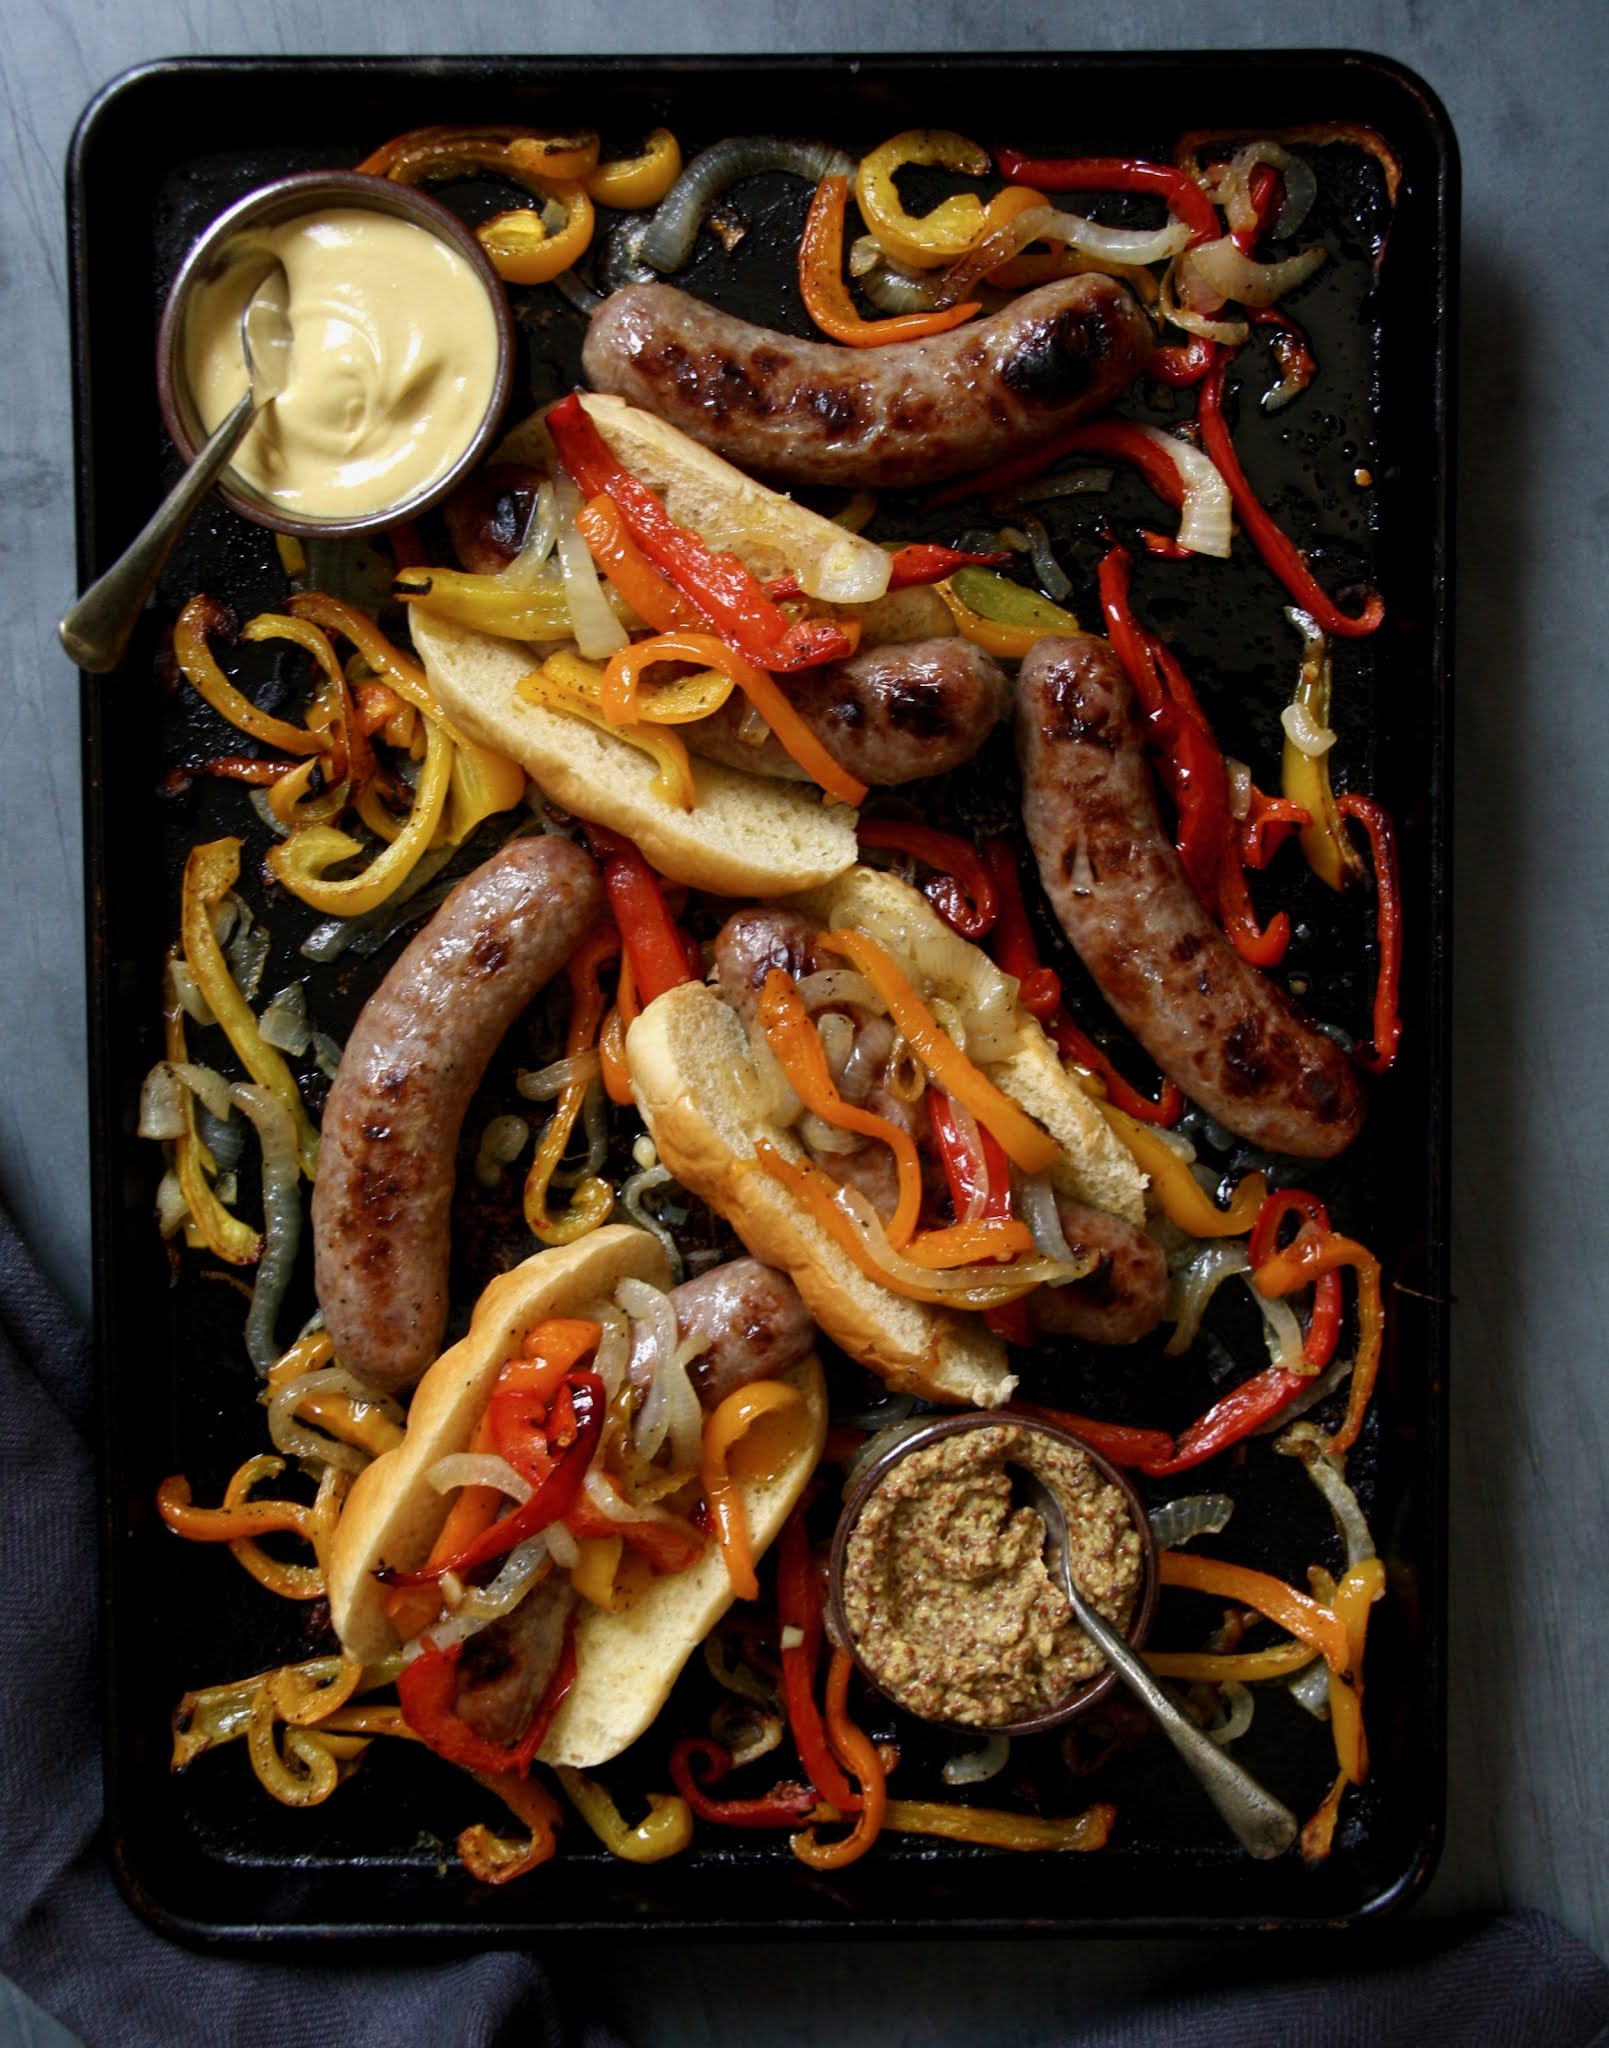
When it comes to serving the Sheet Pan Bratwurst, Sweet Peppers and Onions you have two options. Transfer the cooked bratwurst, peppers, and onions to a serving platter or serve it all on the sheet pan. Yes, I am actually suggesting you serve this meal on the sheet pan it was cooked on!


As far as what condiments or toppings to serve with this dish, well choose what you like. But definitely consider serving the bratwurst with some dijon and coarsely ground mustard. And some iced cold beer, of course.


This Sheet Pan Bratwurst, Sweet Peppers and Onions has so much flavor and is so visually appealing it's likely to be a meal you put on repeat. Whether served on a platter or a sheet pan, it is one definitely hard to resist! If you have never made a sheet pan dinner before, this may be the one to open up your sheet pan door of possibilities. More importantly, if you have never made bratwurst on a sheet pan before, well, this just might be the "living your best life" way of eating it! Just saying.

Recipe
Sheet Pan Bratwurst, Sweet Peppers and Onions
Serves 4-6

Ingredients
3 large bell peppers (preferably one red, one orange and one yellow), cut into 1/4" strips
2 large sweet onions, cut into 1/4" strips
6 fresh, good quality bratwurst (about 1 1/2 - 1 3/4 pounds of meat in total)
3 Tablespoons olive oil
1 round teaspoon Kosher salt
1/2 teaspoon black pepper
6 brioche or hoagie rolls, split and lightly toasted
Dijon and/or coarse ground dijon mustard

Directions
1. Preheat oven to 375 degrees (F).
2. Place the sliced peppers, onions, and bratwurst on a large sheet pan. Drizzle on the olive oil and toss until everything looks lightly coated. Sprinkle with the Kosher salt and pepper. Make 6 pierces into each bratwurst with a skewer or toothpick. Note: Make certain your bratwursts are spread out on the pan.
3. Bake for 20 minutes at 375 degrees (F) for 20 minutes. Rotate the tray and increase the oven temperature to 400 degrees (F). Continue baking for another 20 minutes.
4. Increase the oven temperature to 500 degrees (F) and bake for 3-4 minutes. 
5. Turn the bratwursts over and increase the oven temperature to broil. Broil for 3-4 minutes (or keep the oven at 500 degrees for the additional time). Remove the pan from the oven.
6. Place a cooked bratwurst into each roll and generously top with the peppers and onions.  Serve with small bowls of dijon and/or coarse ground dijon mustard. Serve the bratwurst on the sheet pan or transfer to a platter.

Thursday, September 9, 2021

German Chocolate Caramel Brownies

Almost like clockwork my craving for all things caramel kick in the moment September arrives. Caramel apples, these Sea Salted Chocolate Dipped Caramels, and pretty much anything heavily caramel topped or filled are calling my name. In my world there is no such thing as too much caramel. Found in my very loosely organized (okay, pretty much disorganized) pile of recipes collected over decades was a 3" by 5" surprisingly legible, handwritten note card with a recipe for Chocolate Caramel Brownies. So why is the first time you are hearing about them? More importantly why haven't I shared the recipe for these brownies with you before? The honest answer to those questions is that my bar for craveworthy caramel brownie deliciousness has changed significantly over the years. And his recipe needed a bit of a makeover. Although overhaul might be the better word choice.


The original recipe called for, amongst other things, the use of a 9"x12" pan, an unspecified kind of chocolate chips, margarine (eee-gads!), and a fourteen ounce bag of caramels. If my memory serves me correctly, the 9"x12" pan created a thin brownie, one not lending itself to being described as decadent. More than likely I used semi-sweet chocolate chips when I had first made those brownies. However, with age comes wisdom and a more refined palate. So, when it comes to pairing chocolate with caramel, my favorite combination is caramel with milk chocolate. Knowing that I once baked with margarine makes me cringe. All I will say now is thank goodness I have moved on to butter, or rather unsalted butter, when baking almost everything. Last, but not least, the store bought bag of caramels you have to unwrap in order to make the caramel sauce for these brownies no longer comes in a fourteen ounce package. For some unknown reason, Kraft decided to eliminate three ounces and make eleven ounce packages of wrapped caramels. 


So other than continuing to use a boxed German Chocolate Cake mix and evaporated milk, I created a newer, better, more scrumptious version of the original recipe by changing pretty much everything else. Like increasing the amount of evaporated milk used along with adding some sweetened flaked coconut, toasted pecans, and Kosher salt. In other words, this recipe, now named, German Chocolate Caramel Brownies, is the divine, decadent version.


Creating a more decadent brownie necessitated changing the pan size. But would a 9"x9" square baking pan actually make for a thicker, more impressive brownie? Yes, it did! 

Like many recipes using a boxed cake mix as one of the ingredients, the directions on the box are rarely followed. And this recipe follows that rule. In order to turn the cake mix into a 'brownie-like' mix, a half cup of room temperature unsalted butter, three-quarters of a cup of evaporated milk, and Kosher salt are the only other ingredients used. Once mixed together, the thick batter is divided in half. One half being spread evenly in the bottom of a 9"x9" pan and the other half reserved for the top. After spreading half of the batter into the pan, it's baked for 7-8 minutes in a preheated 350 degree (F) oven just until set. While it's cooling slightly, you make the caramel sauce. 


The warm caramel sauce is poured evenly over the partially baked bottom layer, followed by layers of toasted pecans, milk chocolate chips, and coconut. Spoonfuls of the remaining batter are dropped evenly over the top. Lastly, the reserved chocolate chips and pecans are sprinkled on top. The brownies then go back into the 350 degree (F) oven and bake for 20-22 minutes.


Once the brownies have cooled to room temperature, they are covered with foil and chilled in the refrigerator for at least 6 hours or preferably overnight before being cut into squares. These slightly gooey, insanely scrumptious German Chocolate Caramel Brownies are best served chilled!

Don't let the two step baking process make you think they are complicated to make. Because actually they are really very easy. The most difficult part of making them is waiting for them to chill.

If, by chance, you too crave the taste of caramel, these German Chocolate Caramel Brownies will satisfy it. Along with satisfying any chocolate, coconut, and pecan cravings you might also be having. 

Recipe
German Chocolate Caramel Brownies
Makes 16 brownie squares

Ingredients
1 box (15.25 ounce) German Chocolate Cake Mix (do not buy the pudding in the mix cake mix)
8 Tablespoons (113g) room temperature unsalted butter
3/4 cup evaporated milk (see notes)
1/4 teaspoon Kosher salt
11 ounce (311g) bag of caramels, unwrapped
1/3 cup plus 2 Tablespoons evaporated milk
1 cup (109g) pecans, toasted, coarsely chopped (divided)
1 cup (168g) milk chocolate chips (divided)
1 cup (93g) sweetened flaked coconut

Directions
1. Preheat oven to 350 degrees (F). Line a 9"x9" pan with parchment paper and set aside.
2. In a medium sized bowl, mix together the German Chocolate Cake mix, room temperature butter, 3/4 cup evaporated milk, and the Kosher salt. Batter should be on the thick side. Divide batter in half. Spread half of the batter in the prepared pan. Use an offset spatula to even out the batter. Place pan in oven and bake for 7-8 minutes, or just until set. Remove from oven and let cool slightly.
3. In a heavy bottomed saucepan, add in the caramels and 1//3 cup plus 2 Tablespoons evaporated milk. Over medium heat, melt caramels until the mixture is smooth (stir frequently). Pour the caramel mixture over the bottom partially baked brownie layer.
4. Sprinkle all but about 2 Tablespoons of the toasted pecans, followed by all but 2 Tablespoons of the chocolate chips, and lastly topped with all of the coconut over the caramel layer.
5. With the remaining batter, drop spoonfuls as evenly as possible over the top of the coconut mixture. Top with the reserved 2 Tablespoons each of the pecans and chocolate chips. Bake for 21-23 minutes.
6. Remove from the oven and place on a cooling rack. Let the brownies cool to room temperature. Tightly cover with aluminum foil and chill in the refrigerator for at least 6 hours or preferably overnight. Cut into 16 squares. 
7. Serve chilled. Store any leftovers in the refrigerator.

Notes: (1) I used a 12 ounce can of evaporated milk for this recipe, but did not use all of it. (2) I used the Guittard Milk Chocolate Baking chips as they are slightly oversized as well as my favorites. (3) If you like a slightly salty brownie, I would recommend lightly sprinkling the caramel layer with some flaky sea salt. I will be doing just that next time.

Wednesday, September 1, 2021

Cinnamon Apple Bundt Cake


Apple picking is a relatively new favorite fall tradition around here. This not nearly long enough season begins in early September and ends sometime in October. The euphoria felt walking through an orchard and filling up a bushel, or maybe two, of perfect, flawless, crisp apples on a glorious weather day is akin to experiencing the kind of heart racing, goosebumps exhilaration one might associate with rafting down the rapids of a Montana river or hiking in the mountains on a glorious day. Okay, maybe I am slightly exaggerating about what it feels like to go apple picking. But just slightly. Last year we just missed out on the Honeycrisp picking season (someone wasn't paying attention), but fortunately not the Granny Smith and Fuji Apple season. So as not to miss out on gathering the beloved Honeycrisp apples hanging in wait on trees this year, I already have my calendar marked with the first and last days they can be picked. And this just could be the year I finally learn to overcome my canning anxiety in order to successfully and safely put up jars of this homemade applesauce. 

There is no shortage of apple recipes on the blog, but this is the first time a bundt cake made with apples is making an appearance. If there was ever a bundt cake to get excited about and to embrace the fall apple season, it would be this dense crumb, moist, packed with flavor Cinnamon Apple Bundt Cake. There may no more ideal cake to welcome in the fall season. 


While baking in the oven, this Cinnamon Apple Bundt Cake creates the most intoxicating aroma. With the scents of apples, brown sugar, pecans, cinnamon, nutmeg, and caramel floating in the air, the anticipation of savoring a slice of the cake is intensified. 


When it comes to choosing apples for baking, there is no shortage of opinions on which apples are best. However, Honeycrisps and Granny Smiths are the two appearing most often on best baking apple lists. You can use either one in this cake, however, my love of and loyalty to Honeycrisp apples makes them my go to choice. To finely dice or to grate is the second apple decision you need to make. Your choice will have an affect on the cake's texture. If you like the flavor of apple but don't want to see bits of apples in your cake, grate them. But, if you love seeing and tasting tiny bits of apples studded in the cake, then finely dice them (slightly smaller than 1/4" dice). I might be slightly biased but I believe the finely diced apples contribute to the greatness of this cake.


Brown sugar not only adds a deep, rich flavor, it helps to keep the cake moist. The use of both cinnamon and nutmeg give the cake a level of spice you might find in those homemade cake donuts sold at Farmer's Market. In addition to vanilla, caramel syrup in added to the cake batter. Because who wouldn't want some subtle caramel flavor in their apple cake? It's a game changer!


As far as bundt cakes go, this one comes together pretty easy. Dry ingredients are whisked together, wet ingredients are blended in a mixer. Both are folded together before the finely diced apples are added in. That's it! The only thing as important as not over mixing the batter, is preparing the bundt pan. After years of using vegetable spray, melted butter, room temperature butter, and oil, brushing on room temperature butter with a pastry brush and then lightly dusting with flour is the way I now prepare my bundt pans. Using a pastry brush helps to get the butter into the grooves of the bundt pan, making for a successful cake release. Even if you are using a non-stick bundt pan, you must butter and flour your pan!


Baking time for the Cinnamon Apple Bundt Cake will range from 55-65 minutes. Because all ovens bake a little differently, begin checking for doneness at the 55 minute mark. 

I don't know about you, but I almost always take a deep breath when I unmold a bundt cake. Letting the baked cake rest on a wire rack for 10-11 minutes before inverting it onto a cake platter is just long enough for it to successfully release.


The only thing this Cinnamon Apple Bundt Cake needs a generous dusting of confectionary sugar. It's the perfect finishing touch.


As excited as you may be to dive into this moist, deeply flavorful, textured cake, I recommend waiting at least an hour before cutting a slice. I promise it will be worth the wait. 

This is an insanely scrumptious Cinnamon Apple Bundt Cake. Destined to become one of your favorites, a bundt cake staple. This cake is worthy of being served for Rosh Hashanah, to make for a weekend gathering, or simply to celebrate the arrival of the fall apple season. It's the kind of 'leave no crumbs behind' cake having flavors that will linger on your palate long after you have cleaned your plate. What are you waiting for? Happy apple season!

Recipe
Cinnamon Apple Bundt Cake
Serves 10-12

Ingredients
4 Tablespoons unsalted butter, room temperature

3 cups (390g) all-purpose flour
1 ever so slightly rounded teaspoon baking soda
1 teaspoon Kosher salt
2 heaping teaspoons cinnamon
1/2 teaspoon ground nutmeg
1 1/4 cups canola or vegetable oil
1 1/2 cups (300g) dark brown sugar
1/2 cup (120g) sour cream
3 large eggs, room temperature
1 teaspoon vanilla
1 Tablespoon caramel syrup (e.g. Torani's)
3 cups (345g) peeled and finely diced apples (i.e., Honeycrisp, Granny Smith, or a combination of both)
1 cup (104g) pecans, toasted and finely ground

Confectionary sugar, for dusting the baked cake

Directions
1. Preheat oven to 350 degrees (F). Brush a 10 cup capacity bundt pan with 4 Tablespoons of room temperature unsalted butter (using a pastry brush) and lightly dust with flour. Shake out any excess flour. Set pan aside.
2. In a large bowl, whisk together the flour, ground pecans, baking soda, Kosher salt, cinnamon, and nutmeg until well blended. Set aside.
3. In the bowl of a standing mixer fitted with a paddle attachment, add in the oil and dark brown sugar. Beat for approximately 2 minutes.
4. Add in the sour cream, vanilla, and caramel syrup. Beat just until blended.
5. Beat in the eggs one at a time. After all of the eggs have been added continue beating for 1 additional minute.
6. Pour the liquid mixture into the dry ingredients. Fold just until blended but leaving a few streaks of the flour mixture.
7. Add in the finely diced apples, folding until fully incorporated (no flour streaks should remain).
8. Pour and/or spoon the mixture into the prepared bundt ban. Smooth the top of the batter with an offset spatula. Place the bundt pan on a large baking sheet.
9. Bake the bundt cake for 55-65 minutes (rotating the baking pan halfway through) or until a toothpick or skewer inserted into the cake comes out clean.
10. Remove from the oven and let the cake rest for 10-11 minutes. Invert the cake onto a platter. Tap on the pan to help release the cake from the pan.
11. Let the cake cool for at least 45-60 minutes before dusting with confectionary sugar.

Notes: (1) I used 2 large Honeycrisp apples, cutting then to around or slightly smaller than a 1/4" dice, to get the three cups of diced apples. If you can't find large apples, then use 3 medium sized apples. You could easily use Granny Smith or a combination of Honeycrisp and Granny Smith apples. (2) To toast the pecans, place them on a baking sheet into a preheated 350 degree (F) oven. Bake for about 8 minutes. Remove from the oven and immediately transfer to a plate to allow to cool before processing in a food processor. (3) I used this Nordicware Bundt Pan. (4) This cake was equally delicious and moist on day two as it was on day one. Make sure to tightly cover any leftovers with plastic wrap.

Monday, August 30, 2021

Creamy Pesto Tortellini Salad


We are just days away from the beginning of September, my absolute favorite month of the year. From the anticipation of the official start of new book season, to the elation over the arrival of autumnal colors and temperatures, to the end of whining over running in heat stroke inducing, sauna-like weather, to the nights chilly enough to wear a sweatshirt, to the once beloved rituals of a new school year, to the return of fall fruits and vegetables, and last but not least, to my birthday. I could go on endlessly sharing or telling you again about the almost endless number of reasons for my affinity for the month of September. But I will spare you from me getting carried away sharing all of the reasons for and details of all of the memorable moments/favorite things about my birthday month (hey, it's your lucky day!), as I have something more important to share with you.


Like this ohhemmgee, be still my heart Creamy Pesto Tortellini Salad. A salad now added near the top of my list of my favorite things! Between the recently shared Herbed Potato Salad and this ONE, your Labor Day weekend gathering is now poised to become epic. If you only knew how much I wish I could have you take a bite of this salad right now. Not only because I love sharing food with friends, but selfishly I want to be witness when you unequivocally declare it to be the BEST tortellini salad you have ever tasted. I am completely obsessed with this Creamy Pesto Tortellini Salad. And for the record, I don't throw the emphatic BEST out around here very often. Reserving it only for those dishes that completely take my breath away. And this gorgeous, scrumptious, refreshing salad has done just that!


Had I not tasted a delicious, couldn't stop eating pesto tortellini salad made by one of my good friends for our girl's getaway a couple of weeks ago, I may have never been inspired to create this one. Because those that know me, know I have to put my twist on almost every recipe I learn about or discover. Not even an Ina Garten or Yotam Ottolenghi recipe is safe from my tweeking. 


When given the choice between fresh and frozen, with a few exceptions, I almost always choose fresh. With the increased availability of fresh 'refrigerated' pasta these days, it made perfect sense to use a fresh 'cheese' tortellini in this salad (see notes). Not just because of how tender and flavorful it is, but a cooking time of less than five minutes made this easy to make pasta salad even easier.


Keeping with the easy to make theme, the creamy pesto dressing for the salad is a two-ingredient wonder. Whether you make your own basil pesto (like this one) or use one store-bought (like this one), the combination of a good quality mayonnaise and a good quality pesto creates the 'I almost have no words' dreamiest dressing. It brings new meaning to the words 'awesome sauce'! Having made this dressing with a 'fresh' refrigerated basil pesto sauce, I am not sure I would feel compelled to make a homemade pesto to use in the dressing. 


If you go down the pesto tortellini salad recipe rabbit hole you will discover that other than tortellini and some kind of pesto dressing, the other ingredients included in the salad are all over the map. The beauty of this particular salad is that you have options! You can keep it simple by adding in only balls of fresh mozzarella, thick pieces of red, yellow, and/or orange sweet peppers, and sliced green onions. Or......


You can top the salad with some toasted pine nuts for added crunch and flavor, some whole (do not cut) baby red tomatoes, and/or some fresh basil. Those were all of the ingredients used in Creamy Pesto Tortellini Salad. But instead of adding in fresh whole baby tomatoes use drained sun-dried tomatoes or instead of using fresh baby mozzarella balls, use a log of fresh mozzarella cut into one inch pieces. If you like olives (they are a divisive ingredient in this household), add them in. If you like artichoke hearts, add them in. If you want to top it with some shavings of Parmigianno-Reggiano, go for it. In other words, be my guest and add and/or replace some the ingredients listed in the recipe below based on your taste preferences. As much as I might love for you to make no tweeks to this BEST recipe, it would make me one of those (yikes) 'do as I say, not as a do' kind of food bloggers. As passionate as I am about this mouthwatering salad, this isn't one of those recipes where I plead with you to not change a thing. Okay, maybe just say 'pretty please' try it this way first.

If you come to a gathering at my house, more than likely I will be serving 'my' version of this Creamy Pesto Tortellini Salad. Even down to the 'fresh' store bought basil pesto. At least for now.

From beginning to end, this mouthwatering Creamy Pesto Tortellini Salad takes about forty minutes to make. As far as making flavor packed, dangerously delicious salads goes, it doesn't get any easier or better than that. If I learned anything after tasting this salad with all of its' flavor and textures, it's that I am not at all certain I could or even want to eat a store bought pasta salad. Especially a tortellini one and/or even if I was starving. 

Recipe
Creamy Pesto Tortellini Salad
Serves at least 8

Ingredients
20 ounces (567g) cheese tortellini (see notes)
7 ounces (200g) basil pesto, homemade or a 'fresh' store bought version
8 ounces (228g) good quality mayonnaise
12-16 ounces (337-449g) fresh balls of mozzarella
2-3 sweet peppers (highly recommend using a combination of red, orange, and/or yellow peppers), cut into thick pieces (about 1 inch long and about 1/2 inch thick)
2-3 green onions, green and white parts, sliced on the diagonal
1/3 cup pine nuts, lightly toasted
Cherry tomatoes, left whole 
Sprigs of fresh basil for garnish

Directions
1. Whisk together the basil pesto and mayonnaise until well blended. Set aside briefly.
2. Cook the tortellini according to package directions. Rinse under cold water. Drain and transfer to a large bowl.
3. Add in the creamy pesto dressing. Mix until well blended. Note: It may look like you have to much dressing, but don't worry. Once you add in all of the other ingredients it will be perfect. But if you are worried, reserve about 1/4 of the dressing and add the rest after you all of the other ingredients.
4. Add in the balls of mozzarella, sweet peppers, and green onions. Stir gently until well blended. Transfer to a large serving platter or to low, shallow bowl.
5. Top with cherry tomatoes, toasted pine nuts, and sprigs of basil.
6. Serve immediately or cover and chill in the refrigerator. Note: This salad was just as delicious on day two as it was on day one. 

Notes: (1) If possible use a fresh, refrigerated tortellini. I used the family sized bag of this five cheese tortellini. (2) If not using a homemade or 'fresh' store bought basil pesto, I would recommend you not use an off the shelf jar of basil pesto, unless you have found one to be highly flavorful. (3) I kept the ball of the fresh mozzarella whole, but you could cut them in half if you wanted to. (4) If you add cherry tomatoes, add them in whole, do not cut them in half as their juices will alter the flavor of the dressing.


Frida Kahlo Exhibition, College of DuPage, Glen Ellyn, IL (August 2021)


Saturday, August 28, 2021

Herbed Potato Salad


Without a doubt most of the potato salads we grew up and subsequently continued to make were nothing short of labors of love. Some of us often curse our way through the hours it takes to make them. But we remain gluttons for punishment because to make a treasonous change to the beloved, traditional potato salad would send some in the family off the deep end. "What do you mean you added dijon mustard?" "What do you mean you used a different kind of pickle?" "Why would you make any changes to the best, most favorite potato salad recipe ever?" For some reason potato salads seem to be one of those things deeply grounded in personal preferences, long standing family traditions, and complete irreverence for the eight hours you spent peeling, slicing, dicing, and mixing. But the world was upended eighteen months ago causing us to either hold on even tighter to those beloved family recipes or open us to the possibilities of the existence of extraordinary levels of deliciousness in new recipes. This Herbed Potato Salad may be a far cry from the one you grew up with, but it's the potato salad you never knew you have been missing out on. Until now.


Before I divulge the ingredients in this Herbed Potato Salad (no peaking ahead to the recipe), let me begin by (unintentionally) sending some of you over the deep end by shattering a few potato salad myths. All great potato salads must take hours to make, must have hard-boiled eggs in them, or must be finished with a light dusting of paprika. And yes, these myth busting words are coming from someone who has had a deep affection to, as well as, has probably eaten more potato/hard-boiled egg, sweet pickle, paprika finished potato salads than the average person consumes in their lifetime. So it is as a self-proclaimed potato salad fussytarian that I am here to tell you how deeply, madly in love I am with this Herbed Potato Salad.  And it has absolutely nothing to do with the fact that it takes just a little more than an hour to make.


Okay, I have made you wait long enough. Baby red potatoes tossed in a creamy dressing made with mayonnaise, sour cream, dijon mustard, freshly squeezed lemon juice, creamy horseradish, Kosher salt, and black pepper topped with freshly chopped dill, green onions, fresh parsley and a light sprinkle of sea salt are the gateway ingredients to potato salad heaven. 


One of the keys to a great potato salad is the texture of the potatoes. One bite of a too mushy or too hard potato and we immediately wonder how to strategically make that big helping we took disappear from our plates. Using baby red potatoes helps, in part, to preventing that from happening. Bringing lightly salted water to boil, then immediately reducing it to a simmer helps to evenly cook the potatoes. For the potato salad perfect potato cook them just until they knife (not fork) tender. Cooking time will range somewhere between 14-18 minutes depending on the size of your baby potatoes. If the skins on your potatoes begin to split, you may have cooked them a bit too long. Once a knife easily goes into the potatoes, remove from the heat and drain them immediately. I prefer to have the potatoes cool slightly on their own rather than running them under cold water before tossing them with the dressing.


The dressing for the potatoes is creamy and has the right amount of zing. The mayonnaise and sour cream both compliment and bring the right amount of coolness and balance to the flavors of the lemon juice, dijon mustard and the slightly zesty cream style horseradish. This wow-ser dressing was destined to be paired with baby red potatoes, freshly chopped dill, green onions, and parsley. Making for the kind of Herbed Potato Salad redefining the concept of a great potato salad. As well as being one that's a significant departure from those time-honored salads having a long-standing place at our tables.


One bite of this Herbed Potato Salad and I am almost certain any aversion you may have to the sometimes polarizing horseradish will have you now have you seeing it as the most brilliant, insanely delicious ingredient to have ever been added to potato salad. I have never before been more excited for you to try a recipe!

Last, but not least, serve this Herbed Potato Salad on a beautiful platter rather than in a bowl. Think of the platter as an added enticement for your family and friends to taste it. I promise they won't think you have lost your potato salad making mind. But just in case, have a life parachute ready for anyone who happens to fall of the edge.

Recipe
Herbed Potato Salad
Serves 6-8

Ingredients
2 pounds (920g) baby red potatoes
1 1/2 teaspoons Kosher salt

1/2 cup mayonnaise
1/2 cup sour cream
2 slightly heaping teaspoons of a cream style, fine cut horseradish (see notes)
1 1/2 teaspoons dijon mustard
1 Tablespoon freshly squeezed lemon juice
3/4 teaspoon Kosher salt
1/2 teaspoon black pepper

2 Tablespoons freshly minced dill
1 cup freshly chopped parsley
2-3 green onions, thinly sliced on the diagonal

Flaky sea salt for finishing

Directions
1. In a medium-large sized pan, add the potatoes, cover with cold water and add 1 1/2 teaspoons Kosher salt. Bring the water to a boil, then reduce the heat to a simmer. Cook the potatoes until knife tender. Cooking time could range between 14 and 18 minutes depending on the size of your potatoes. Start checking them at the 14 minute mark so you don't over cook them. Remove from heat, drain and let cool slightly while you make the dressing.
2. In a medium sized bowl, whisk together the mayonnaise, sour cream, horseradish, dijon mustard, lemon juice, Kosher salt, and pepper. Set aside momentarily.
3. Cut the slightly cooled potatoes in half and place in a large mixing bowl.
4. Add about 3/4s of the dressing and mix until the potatoes are coated. Note: The recipe makes a little more dressing than you need. Serve any reserved dressing on the side for those who want a little bit more.
5. Arrange the dressing coated potatoes on a serving platter.
6. Sprinkle on the green onions, dill, and parsley. Add a light sprinkle of flaky sea salt.
7. Serve and enjoy!

Notes: (1) Look for a cream style horseradish in the refrigerated section at the grocery. I used this one. (2) If possible, wait until you are ready to serve the potato salad to top it with the dill, parsley, and green onion. (3) If you like a saltier potato salad, taste the dressing before mixing it into the potatoes. I slightly under salted this potato salad. (4) Store any leftovers covered in the refrigerator.

Tuesday, August 24, 2021

Peach & Mozzarella Caprese w/ Honey Vinaigrette


It was on my birthday trip to Colorado last September where I first tasted the best, sweetest, juiciest peaches ever. Little did I know at the time how sought after those sweet Palisade peaches were. At first I thought I was suffering from extreme form of hunger after traveling all morning, then driving for hours on the Peak to Peak Scenic Byway. Making me wonder if anything I ate would have been declared the best ever. But everyday as I ate my way through the bag of Palisade Peaches bought from a roadside stand, my first reaction to them never wavered. They were 'best' worthy. So when peach season arrived here this summer, I began longing for those Palisade peaches. However, seeing the beautifully, freshly harvested Michigan peaches at my local Farmer's Market still brought joy to my peach loving heart. 


My love for peaches has inspired many (fourteen not counting this one) recipes here on the blog. From the Peach, Tomato and Burrata Caprese Salad with Basil Drizzle, Grilled Peach Salad with Honey Ricotta and Prosciutto, to the Grilled Peach, Burrata, and Arugula Salad with Balsamic Drizzle, to the Peach Cobbler, to the Peach Buttermilk Ice Cream with Raspberry Swirl, there are no shortage of salad and dessert recipes made with peaches. Except there has been one thing missing. A peach recipe for a dish that can be either an enjoyed as an appetizer or a salad. If you ask me, this Peach & Mozzarella Caprese w/ Honey Vinaigrette might be the best, simplest, refreshing, destined to be a memorable first bite moment peach appetizer ever.


Made with fresh herbs (thyme and basil), ripe yellow peaches, fresh mozzarella, honey vinaigrette, pistachios, and a honey drizzle finish, this Peach & Mozzarella Caprese w/ Honey Vinaigrette is divine.


When buying peaches for this appetizer or if you prefer, this salad, look for smaller ones so your slices fit perfectly on the slices of mozzarella. Either buy them ripe or let them ripen on the counter. Peaches are one of those fruits best kept at room temperature, never refrigerated. 


Cutting the log of mozzarella at a slight angle at about a 1/4" of thickness will give them the look of a piece of crostini as well as help to give a bit more surface for the thinly sliced pieces to lay on.

The Honey Vinaigrette is made with extra-virgin olive oil, freshly squeezed lemon juice, Kosher salt, (white) pepper, and a good quality honey. For those of you have followed me for awhile, you know there is no shortage of personal opinions on a variety of things, but especially food preferences. So it might not surprise you when I say using honey from that cute little bear jar in this vinaigrette would be blasphemous. Not that there isn't a use for that honey, but this vinaigrette and the finishing honey drizzle finish isn't one of them. It deserves nothing less than a jar of a good quality honey. The kind from jars you find at a Farmer's Market, a speciality food store, and sometimes even the grocery store. Or if you are lucky, the jar your sister brings you back from Two Maples Farm in Oregon.

You can make the vinaigrette a couple of hours ahead of assembling the Peach and Mozzarella Caprese, but the entire appetizer (or salad) is best served immediately after it is assembled. Which takes all of about 10 minutes. Put a platter of this rustic, yet elegant Peach & Mozzarella Caprese w/ Honey Vinaigrette out on the table and almost instantly your gathering will feel a little bit celebratory. 


If you are looking for an almost effortless appetizer delivering great flavor, harnessing the best of seasonal ingredients, and making for an impressive beauty contest winning presentation, then this Peach & Mozzarella Caprese w/ Honey Vinaigrette is the one! If your lucky enough to live in Colorado, have access to those famed Georgia peaches, or have a local Farmer's Market selling freshly picked peaches from an orchard, you should run, not walk to go out to get some while they are in season! Bliss awaits you.

Recipe
Peach & Mozzarella Caprese w/ Honey Vinaigrette
Serves 4-6

Ingredients
2 teaspoons freshly squeezed lemon juice
1 very generous teaspoon of honey
1/4 teaspoon Kosher or Flaky Sea Salt
1/4 teaspoon white pepper (you can use black pepper too)
2 Tablespoons extra-virgin olive oil

3-4 small ripe yellow flesh peaches, cut into thin slices
16 ounce (453g) log of fresh mozzarella, cut on the diagonal in 1/4" slices
Fresh thyme chopped, somewhere between 1 and 2 Tablespoons
Fresh basil julienned, somewhere between 2 and 3 Tablespoons

1/4 - 1/3 cup of pistachios
Additional honey for the finishing drizzle

Directions
1. To make the honey vinaigrette, whisk together the lemon juice, honey, salt, and pepper until the honey is fully blended.
2. Slowly whisk in the olive oil until the mixture is well blended.
3. Use immediately or cover and store on the counter for several hours before serving.
4. Place the slices of mozzarella on a platter. Lay 4-5 slices of the peaches on each piece.
5. Spoon the honey vinaigrette over each piece.
6. Sprinkle the top with some thyme and basil.
7. Lightly drizzle each piece with some honey.
8. Top with some pistachios.
9. First swoon, then immediately serve and savor.