Monday, August 30, 2021

Creamy Pesto Tortellini Salad


We are just days away from the beginning of September, my absolute favorite month of the year. From the anticipation of the official start of new book season, to the elation over the arrival of autumnal colors and temperatures, to the end of whining over running in heat stroke inducing, sauna-like weather, to the nights chilly enough to wear a sweatshirt, to the once beloved rituals of a new school year, to the return of fall fruits and vegetables, and last but not least, to my birthday. I could go on endlessly sharing or telling you again about the almost endless number of reasons for my affinity for the month of September. But I will spare you from me getting carried away sharing all of the reasons for and details of all of the memorable moments/favorite things about my birthday month (hey, it's your lucky day!), as I have something more important to share with you.


Like this ohhemmgee, be still my heart Creamy Pesto Tortellini Salad. A salad now added near the top of my list of my favorite things! Between the recently shared Herbed Potato Salad and this ONE, your Labor Day weekend gathering is now poised to become epic. If you only knew how much I wish I could have you take a bite of this salad right now. Not only because I love sharing food with friends, but selfishly I want to be witness when you unequivocally declare it to be the BEST tortellini salad you have ever tasted. I am completely obsessed with this Creamy Pesto Tortellini Salad. And for the record, I don't throw the emphatic BEST out around here very often. Reserving it only for those dishes that completely take my breath away. And this gorgeous, scrumptious, refreshing salad has done just that!


Had I not tasted a delicious, couldn't stop eating pesto tortellini salad made by one of my good friends for our girl's getaway a couple of weeks ago, I may have never been inspired to create this one. Because those that know me, know I have to put my twist on almost every recipe I learn about or discover. Not even an Ina Garten or Yotam Ottolenghi recipe is safe from my tweeking. 


When given the choice between fresh and frozen, with a few exceptions, I almost always choose fresh. With the increased availability of fresh 'refrigerated' pasta these days, it made perfect sense to use a fresh 'cheese' tortellini in this salad (see notes). Not just because of how tender and flavorful it is, but a cooking time of less than five minutes made this easy to make pasta salad even easier.


Keeping with the easy to make theme, the creamy pesto dressing for the salad is a two-ingredient wonder. Whether you make your own basil pesto (like this one) or use one store-bought (like this one), the combination of a good quality mayonnaise and a good quality pesto creates the 'I almost have no words' dreamiest dressing. It brings new meaning to the words 'awesome sauce'! Having made this dressing with a 'fresh' refrigerated basil pesto sauce, I am not sure I would feel compelled to make a homemade pesto to use in the dressing. 


If you go down the pesto tortellini salad recipe rabbit hole you will discover that other than tortellini and some kind of pesto dressing, the other ingredients included in the salad are all over the map. The beauty of this particular salad is that you have options! You can keep it simple by adding in only balls of fresh mozzarella, thick pieces of red, yellow, and/or orange sweet peppers, and sliced green onions. Or......


You can top the salad with some toasted pine nuts for added crunch and flavor, some whole (do not cut) baby red tomatoes, and/or some fresh basil. Those were all of the ingredients used in Creamy Pesto Tortellini Salad. But instead of adding in fresh whole baby tomatoes use drained sun-dried tomatoes or instead of using fresh baby mozzarella balls, use a log of fresh mozzarella cut into one inch pieces. If you like olives (they are a divisive ingredient in this household), add them in. If you like artichoke hearts, add them in. If you want to top it with some shavings of Parmigianno-Reggiano, go for it. In other words, be my guest and add and/or replace some the ingredients listed in the recipe below based on your taste preferences. As much as I might love for you to make no tweeks to this BEST recipe, it would make me one of those (yikes) 'do as I say, not as a do' kind of food bloggers. As passionate as I am about this mouthwatering salad, this isn't one of those recipes where I plead with you to not change a thing. Okay, maybe just say 'pretty please' try it this way first.

If you come to a gathering at my house, more than likely I will be serving 'my' version of this Creamy Pesto Tortellini Salad. Even down to the 'fresh' store bought basil pesto. At least for now.

From beginning to end, this mouthwatering Creamy Pesto Tortellini Salad takes about forty minutes to make. As far as making flavor packed, dangerously delicious salads goes, it doesn't get any easier or better than that. If I learned anything after tasting this salad with all of its' flavor and textures, it's that I am not at all certain I could or even want to eat a store bought pasta salad. Especially a tortellini one and/or even if I was starving. 

Recipe
Creamy Pesto Tortellini Salad
Serves at least 8

Ingredients
20 ounces (567g) cheese tortellini (see notes)
7 ounces (200g) basil pesto, homemade or a 'fresh' store bought version
8 ounces (228g) good quality mayonnaise
12-16 ounces (337-449g) fresh balls of mozzarella
2-3 sweet peppers (highly recommend using a combination of red, orange, and/or yellow peppers), cut into thick pieces (about 1 inch long and about 1/2 inch thick)
2-3 green onions, green and white parts, sliced on the diagonal
1/3 cup pine nuts, lightly toasted
Cherry tomatoes, left whole 
Sprigs of fresh basil for garnish

Directions
1. Whisk together the basil pesto and mayonnaise until well blended. Set aside briefly.
2. Cook the tortellini according to package directions. Rinse under cold water. Drain and transfer to a large bowl.
3. Add in the creamy pesto dressing. Mix until well blended. Note: It may look like you have to much dressing, but don't worry. Once you add in all of the other ingredients it will be perfect. But if you are worried, reserve about 1/4 of the dressing and add the rest after you all of the other ingredients.
4. Add in the balls of mozzarella, sweet peppers, and green onions. Stir gently until well blended. Transfer to a large serving platter or to low, shallow bowl.
5. Top with cherry tomatoes, toasted pine nuts, and sprigs of basil.
6. Serve immediately or cover and chill in the refrigerator. Note: This salad was just as delicious on day two as it was on day one. 

Notes: (1) If possible use a fresh, refrigerated tortellini. I used the family sized bag of this five cheese tortellini. (2) If not using a homemade or 'fresh' store bought basil pesto, I would recommend you not use an off the shelf jar of basil pesto, unless you have found one to be highly flavorful. (3) I kept the ball of the fresh mozzarella whole, but you could cut them in half if you wanted to. (4) If you add cherry tomatoes, add them in whole, do not cut them in half as their juices will alter the flavor of the dressing.


Frida Kahlo Exhibition, College of DuPage, Glen Ellyn, IL (August 2021)


Saturday, August 28, 2021

Herbed Potato Salad


Without a doubt most of the potato salads we grew up and subsequently continued to make were nothing short of labors of love. Some of us often curse our way through the hours it takes to make them. But we remain gluttons for punishment because to make a treasonous change to the beloved, traditional potato salad would send some in the family off the deep end. "What do you mean you added dijon mustard?" "What do you mean you used a different kind of pickle?" "Why would you make any changes to the best, most favorite potato salad recipe ever?" For some reason potato salads seem to be one of those things deeply grounded in personal preferences, long standing family traditions, and complete irreverence for the eight hours you spent peeling, slicing, dicing, and mixing. But the world was upended eighteen months ago causing us to either hold on even tighter to those beloved family recipes or open us to the possibilities of the existence of extraordinary levels of deliciousness in new recipes. This Herbed Potato Salad may be a far cry from the one you grew up with, but it's the potato salad you never knew you have been missing out on. Until now.


Before I divulge the ingredients in this Herbed Potato Salad (no peaking ahead to the recipe), let me begin by (unintentionally) sending some of you over the deep end by shattering a few potato salad myths. All great potato salads must take hours to make, must have hard-boiled eggs in them, or must be finished with a light dusting of paprika. And yes, these myth busting words are coming from someone who has had a deep affection to, as well as, has probably eaten more potato/hard-boiled egg, sweet pickle, paprika finished potato salads than the average person consumes in their lifetime. So it is as a self-proclaimed potato salad fussytarian that I am here to tell you how deeply, madly in love I am with this Herbed Potato Salad.  And it has absolutely nothing to do with the fact that it takes just a little more than an hour to make.


Okay, I have made you wait long enough. Baby red potatoes tossed in a creamy dressing made with mayonnaise, sour cream, dijon mustard, freshly squeezed lemon juice, creamy horseradish, Kosher salt, and black pepper topped with freshly chopped dill, green onions, fresh parsley and a light sprinkle of sea salt are the gateway ingredients to potato salad heaven. 


One of the keys to a great potato salad is the texture of the potatoes. One bite of a too mushy or too hard potato and we immediately wonder how to strategically make that big helping we took disappear from our plates. Using baby red potatoes helps, in part, to preventing that from happening. Bringing lightly salted water to boil, then immediately reducing it to a simmer helps to evenly cook the potatoes. For the potato salad perfect potato cook them just until they knife (not fork) tender. Cooking time will range somewhere between 14-18 minutes depending on the size of your baby potatoes. If the skins on your potatoes begin to split, you may have cooked them a bit too long. Once a knife easily goes into the potatoes, remove from the heat and drain them immediately. I prefer to have the potatoes cool slightly on their own rather than running them under cold water before tossing them with the dressing.


The dressing for the potatoes is creamy and has the right amount of zing. The mayonnaise and sour cream both compliment and bring the right amount of coolness and balance to the flavors of the lemon juice, dijon mustard and the slightly zesty cream style horseradish. This wow-ser dressing was destined to be paired with baby red potatoes, freshly chopped dill, green onions, and parsley. Making for the kind of Herbed Potato Salad redefining the concept of a great potato salad. As well as being one that's a significant departure from those time-honored salads having a long-standing place at our tables.


One bite of this Herbed Potato Salad and I am almost certain any aversion you may have to the sometimes polarizing horseradish will have you now have you seeing it as the most brilliant, insanely delicious ingredient to have ever been added to potato salad. I have never before been more excited for you to try a recipe!

Last, but not least, serve this Herbed Potato Salad on a beautiful platter rather than in a bowl. Think of the platter as an added enticement for your family and friends to taste it. I promise they won't think you have lost your potato salad making mind. But just in case, have a life parachute ready for anyone who happens to fall of the edge.

Recipe
Herbed Potato Salad
Serves 6-8

Ingredients
2 pounds (920g) baby red potatoes
1 1/2 teaspoons Kosher salt

1/2 cup mayonnaise
1/2 cup sour cream
2 slightly heaping teaspoons of a cream style, fine cut horseradish (see notes)
1 1/2 teaspoons dijon mustard
1 Tablespoon freshly squeezed lemon juice
3/4 teaspoon Kosher salt
1/2 teaspoon black pepper

2 Tablespoons freshly minced dill
1 cup freshly chopped parsley
2-3 green onions, thinly sliced on the diagonal

Flaky sea salt for finishing

Directions
1. In a medium-large sized pan, add the potatoes, cover with cold water and add 1 1/2 teaspoons Kosher salt. Bring the water to a boil, then reduce the heat to a simmer. Cook the potatoes until knife tender. Cooking time could range between 14 and 18 minutes depending on the size of your potatoes. Start checking them at the 14 minute mark so you don't over cook them. Remove from heat, drain and let cool slightly while you make the dressing.
2. In a medium sized bowl, whisk together the mayonnaise, sour cream, horseradish, dijon mustard, lemon juice, Kosher salt, and pepper. Set aside momentarily.
3. Cut the slightly cooled potatoes in half and place in a large mixing bowl.
4. Add about 3/4s of the dressing and mix until the potatoes are coated. Note: The recipe makes a little more dressing than you need. Serve any reserved dressing on the side for those who want a little bit more.
5. Arrange the dressing coated potatoes on a serving platter.
6. Sprinkle on the green onions, dill, and parsley. Add a light sprinkle of flaky sea salt.
7. Serve and enjoy!

Notes: (1) Look for a cream style horseradish in the refrigerated section at the grocery. I used this one. (2) If possible, wait until you are ready to serve the potato salad to top it with the dill, parsley, and green onion. (3) If you like a saltier potato salad, taste the dressing before mixing it into the potatoes. I slightly under salted this potato salad. (4) Store any leftovers covered in the refrigerator.

Tuesday, August 24, 2021

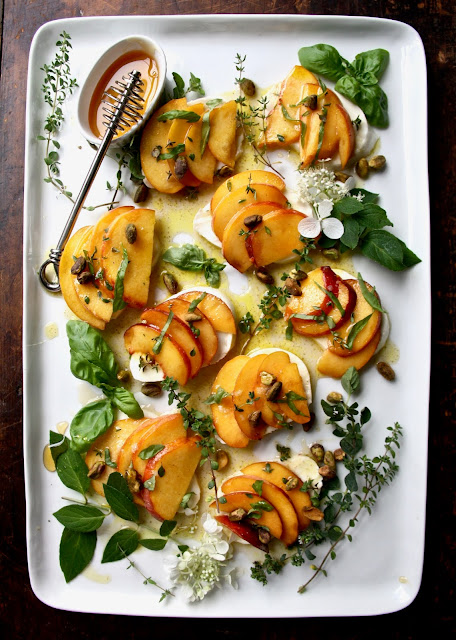
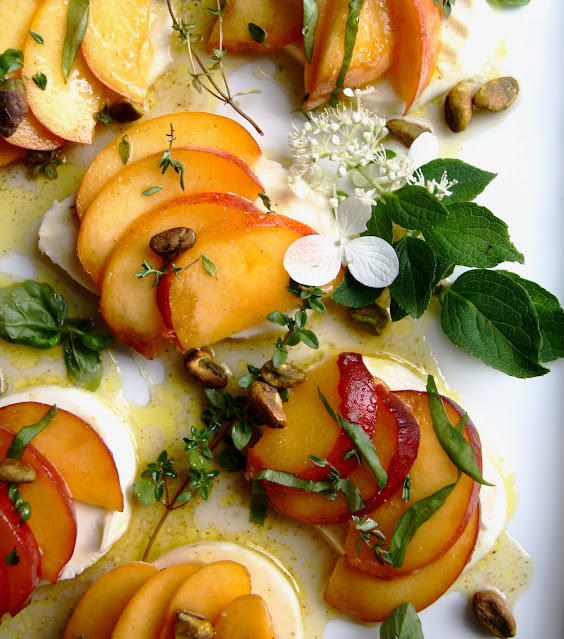
Peach & Mozzarella Caprese w/ Honey Vinaigrette


It was on my birthday trip to Colorado last September where I first tasted the best, sweetest, juiciest peaches ever. Little did I know at the time how sought after those sweet Palisade peaches were. At first I thought I was suffering from extreme form of hunger after traveling all morning, then driving for hours on the Peak to Peak Scenic Byway. Making me wonder if anything I ate would have been declared the best ever. But everyday as I ate my way through the bag of Palisade Peaches bought from a roadside stand, my first reaction to them never wavered. They were 'best' worthy. So when peach season arrived here this summer, I began longing for those Palisade peaches. However, seeing the beautifully, freshly harvested Michigan peaches at my local Farmer's Market still brought joy to my peach loving heart. 


My love for peaches has inspired many (fourteen not counting this one) recipes here on the blog. From the Peach, Tomato and Burrata Caprese Salad with Basil Drizzle, Grilled Peach Salad with Honey Ricotta and Prosciutto, to the Grilled Peach, Burrata, and Arugula Salad with Balsamic Drizzle, to the Peach Cobbler, to the Peach Buttermilk Ice Cream with Raspberry Swirl, there are no shortage of salad and dessert recipes made with peaches. Except there has been one thing missing. A peach recipe for a dish that can be either an enjoyed as an appetizer or a salad. If you ask me, this Peach & Mozzarella Caprese w/ Honey Vinaigrette might be the best, simplest, refreshing, destined to be a memorable first bite moment peach appetizer ever.


Made with fresh herbs (thyme and basil), ripe yellow peaches, fresh mozzarella, honey vinaigrette, pistachios, and a honey drizzle finish, this Peach & Mozzarella Caprese w/ Honey Vinaigrette is divine.


When buying peaches for this appetizer or if you prefer, this salad, look for smaller ones so your slices fit perfectly on the slices of mozzarella. Either buy them ripe or let them ripen on the counter. Peaches are one of those fruits best kept at room temperature, never refrigerated. 


Cutting the log of mozzarella at a slight angle at about a 1/4" of thickness will give them the look of a piece of crostini as well as help to give a bit more surface for the thinly sliced pieces to lay on.

The Honey Vinaigrette is made with extra-virgin olive oil, freshly squeezed lemon juice, Kosher salt, (white) pepper, and a good quality honey. For those of you have followed me for awhile, you know there is no shortage of personal opinions on a variety of things, but especially food preferences. So it might not surprise you when I say using honey from that cute little bear jar in this vinaigrette would be blasphemous. Not that there isn't a use for that honey, but this vinaigrette and the finishing honey drizzle finish isn't one of them. It deserves nothing less than a jar of a good quality honey. The kind from jars you find at a Farmer's Market, a speciality food store, and sometimes even the grocery store. Or if you are lucky, the jar your sister brings you back from Two Maples Farm in Oregon.

You can make the vinaigrette a couple of hours ahead of assembling the Peach and Mozzarella Caprese, but the entire appetizer (or salad) is best served immediately after it is assembled. Which takes all of about 10 minutes. Put a platter of this rustic, yet elegant Peach & Mozzarella Caprese w/ Honey Vinaigrette out on the table and almost instantly your gathering will feel a little bit celebratory. 


If you are looking for an almost effortless appetizer delivering great flavor, harnessing the best of seasonal ingredients, and making for an impressive beauty contest winning presentation, then this Peach & Mozzarella Caprese w/ Honey Vinaigrette is the one! If your lucky enough to live in Colorado, have access to those famed Georgia peaches, or have a local Farmer's Market selling freshly picked peaches from an orchard, you should run, not walk to go out to get some while they are in season! Bliss awaits you.

Recipe
Peach & Mozzarella Caprese w/ Honey Vinaigrette
Serves 4-6

Ingredients
2 teaspoons freshly squeezed lemon juice
1 very generous teaspoon of honey
1/4 teaspoon Kosher or Flaky Sea Salt
1/4 teaspoon white pepper (you can use black pepper too)
2 Tablespoons extra-virgin olive oil

3-4 small ripe yellow flesh peaches, cut into thin slices
16 ounce (453g) log of fresh mozzarella, cut on the diagonal in 1/4" slices
Fresh thyme chopped, somewhere between 1 and 2 Tablespoons
Fresh basil julienned, somewhere between 2 and 3 Tablespoons

1/4 - 1/3 cup of pistachios
Additional honey for the finishing drizzle

Directions
1. To make the honey vinaigrette, whisk together the lemon juice, honey, salt, and pepper until the honey is fully blended.
2. Slowly whisk in the olive oil until the mixture is well blended.
3. Use immediately or cover and store on the counter for several hours before serving.
4. Place the slices of mozzarella on a platter. Lay 4-5 slices of the peaches on each piece.
5. Spoon the honey vinaigrette over each piece.
6. Sprinkle the top with some thyme and basil.
7. Lightly drizzle each piece with some honey.
8. Top with some pistachios.
9. First swoon, then immediately serve and savor. 

Sunday, August 22, 2021

Cherry Tomato Sauce w/ Paccheri Pasta & Burrata


How is it possible for a simple platter of pasta to make you feel deliriously, blissfully happy? Could it be because it can be made in less than thirty minutes? Or that giant, flat, tubular pasta is coated in the most delicious cherry tomato sauce? Or that it's finished with fresh herbs, some roasted cherry tomatoes, and creamy burrata? Or could it be that it makes one fully embrace the concept of serving friends and family eye candy? Well this Cherry Tomato Sauce w/ Paccheri Pasta & Burrata is all of that and then some. 


If ever you were looking for an easy to make, to die for, impressive, signature pasta dish, this would be THE one. And it just happens to be both a weeknight and dinner party worthy dish! Which means in my world, it doesn't get any better than this!


Simple, fresh, and readily available seasonal ingredients are one of the hallmarks of this Cherry Tomato Sauce w/ Paccheri Pasta & Burrata. With this being the height of tomato season, most farmer's markets and food stores are well stocked with cherry tomatoes. Or maybe you are lucky enough to have a friend who has an abundance of cherry tomatoes he/she is looking to go to a good home. If your grocery store doesn't carry paccheri pasta, most Italian markets will or at least should. However, if you don't have one near you, then look for pappardelle. Last, but not least, is the burrata. If possible look for a container of burrata having two smaller rather than one large ball (Trader Joe's carries a really good two ball container of burrata).


There may be only one slightly controversial ingredient in the cherry tomato sauce. For some tomato sauce purists, sugar is one of those never ever, forbidden ingredients in a sauce or 'gravy'. I suppose because there is only one teaspoon of sugar in the sauce, you can omit it. However, if your sauce tastes a bit on the acidic side, then you definitely want to add the sugar (just don't tell your friends having strong sauce opinions). 


Adding a tablespoon of unsalted butter at the end helps to give the sauce a thick, velvety texture as well as further enhancing and elevating the flavors of the tomatoes.

When making the pasta, reserve about one cup of the pasta water. You may or may not need to use it when mixing the cooked pasta with the cherry tomato sauce. Note: I didn't need to use any.


Cherry tomatoes on the vine can be roasting in the oven while you are making the sauce. Save the drippings of the roasted tomatoes to drizzle over the pasta dish along with a bit more olive oil.


Ever since burrata became readily available in most grocery stores as well as at Trader Joe's, it has become one of my go-to pasta finishing dish ingredients. Topping the Cherry Tomato Sauce w/ Paccheri Pasta & Burrata with dollops of a homemade whole milk ricotta would be an another option, if for some reason I didn't have any burrata in the refrigerator.


Don't let the summer tomato season come to end before you make this incredibly flavorful, rustic yet elegant Cherry Tomato Sauce w/ Paccheri Pasta & Burrata! Invite some friends over and serve this pasta dish with a beautiful salad, some thickly sliced bread, a great wine, and a lovely dessert. I couldn't think of a more perfect summer meal or a better way to let your friends know how much they are loved.

Make an extra batch of the cherry tomato sauce and freeze it so you can enjoy it in the months ahead. 

Recipe
Cherry Tomato Sauce w/ Paccheri Pasta & Burrata
Serves 4-6 as a main dish, 6-8 as a side dish

Ingredients
Roasted Cherry Tomatoes
12 ounces (340g) cherry tomatoes on the vine
2 Tablespoons extra-virgin olive oil
Kosher salt and black pepper

Cherry Tomato Sauce w/ Paccheri Pasta & Burrata
3 Tablespoons extra-virgin olive oil
1 3/4 pounds (790g) cherry tomatoes, divided
5-6 cloves of garlic, thinly sliced
1 teaspoon granulated sugar
Small handful of fresh basil, julienned
Kosher salt and black pepper to taste
1 Tablespoon unsalted butter, room temperature

1 pound paccheri pasta (or pappardelle or a pasta of your choice)
8 ounces (227g) burrata cheese (preferably made up of two smaller versus one large ball)
Fresh basil and/or oregano, for finishing
Extra-virgin olive oil, for finishing

Directions
Roasted Cherry Tomatoes (make while the pasta is cooking)
1. Preheat oven to 400 degrees (F).
2. In a medium sized cast iron pan or using a medium sized sheet pan, toss the cherry tomatoes (keeping them on the vine) with the olive oil. Sprinkle generously with Kosher salt and pepper.
3. Bake for 18-22 minutes or until the skins of the tomatoes begin to blister.
4. Remove from oven. Set aside until ready to use. Reserve the olive oil and tomato drippings.

Cherry Tomato Sauce w/ Paccheri Pasta & Burrata
1. Remove six ounces (170g) of cherry tomatoes. Cut in half and set aside.
2. In a medium-large sized saucepan, heat the olive oil over low-medium heat. Add in the sliced garlic. Cook just until the garlic starts to become fragrant (about 2-3 minutes).
3. Add in the remaining 1 pound 6 ounces (620g) of the cherry tomatoes and a generous pinch of Kosher salt and some black pepper. Cook over medium heat, stirring frequently, until the tomatoes begin to loose some of their juices and more than half of them have burst (approximately 7-8 minutes).
4. Transfer the tomatoes to the bowl of a large food processor. Process until desired consistency: smooth or slightly chunky (I prefer it slightly chunky).
5. Return the cherry tomato puree back to the saucepan. Add in the reserved halved cherry tomatoes and the sugar. Cook over medium-low heat until the sauce reaches the desired consistency (somewhere between 4 and 6 minutes).
6. Remove from the heat and in the basil and butter. Stir until butter has melted. Keep the sauce warm while the pasta is cooking.
7. Cook the pasta according to package directions. Drain cooked pasta reserving about 1/2 cup of the pasta water.
8. Add the drained pasta to the sauce. Toss until the pasta is coated in the sauce. If necessary, add some of the reserved pasta water.
9. Transfer the mixture to a large platter. 
10. Top with chunks of burrata, some fresh herbs, and the roasted cherry tomatoes.
11. Drizzle the top of the platter with the oil/juices from the roasted tomatoes and some additional olive oil.
12. Serve immediately.

Notes: (1) The sauce can be made a day ahead and reheated just before using. (2) You also freeze this sauce for up to two months. 

Wednesday, August 18, 2021

Cocoa Krispie Peanut Butter Brownie Bars


 "All good things come to those who wait." As someone who skews a bit toward the 'life is short' impatient side of the pendulum, this old adage isn't always one I have completely embraced. However, when you finally have an incredibly fun and relaxing, weather perfect girl's weekend after almost two years due to the pandemic, well, then maybe, just maybe I can give some credence to the 'worth the wait' way of thinking. The time spent with friends was definitely a 'good thing', although, I wouldn't go so far as to say we should wait another two years before having another getaway! Running may have first brought us together, but running isn't what's keeping us together. Although we did make plans to run our own marathon relay in the spring! Spending a couple of days at the beautiful 'within walking distance of Lake Michigan' home of one of our friends, six of us gathered together for the first time in what felt like forever. From having cocktails on the rocks, to painting rocks, to skipping rocks, to watching the gorgeous sunset, we left with no shortage of memories and stories to tell. Everyone left feeling refreshed and reenergized as we rekindled our connections with one another. To say being able to spend time together felt good would be an understatement.


Just like I wouldn't want to wait too long for another girl's trip, I would suggest you not wait too, too long (or years even) before making these Cocoa Krispie Peanut Butter Brownie Bars. They are wicked, sinful, too good to be true, seriously scrumptious confections. But for those of you who decide to put this recipe on pause, then I give you permission to wait until cooler temperatures arrive as I think these bars would be the most perfect treat to serve at a fall or winter gathering. 

A few months back I came across a recipe for Chocolate and Peanut Butter Bars published by Taste of Home. Almost anything made with chocolate and peanut butter speaks my sweet tooth love language. It is one of my unwritten rules, but rarely do I make a found recipe 'as is'. Sometimes I make subtle changes to the recipe, while other times the changes are a bit more significant. Using Taste of Home recipe as an inspiration, these sweet, creamy, crunchy Cocoa Krispie Peanut Butter Brownie Bars exceeded my wildest expectations. They are a more decadent, dare I say better(?) version of the original recipe.


Instead of using only a boxed brownie mix for the bottom layer, I made an enhanced version of a boxed mix. Replacing water with milk as well as adding an additional egg yolk, Kosher salt, instant expresso, and vanilla yielded an even better brownie. Instead of using regular krispie rice cereal I used a cocoa krispie cereal to create an even richer, more chocolatey bar. In addition to swapping out semisweet chocolate chips with milk chocolate chips (although a combination of milk and semisweet would be good), the top of the bars were lightly sprinkled with some flaky sea salt. 


Because I used an 18 ounce brownie mix (see notes), I needed to make some adjustments to both the pan size and baking time. Instead of using a 9" x 12" (or 9" x 13") metal baking pan, I used a 7 1/2" x 12 1/2" inch pan. If you don't own this smaller, odd sized pan, I recommend you look for a brownie mix having a baking pan size option of 9" x 12" (or 9" x 13"). It's important that the bottom brownie layer be neither too thin nor too thick. Whatever you do, do not make these Cocoa Krispie Peanut Butter Brownie Bars in a 9" x 9" sized pan as your second and third layers will be much too thick. And you will also end up with less bars!

For the middle layer, chunky peanut butter is dolloped on top of and spread evenly over the warm baked brownie layer. Placing the brownies in the refrigerator for about 15 minutes to let the peanut butter layer set up a bit makes spreading the top layer much easier. Then once the cocoa krispie-peanut butter-chocolate layer is added, the brownies are chilled for at least 75-90 minutes before they are cut into bars.


If there was ever a brownie bar giving semi-homemade a good name, this would be the one. And. if by chance you are a big fan of chocolate and peanut butter, you will be over the moon over these slightly decadent, over the top scrumptious, deeply flavored Cocoa Krispie Peanut Butter Brownie Bars. So what are you waiting for?

Recipe
Cocoa Krispie Peanut Butter Brownie Bars
Makes 24 bars (1 1/2" x 2 1/2")

Ingredients
1 package premium brownie mix (at least 18 ounces) - See notes.
1 large egg
1 large egg yolk
1/4 cup whole milk
1/3 cup vegetable oil
1 teaspoon vanilla
1/4 teaspoon Kosher salt
1/2 teaspoon instant espresso or instant coffee

1 1/2 cups (400g) crunchy peanut butter

2 cups (344g) milk chocolate chips (or use half milk chocolate and half semisweet chocolate chips)
1 cup (278g) creamy peanut butter
3 cups (120g) cocoa krispie cereal

Flaky sea salt for finishing

Directions
Bottom Brownie Layer
1. Use the ingredients listed above, do not follow the package ingredient directions.
2. Preheat the oven to 350 degrees (F). Line a metal baking pan with parchment paper and set aside.
3. In a large bowl, whisk together the eggs, milk, oil, and vanilla until blended.
4. Add in the brownie mix, kosher salt, and instant espresso/coffee. Mix until blended but do not over mix
5. Pour the batter into the pan and smooth the top using an offset spatula.
6. Baking time for the 7 1/2" x 12 1/2" pan was 22-24 minutes. If using a brownie mix with a 9" x 12" baking pan option, follow the baking directions, but check for doneness earlier than the recommended baking time.
7. Remove the pan from the oven and let sit for a couple of minutes before adding the middle peanut butter layer.

Crunchy Peanut Butter Layer
1. Drop spoonfuls of chunky peanut butter evenly over the still warm brownie layer. Smooth using an offset spatula so you have an even layer of peanut butter.
2. Place in the refrigerator for about 15 minutes to let the peanut butter layer set up slightly.

Cocoa Krispie Peanut Butter Chocolate Layer
1. In the top of a double boiler, add in the peanut butter and chocolate chips. Over low-medium heat, stir until the chocolate has melted and the mixture is smooth.
2. Remove from the heat and stir in the cocoa krispie cereal.
3. Drop spoonfuls of the mixture over the peanut butter layer. Spread evenly using an offset spatula. Lightly sprinkle with some flaky sea salt.
4. Place the pan in the refrigerator and chill for 75-90 minutes before cutting into bars.
5. Serve the chilled bars immediately. If not inhaling immediately, keep the bars covered in the refrigerator.

Notes: (1) I used the Ghiradelli Double Chocolate Brownie Mix (18 ounce). The directions on the box did not give a 9" x 12" (or 9" x 13") baking pan option so I adjusted the pan size. Had I used a larger pan, the bottom brownie layer would have been much too thin. There are brownie mixes out there giving a 9" x 12" (or 9" x 13") baking pan option. I recommend you use one of them if you don't have a smaller sized pan. (2) A 16 ounce jar of crunchy peanut butter will yield the 1 1/2 cups needed for the middle peanut butter layer.


Lake Michigan at Long Beach, Indiana (August 2021)


Friday, August 13, 2021

Frozen Irish Coffee


Remind me not to complain about coldmaggedon or snowmaggedon when winter returns. Simply say the word 'heatmaggedon' to put an immediate stop any of my whining. Just the mere mention of that word should be enough to remind me what the insanely hot and humid days of August felt like and how dripping wet I was while trying to get my half-marathon training runs in this summer. The next best thing to resurrecting the backyard kiddie pool this summer (complete with a floating chaise lounge) has been the discovery of this luscious Frozen Irish Coffee. Between the two of them, I now have relief from hot days and hot nights covered. 

You might be wondering if a Frozen Irish Coffee is as good as or maybe even better than a hot Irish Coffee. The best answer would be you must have both of them in your life. You might also be wondering if this blender cocktail made with ice cream is worth all the calories. The answer is unequivocally and emphatically yes! 

Ice cream based cocktails became all the rage in the 70s an 80s. If you believe bartending lores and legends, then you are likely to believe the first Frozen Irish Coffee was created by Jim Monaghan, Sr., owner of multiple French Quarter bars in New Orleans sometime in the 80s. At some point at the turn of the century, there was a shift from creamy boozy cocktails to a return to the classic cocktails and the arrival of 'lighter' beverages. However, there was one exception. It seems the life of the Frozen Irish Coffee originating in the Big Easy doesn't seem to be ending any time soon.


Typically Irish Coffee is served in a footed Irish Coffee glass, but this one is best served in the more impressive old-fashioned or martini glass. 


It goes without saying, Irish Coffee should be made with an Irish whiskey. I used Jameson but there are plenty of Irish whiskey options available. In addition to Irish whiskey, the cocktail is made with a chilled rich coffee, a good quality vanilla ice cream, a coffee liqueur (like Kahlua or Bailey's Irish Cream), and ice cubes. 

After whirling all of the ingredients together in a blender, pour the mixture into a cocktail glass containing either one or two large ice cubes. The larger the ice cube, the likely they are to melt and dilute this luscious cocktail.  Serve the Frozen Irish Coffee with or without a dusting of cocoa or espresso powder. The recipe below makes two generous servings. 


While I could easily drink this Frozen Irish Coffee year round, it is really best enjoyed during the warm, hot weather months. It is the perfect, most refreshing finish to a meal or as a post cocktail party beverage. 

Recipe
Frozen Irish Coffee
Makes 2 cocktails

Ingredients
2 ounces Irish whiskey
2 ounces coffee liqueur (e.g., Kahlua or Bailey's Irish Cream)
1/2 cup good quality vanilla ice cream, just slightly softened
4 ounces dark roast chilled coffee
2 cups ice cubes
Cocoa or espresso powder for finishing

Directions
1. Put all of the ingredients in a blender.
2. Process until the mixture has a texture similar to a thin milkshake.
3. Add a large ice cube or several ice cubes to an old-fashioned glass. Pour in the Frozen Irish Cream. Lightly dust with cocoa powder.
4. Instead of an old-fashioned glass use a martini or footed Irish coffee glass).

Notes: (1) Recipe inspired by the Frozen Irish Coffee recipe shared in the June/July 2021 issue of Garden and Gun. (2) For optimal flavor, I highly recommend using a dark rather than a medium roast coffee. (3) To make the large cocktail sized ice cubes, I used a silicone mold like this one.